


12
Setting up
4.3.2
Creating a Configuration
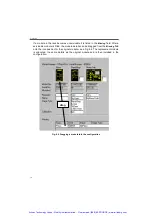
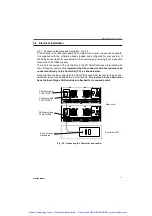
MG17_Config
displays a row of icons corresponding to the modules in the rack. Below
each icon, are the fields where configuration data is entered and viewed. When an icon
is selected (clicked), the green
STATUS
light flashes on the associated module in the rack.
To create a configuration proceed as follows:
1) Ensure the power to the rack is on.
2) Run
MG17_Config
which can be found in the folder
Start/Programs/MellesGriot/
Melhost/Config
, or access the program via the
Start/Modular Electronics Host
menu.
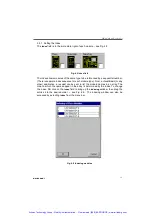
Note.
Item (3) applies only to NanoStep modules in multi-rack systems.
3) Respond to the dialog box requesting the location of the NanoStep. The serial
number of the rack is labelled on the rear panel (to identify the module, click on its
icon and the STATUS light on the front panel of the actual module illuminates).
4) LH Click-and drag the icons among the slots to put them in the same order as the
modules in the actual rack (this allows for easy identification of each module).
5) LH click in the
Required
field and select ‘YES’ for each module that is required.
6) LH click in the
Name
field and enter a unique name for each module (including the
axis it controls if applicable). Later, this name is used as a ‘handle’ to operate the
axis in high-level applications (e.g., LabVIEW or Visual Basic).
Note
. Items (7) and (8) apply only to NanoStep modules.
7) LH click in the
Stage Type
field and enter the type of stage being used. It is
important to specify the correct stage type, otherwise the stage will move through
the wrong distance or at the wrong velocity.
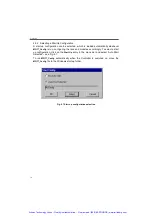
8) LH click in the
Calibration
field and select which Calibration file (if any) to apply to
the axis – see Handbook HA0085 NanoStep Control Module for more details.
9) If multiple racks are being configured, select the next rack using the
Racks (Serial Number)
buttons. Repeat steps (4) to (8) for each rack.
10) From the
Configuration
menu (top left-hand corner of screen), save the
configuration using a meaningful name. This name may be used in the
initialization part of a program. Note that a single configuration covers all racks.
Note.
• The
Allocated
field indicates whether the module is currently allocated to an application.
Modules cannot be allocated to more than one application at a time. However, a new
configuration that specifies the module can be created, irrespective of whether the module is
currently allocated or not.
• Similarly to dragging an icon horizontally within a rack to correspond to the actual position
of the module, a NanoStep icon can also be moved from one rack to another by dragging it
onto the ‘Serial Number’ button for the relevent rack.
• The ordering of the module icons into slots and racks is optional. Its purpose is to make the
icons easier to identify against the real modules and racks.
Artisan Technology Group - Quality Instrumentation ... Guaranteed | (888) 88-SOURCE | www.artisantg.com


