


Hardware Preparation and Installation
MVME8100 / MVME8110 Installation and Use (6806800P25J
)
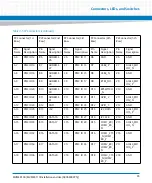
50
5. Align the mating connectors properly and apply minimal pressure to the PMC/XMC
until it is seated to the board.
6. Insert the two front PMC/XMC mounting screws through the mounting holes on
the bottom side of the board, and then install the top side screws. Tighten the
screws.
Note: Rugged PMC/XMC modules installed on an ENP4 MVME8100 have more than
four mounting screws.
7. Install the board into the appropriate card slot. Make sure that the board is well
seated into the backplane connectors. Do not damage or bend connector pins.
Содержание MVME8100
Страница 1: ...MVME8100 MVME8110 Installation and Use P N 6806800P25J August 2015 ...
Страница 8: ...MVME8100 MVME8110 Installation and Use 6806800P25J 8 List of Tables ...
Страница 10: ...MVME8100 MVME8110 Installation and Use 6806800P25J 10 List of Figures ...
Страница 26: ...MVME8100 MVME8110 Installation and Use 6806800P25J Sicherheitshinweise 26 ...
Страница 58: ...Hardware Preparation and Installation MVME8100 MVME8110 Installation and Use 6806800P25J 58 ...
Страница 84: ...Connectors LEDs and Switches MVME8100 MVME8110 Installation and Use 6806800P25J 84 ...
Страница 108: ...Functional Description MVME8100 MVME8110 Installation and Use 6806800P25J 108 ...
Страница 122: ...Related Documentation MVME8100 MVME8110 Installation and Use 6806800P25J 122 ...
Страница 123: ......


