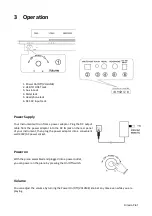
Artesia F-61 Скачать руководство пользователя страница 9

Artesia F-61 


3  Operation 


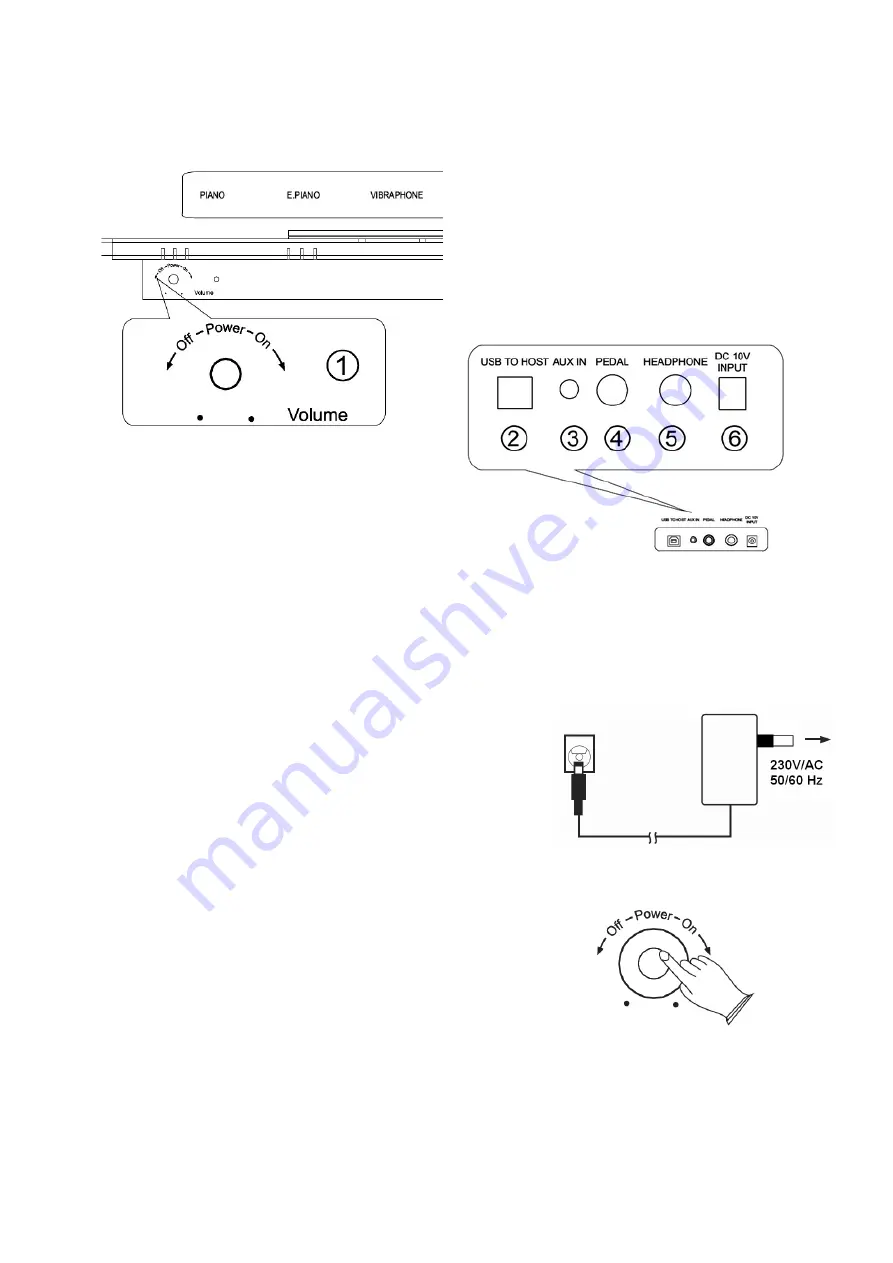
1. Power On/Off (VOLUME) 
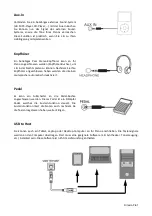
2. USB TO HOST Jack 
3. Aux In Jack 
4. Pedal Jack 
5. Headphone Jack 
6. DC 10V Input Jack 


Power Supply 

 
Your instrument will run from a power adaptor. Plug the DC output 
cable from the power adaptor into the DC IN jack on the rear panel 
of your instrument, then plug the power adaptor into a convenient 
wall 230V/AC power socket. 


Power on 

 
With the piano assembled and plugged into a power outlet,  
you can power on the piano by pressing the On/Off switch. 


Volume 

 
You can adjust the volume by turning the Power On/Off (VOLUME) knob at any time even while you are 
playing. 
 

Содержание F-61

Страница 1: ...Artesia F 61 00046687 00046688 00046689 Version 11 2016 F 61 Digitalpiano Bedienungsanleitung User manual Mode d emploi...

Страница 2: ...rs Anschl sse Bevor Sie das Instrument mit anderen Ger ten verbinden schalten Sie bitte alle Ger te zuerst aus Das bewahrt die Ger te vor Sch den und hilft Fehlfunktionen zu vermeiden Umgebung Setzen...

Страница 3: ...il betrieben Stecken Sie das Kabel von dem Netzteil in den Stromanschluss des Instrumentes und anschlie end in eine bliche Steckdose An Aus Schalter Nachdem Sie Ihr Piano aufgebaut und angeschlossen h...

Страница 4: ...nnen Nachdem Sie Ihre Kopfh rer angeschlossen haben werden die internen Lautsprecher automatisch deaktiviert Pedal Es kann ein Fu schalter an die Pedal Buchse angeschlossen werden Dieses Pedal ist ein...

Страница 5: ...elangen Halten Sie die ersten 3 Tasten gedr ckt und mit der 6ten bis 20ten Taste k nnen Sie einen Song siehe unten ausw hlen Um die Betriebsart Demo Song zu verlassen dr cken Sie die ersten drei Taste...

Страница 6: ...ngswinkel gro 2x C Befestigungswinkel klein 4x E Schraube M4 25 4x F Schraube M6 20 4x Einzelteile der Bank A Verbindungsbolzen 8x B Einsetzmutter 8x C Plastikkappe 8x Montage Beginnen Sie mit dem Auf...

Страница 7: ...g des Unterbaus F hren sie je zwei Einsetzmuttern B in die vor gesehenen Bohrungen der beiden Seitenteile F hren Sie 4 Verbindungsbolzen A in die Bohrungen der Querstrebe ein F hren Sie Querstrebe und...

Страница 8: ...Only use attachments accessories specified by the manufacturer Use only with the cart stand tripod bracket or table specified by the manufacturer or sold with the device When a cart is used use cauti...

Страница 9: ...output cable from the power adaptor into the DC IN jack on the rear panel of your instrument then plug the power adaptor into a convenient wall 230V AC power socket Power on With the piano assembled...

Страница 10: ...ack for private practice or late night playing The internal speaker system is automatically shut off when a pair of headphones is plugged into the headphone jack Pedal A foot switch can be plugged int...

Страница 11: ...ng mode The demo song will start to play Press first three keys and one of 6th to 20th keys to select the desired song To leave demo song mode hold the first 3 keys simultaneously and then press the l...

Страница 12: ...small 4x E Screws M4 25 4x F Screws M6 20 4x Bench parts A Locking nut 8x B Kernel screw 8x C Caps 16x Piano Assembly Attaching the stand Begin assembling the piano by attaching the brackets to the c...

Страница 13: ...esponding holes in the bottom of the piano with the holes in the brackets on the leg Make sure that the piano and legs are facing the same way Tighten F bolts into each hole until the piano sits flush...

Страница 14: ...s Avant de brancher l instrument d autres appareils veuillez teindre tous les appareils Cela prot ge les appareils d ventuels dommages et aide viter des dysfonctionnements Environnement N exposez pas...

Страница 15: ...loc d alimentation Branchez le c ble du bloc d alimentation dans la prise de courant de l instrument et en m me temps dans une prise de courant usuelle Interrupteur on off volume Apr s voir mont et br...

Страница 16: ...de pouvoir par exemple jouer en soir e ou la nuit Une fois votre casque branch les haut parleurs internes seront automatiquement d sactiv s P dale Vous pouvez brancher une p dale la prise pr vue cet...

Страница 17: ...rez la chanson d mo En maintenant les trois premi res touches enfonc es et en appuyant une touche entre la 6 me et la 20 me vous pourrez choisir une chanson voir ci dessous Pour arr ter la chanson d m...

Страница 18: ...12 18x B querre de montage 2x C querre de montage 4x E Vis M4 25 4x F Vis M6x20 4x Articles de la banquette A Boulon de connexion 8x B crou C Calotte 8x Montage du support Commencez par le montage de...

Страница 19: ...ano num rique est stable Montage de la banquette Implantez maintenant les boulons B aux perc es pr vues des deux pi ces lat rales Inaugurez les 4 chevilles A aux perc es de la traverse Fusionnez la ba...

Страница 20: ...cklich oder durch schl ssiges Handeln rechtlich zu binden Diese Bedienungsanleitung ist urheberrechtlich gesch tzt Jede Vervielf ltigung bzw jeder Nachdruck auch auszugsweise und jede Wiedergabe der A...

Отзывы: