


INSTALLATION
&
USER
MANUAL
ENERGY EFFICIENT WOODSTOVE
| ASSOS & ASSOS OVEN
9 |
Page
7.
I
GNITING THE STOVE
7.1.
Traditional method of igniting
Every time you ignite the stove, it initially needs a large amount of air. If the stove is cold, leave the door slightly open or secure the handle on
the first latch, in order for air to circulate around it for the first minutes of ignition. Also you must fully open the primary and secondary
combustion air supplies.
To form an adequate layer of ash at the base of the woodstove, use 1-2 kg of dry kindling the first time you ignite it. If it is possible, constantly
maintain a layer of ash with thickness of 2-3 cm at the base of the combustion chamber for added insulation.
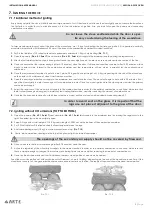
1.
Put 2-4 fuel tablets or 7-10 rolled up sheets of newspaper underneath 1-2 kg of dry kindling. (
Pic. 7.1.1
)
2.
Open the primary (
Pic. 6.2.1, Point 7
) and aircurtain (
Pic. 6.2.1, Point 6
) air supply in the maximum level by pulling the regulators out.
3.
After the fuel tablets/rolled up sheets have ignited, leave the door slightly open, in order to ensure an adequate convection of the flue.
4.
Once you ensure the flue is warm enough (after 5-10 minutes), close the door. If all required conditions are met, after 15-20 minutes a thick
layer of cinder will be formed in the combustion chamber and the temperature will rise, which is essential for the continuation of
combustion.
5.
Once the requirement described in point 4 is met, place 2-3 logs with overall weight of 1.5-3kg, depending on the size of the woodstove,
on the cinder, with a distance of about 1cm from one another.
6.
Open the primary combustion air supply to the maximum level and close the door. The wood will begin to burn within 2-3 minutes. If not,
open the door slightly in order for enough air for combustion to enter. Once the wood ignites close the door again and also the primary
combustion air supply.
7.
Adjust the regulator of the air curtain air supply to the desired position in order for the optimal combustion to continue. Make sure that
there is always enough air (oxygen) to maintain clear, lasting flames when, and after, reducing the amount of combustion air.
8.
Once the fire has been reduced to a thick layer of embers, a new portion of wood can be added by repeating steps 5-7.
7.2.
Igniting without CO emissions (TOP TO BOTTOM)
1.
Open the primary (
Pic. 6.2.1, Point 7
) and aircurtain (
Pic. 6.2.1, Point 6
) air supply in the maximum level by moving the regulators to the
right. If needed, leave the door slightly open.
2.
Place 2-3 logs with a total weight of 1.5-3 kg and a length of 30-35 cm on the bottom of the combustion chamber.
3.
Put 2-3 fuel tablets or 5-8 rolled up sheets of newspaper between the logs.
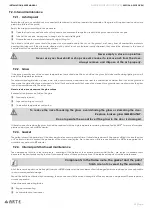
4.
Add some kindling wood (1-2 kg) in a criss-cross pattern on top. (
Pic. 7.1.2
)
5.
Finally, place a medium-sized log on the top of the pile and light the tablets/newspaper.
6.
Once you ensure the flue is warm enough (after 5-10 minutes), close the door.
7.
Adjust the regulator of the aircurtain air supply to the desired position in order for the optimal combustion to continue. Make sure that
there is always enough air (oxygen) to maintain clear, lasting flames when, and after, reducing the amount of combustion air.
8.
Once the fire has been reduced to a thick layer of embers, a new portion of wood can be added.
Feed the woodstove often but with small amounts of firewood, at most 1.5-4.8kg, depending on the size of the woodstove, each time. If the
woodstove is overly full, t he generated heat may cause excessive strain on the flue. The supply of firewood should be done in moderation.
Pic. 7.1.1
Pic. 7.1.2
The openings of the secondary air supply should not be covered by firewood.
In order to avoid soot on the glass, it is important that the
logs are not placed adjacent to the glass of the door
.
Do not leave the stove unattended
while the door is open.
Be very careful during the fueling of the woodstove.
Содержание ASSOS
Страница 1: ......
Страница 19: ...INSTALLATION USER MANUAL ENERGY EFFICIENT WOODSTOVE ASSOS ASSOS OVEN 18 Page NOTES S N...
Страница 20: ......