3. After bootup, the AP starts to broadcast a "Configure.Me"
SSID.
4. Connect to the "Configure.Me" SSID and point a web
browser to the AP's default IP address (default:
192.168.0.1).
NOTE: If LTE service does not come up, you may need
to check with the LTE service provider and enter the
APN settings in the AP configuration.
5. Log into the AP using the default login credentials (default:
super/sp-admin) to configure a new username and
password, WLAN settings, and any other settings as
needed.
Initial Setup - Manual Controller Discovery
The M510 can be configured for manual controller discovery
using the following procedure:
1. Perform the LTE and power connection tasks as in the
standalone AP initial setup procedure.
2. The LTE module connects to cellular network, and the AP
starts to broadcast a "Configure.Me" SSID.
3. Connect to the "Configure.Me" SSID and point a web
browser to the AP's default IP address.
4. Log into the AP using the default login credentials to
configure controller discovery settings.
5. Enter the public IP address of the controller.
6. The AP discovers the controller, downloads controller-
compatible firmware to the AP, and then the AP reboots
as a controller-managed AP.
Initial Setup - Cloud Managed AP
Before deployment, the admin creates an entry in the AP
registrar for a specific M510 unit and controller.
NOTE: The AP registrar does not apply only to Ruckus
Cloud-managed APs. SmartZone discovery can also be
achieved with AP registrar.
1. Perform the LTE and power connection tasks as in the
standalone AP initial setup procedure.
2. Connect to the "Configure.Me" SSID and point a web
browser to the AP's default IP address.
3. Log into the AP using the default login credentials to
enable cloud controller discovery.
4. The AP contacts the AP registrar and retrieves the IP
address of the controller.
5. The AP discovers the controller, the controller pushes new
firmware to the AP, and the AP reboots as a controller-
managed AP.
Mounting Instructions
Mounting on a Flat Surface
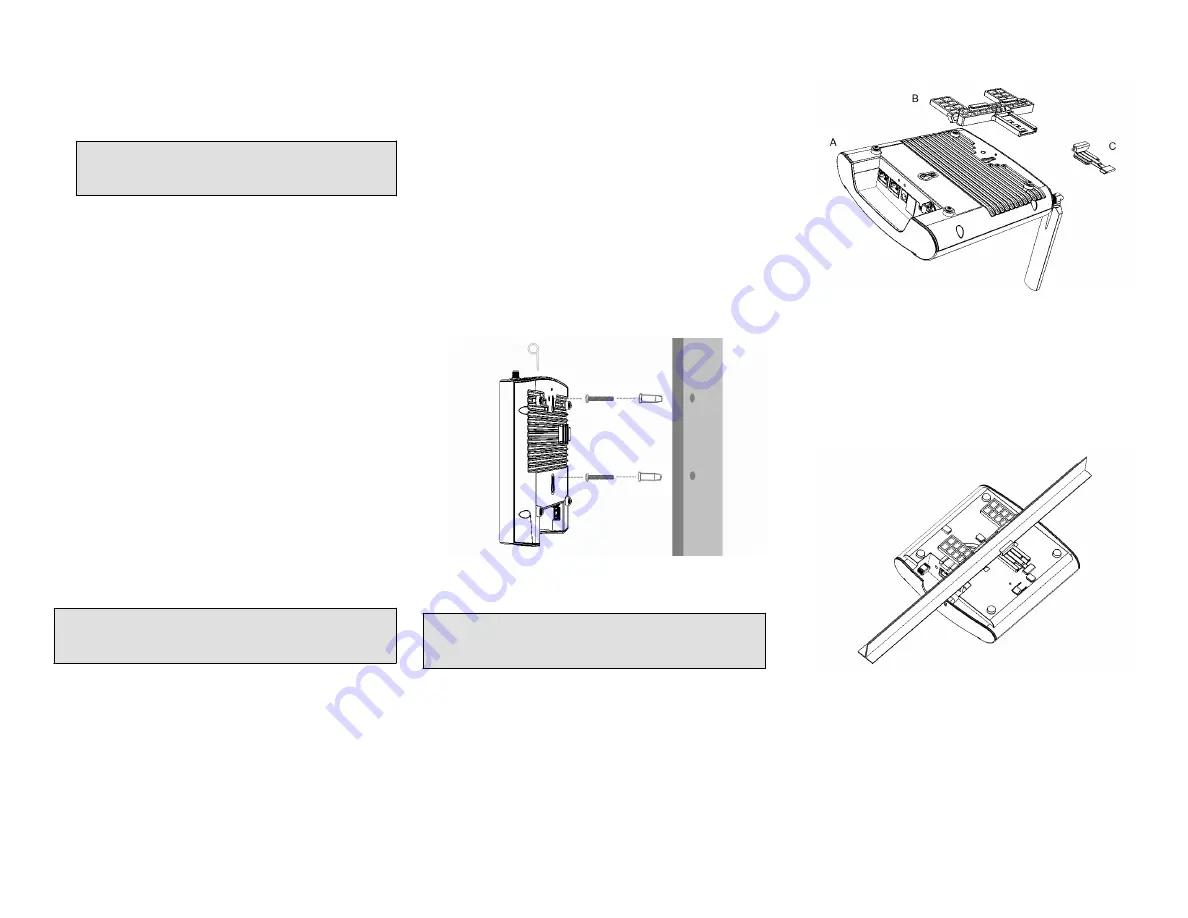
1. Use the Mounting Template on the last page of this Quick
Setup Guide as a template to mark the locations for drill
holes on the mounting surface.
2. Use a 5mm drill bit to drill holes approximately 25mm into
the mounting surface.
3. Insert the anchors and mounting screws into the
mounting surface, leaving approximately 1/4” (6 mm) of
the screw heads protruding for the AP enclosure.
4. To remove the AP, insert the unit removal pin into the hole
on the top of the AP to unlock, then push the AP up to
release the AP enclosure from the mounting screws.
FIGURE 3 Flat surface mounting
Mounting on a Recessed Drop-Ceiling T-Bar
NOTE: This mounting bracket can also be used on a flush
drop-ceiling T-bar, so the four rubber feet on the bottom of
the AP minimize ceiling tile displacement.
The enclosed T-bar bracket supports mounting to recessed
drop ceiling T-bars.
To mount the AP using the external T-bar bracket:
1. Position the studs on the bottom of the T-bar bracket (B)
in the mounting holes on the AP enclosure (A), and then
slide the T-bar bracket until the studs are in the narrow
parts of the AP mounting keyholes. The mounting bracket
locks in place on the AP enclosure.
FIGURE 4 Attaching the external bracket to the AP
2. Attach the locking tab (C) to one side of the T-bar and the
bracket (B) to the other side of the T-bar.
3. Slide the locking tab (C) into the bracket (B) so that it
locks in place around the T-bar. Make sure that both
clasps are gripping the T-bar.
FIGURE 5 Attaching the external bracket to the T-bar
Removing an External Bracket from a T-Bar
1. Move the ceiling tiles out of the way.
2. Slide the locking tab away from the T-bar to release the
AP-bracket assembly from the T-bar.
3. The AP bracket assembly comes away from the T-bar.
Copyright
®
2018 Ruckus Wireless, Inc.
Page 2 of 4
Published January 2018, Part Number 800-71642-001 Rev A


