background image

•  Press “ON”. The safe will beep twice and the light will turn 

green.

•  Enter the master code (123456 by default) or the 6-to-8-

digit user code (this is not configured by default; to do so, 

see “Programming the User Code).

•  Press  “ENTER”.  Once  the  light  turns  green  you  have 

approximately 5 seconds to turn the handle clockwise and 

open the safe.

To close the safe, simply close the door and turn the handle 

anticlockwise.
If you enter an incorrect code 3 times in a row, the safe will be 

blocked for 5 minutes. When this occurs, the light flashes red.

•  Press «ON».
•  Press «ENTER».
•  Pulse «1».
•  Press «ENTER».
•  Enter  the  current  master  code  and  press  “ENTER”  (when 

programming for the first time, the default master code is 

123456).

•  Enter the new master code (minimum of 6 and maximum of 

8 digits) and press “ENTER”.

•  Enter the new master code again and press “ENTER”.
•  To check the new master code, press: “ON” > New master 

code > “ENTER”.

If the process has been completed successfully, the safe will 

beep twice and the light will turn green.
If the process has not been completed successfully, the safe 

will beep twice and the light will turn red. In this case, wait 10 

seconds and then start the process again from the beginning.

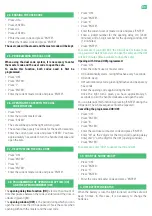
•  Press «ON».
•  Press «ENTER».
•  Press «3».
•  Press «ENTER».
•  Enter the current user code and press “ENTER”.
•  Enter the new user code (minimum of 6 and maximum of 8 

digits) and press “ENTER”.

•  Enter the new user code again and press “ENTER”.
To check the new user code, press: “ON” > New user code > 

“ENTER”.

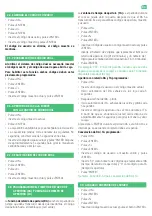
•  Press «ON».
•  Press «ENTER».
•  Press «2».
•  Press «ENTER».
•  Enter  the  current  user  code  >  “ENTER”  >  master  code  > 

“ENTER”.

•  Enter the new user code > “ENTER”.
•  Enter the new user code again > “ENTER”.
To check the new user code, press: “ON” > New user code > 

“ENTER” and the safe should open.

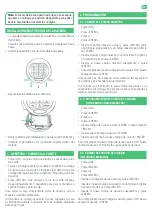
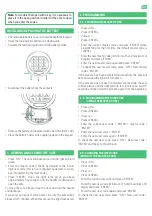
•  The removable battery case is located beneath the keypad.
•  Press the tabs inwards and move it downwards.
•  Squeeze the latch and pull down on the battery holder..

•  Disconnect the battery from the contacts.

•  Remove the battery and replace it with a new one (6LF22 9V).
•  Place the battery holder in its original position in the keypad.

INSTALLING/REPLACING THE BATTERY

1. OPENING AND CLOSING THE SAFE

2. PROGRAMMING

2.1. CHANGING THE MASTER CODE

2.3. CHANGING THE USER CODE  

(WITHOUT THE MASTER CODE)

2.2. PROGRAMMING THE USER CODE  

(USING THE MASTER CODE)

Note: For models that open with a key, it is necessary to 

place it in the open position in order for the safe to open 

when you enter the codes.

En

Содержание PERFECT 44240

Страница 1: ...STICK THE SERIAL NO PERFECT Caja fuerte electrónica Electronic Safe ES EN ...

Страница 2: ...y repita el proceso desde el principio Pulse ON Pulse ENTER Pulse 3 Pulse ENTER Inserte el código de usuario actual y pulse ENTER Inserte el nuevo código de usuario con un mínimo 6 dígitos y un máximo de 8 y pulse ENTER Inserte el nuevo código de usuario nuevamente y pulse ENTER Para comprobar el nuevo código de usuario pulse ON Nuevo código de usuario ENTER Pulse ON Pulse ENTER Pulse 2 Pulse ENTE...

Страница 3: ...NTER Inserte el número de 2 dígitos que represente el tiempo de retardo de apertura RA 01 99 minutos y un número de 1 dígitoparalaventanadetiempodeapertura TA 1 9minutos Pulse ENTER Por ejemplo 092 9 minutos para RA minutos que se debe esperar para poder abrir la caja y 2 minutos para TA tiempo disponible para abrir la caja Apertura con retardo RA y TA programados Pulse ON Inserte un código de usu...

Страница 4: ...nclaje en mm Longitud del anclaje L Diámetro de la broca D Profundidad mínima de la perforación M Profundidad mínima de la instalación H 80 120 120 8 90 50 10 150 150 10 120 60 10 200 200 10 170 60 12 140 140 12 110 80 12 180 180 12 150 80 16 180 180 16 150 100 Solo en caso de caja con llave ante una pérdida puede solicitar copia indicando el nº de serie de la caja que está situada en la parte inf...

Страница 5: ...orizadas causas catastróficas golpes y caídas La reparación o sustitución por avería de cualquier pieza implica una prórroga de 6 meses de la garantía de la pieza reparada o sustituida ABSS responderá de las faltas de conformidad que motivaron dicha reparación cuando en la caja fuerte se reproduzcan los mismos defectos de origen que ocasionaron la primera reparación IMPORTANTE Estos datos deben se...

Страница 6: ...l turn red In this case wait 10 seconds and then start the process again from the beginning Press ON Press ENTER Press 3 Press ENTER Enter the current user code and press ENTER Enter the new user code minimum of 6 and maximum of 8 digits and press ENTER Enter the new user code again and press ENTER To check the new user code press ON New user code ENTER Press ON Press ENTER Press 2 Press ENTER Ent...

Страница 7: ... a 1 digit number for the opening window OW 1 9 minutes Press ENTER For example if you enter 092 the OD will be 9 minutes how long you must wait before you can open the safe and the OW will be 2 minutes time available to open the safe Opening with OD and OW programmed Press ON Enter the current user or master code OD automatically starts red light flashes every 5 seconds OD ends beep OW automatica...

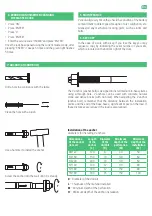
Страница 8: ...tion V ANCHOR ANCHOR BOLT T T Dimensions of the anchor in mm Length of the anchor L Diameter of the drill bit D Minimum depth of the perforation M Minimum depth of the installation M 80 120 120 8 90 50 10 150 150 10 120 60 10 200 200 10 170 60 12 140 140 12 110 80 12 180 180 12 150 80 16 180 180 16 150 100 In the case of a safe with a key if you lose the key you may request a copy by indicating th...

Страница 9: ...disasters impacts and falls are excluded from the guarantee The repair or substitution of any part due to a fault implies a 6 month extension to the guarantee of the part repaired or substituted ABSS will accept the responsibility for the non conformities that caused this repair when the same factory faults that caused the first repair are repeated IMPORTANT These details must be completed as clea...

Страница 10: ...arregui es I arregui it I arregui biz Arregui Pol Industrial Ubegun 3B 20809 Aia Orio Gipuzkoa SPAIN arregui arregui es www arregui es ...

Отзывы: