background image

7 (10)

Installation/Installation

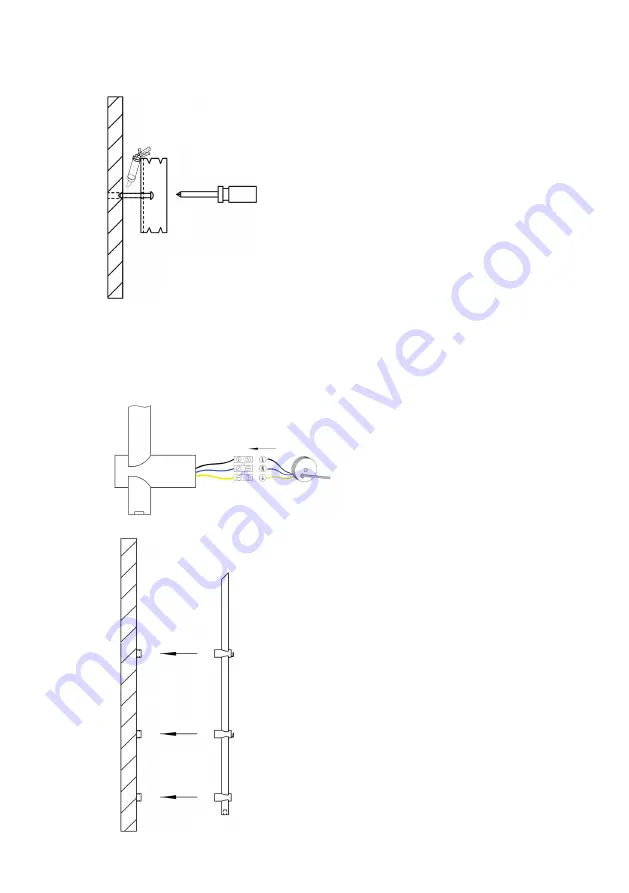
Use the screwdriver to tighten 
the back plate (E) with screw 
(A) and optional plug (B) for the 
upper hook.

After you have installed all the 
back plates (E) and connected the 
power cable, put the towel warmer 
on to the back plates (E).

5

Skruva även fast väggfästplattan 
(E) med skruv (A) och eventuellt 
plugg (B) i krokväggfästet.

6

Efter att installationen av plattorna 
(E) är gjord och strömsladden är 
kopplad, fäst då handdukstorken 
på väggfästplattorna (E).

Koppla strömkabeln till 
kopplingsplinten.

Connect the power ca-
ble to the terminal.

OBS! Se sida 4 för skruvin-
fästningar i våtzon.

Attention! View page 4 for 

fixing screws in wet zones.

silicone

Содержание Illusion 1000

Страница 1: ...visning Handdukstork Instruction manual Towel warmer Artikelnummer Article number Produktnamn Product name 8754189 8754190 Rsknummer Rsk number Version 2017 08 31 581000 51420 581600 51420 Illusion 10...

Страница 2: ...ering r ej till ten Handdukstorken r avsedd f r normalt hush llsbruk inomhus Felaktig anv nd ning kan f rorsaka en elektrisk chock Produkten skall endast installeras anv ndas som beskrivs i den h r mo...

Страница 3: ...The towel warmer is intended for normal household use indoors Improper use may cause an electric shock This product shall only be installed and used as described in this manual All other usage or ins...

Страница 4: ...regel eller godk nd skivkonstruktion Skiss A 1 Borra 2 T ta och 3 Skruva R tt metod f r borrning och skruvning f r massiv konstruktion Skiss B 1 Borra 2 T ta 3 Plugga 4 T ta och 5 Skruva EN Fixing scr...

Страница 5: ...n 1600 x2 Illusion 1000 x2 Illusion 1600 x3 Illusion 1000 x2 Illusion 1600 x3 Illusion 1000 x1 Illusion 1600 x1 Insert the two upper hooks on to the towel rail Illusion 1000 has only one hook 1 2 F r...

Страница 6: ...le through another hole and connect to the towel rail back plates E 3 Anv nd en markeringspenna f r att markera var p v ggen du skall borra h let f r v gg f stplattorna E Anv nd en stj rnskruvmejsel f...

Страница 7: ...r on to the back plates E 5 Skruva ven fast v ggf stplattan E med skruv A och eventuellt plugg B i krokv ggf stet 6 Efter att installationen av plattorna E r gjord och str msladden r kopplad f st d ha...

Страница 8: ...plate E with the towel warmer Finished Use a soft cloth to clean the towel warmer and the wall Anv nd insexnyckel F och insexskruv D f r att skruva t krokv ggsf stet p v gg f stplattorna E 7 8 Install...

Страница 9: ...reng ras med reng ringsmedel och en mjuk trasa Anv nd ej sura eller korniga l sningsmedel str va reng ringssvampar eller st lull Reng ring Cleaning To preserve the surface finish of the towel warmer i...

Страница 10: ...del av installationen eller har fr gor s kontakta ditt ink psst lle eller en auktoriserad el installat r If you are unsure of any part of the installation or if you got further questions Please conta...

Отзывы: