4
•
Always turn off and unplug the dehumidifier before cleaning, emptying the water tank, changing the filter and if it
is not in use.
•
Do not use the dehumidifier if it has been dropped, damaged, le� outside, dropped in water or not working
properly.
•
If the dehumidifier falls over with a full water tank, immediately unplug the power cord. Ensure the unit is dried
thoroughly before resuming opera�on.
•
Do not move the dehumidifier when the water tank is full to prevent water spillage.
•
Water collected in the water bucket should not be used for drinking, serving animals and plants watering. Use a
drainage to empty the water.
•
Do not turn on the dehumidifier when the water tank is removed from the unit.
•
Do not remove the water tank when the dehumidifier is turned on.
•
Do not use the dehumidifier when the cord looks damaged.
•
Do not use the dehumidifier near gas appliances, fire places, stoves, candles, or hea�ng devices.
•
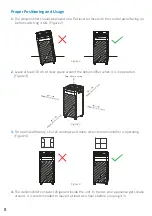
Posi�on the appliance at a minimum distance of 30 cm away from walls, curtains and other heat or steam
sensitve materials and provide adequate space above and on all sides for air circula�on.
•
Do not use the dehumidifier in an area with insect repellents, burning incense, toxic fumes, flammable dust or
oxygen tanks. Always leave at least 1.5 m of clear space from any oxygen being administered.
•
Do not run the power cord under furniture, other appliances, carpet, or cover with rugs, runners or floor
covering.
•
Always tuck away the power cord to prevent tripping accidents.
•
Do not put the dehumidifier on an unstable surface e.g. bed or couch.
•
Do not touch any part of the dehumidifier with the wet hands.
•
Do not immerse the dehumidifier in water or liquids to avoid electrical hazards and possible damages.
•
Do not use the dehumidifier in the immediate surroundings of a bath, shower, or swimming pool.
•
Do not use for commercial or/and outdoor purposes. This appliance is for household only.
•
Do not a�empt to repair or adjust any electrical or mechanical func�ons of the dehumidifier, as this may cause
danger and void the warranty.
•
Do not let children or people with reduced physical or mental capabili�es to use or clean the dehumidifier.
•
Do not let children play with this appliance or packaging including plas�c bag. Children must
be supervised around the dehumidifier to help keep them safe.
•
Do not sit on the dehumidifier or put any object on the top of the unit.
•
Do not block the air inlet/outlet of the dehumidifier. Keep free of anything that cause airflow reduc�on.
•
Do not insert fingers or any object into the air inlet/outlet, par�cularly when the device is plugged in power
source.
•
Do not pull the cord to unplug the dehumidifier.
•
Do not use an external �mer or control device to switch on the dehumidifier automa�cally since a fire risk may
occur if the dehumidifier is covered or posi�oned incorrectly.
•
Do not spray air fresheners, perfumes, or oils on or near the dehumidifier.
•
Do not fit the dehumidifier with a different power supply rather than 220-240 V power outlet.
•
During electrical storms, the appliance should be disconnected from the power source at the wall socket to
prevent any electrical surges which may cause damage to the unit’s electronic componentry.
•
Keep the dehumidifier and dust filters clean. Do not clean the device while it is plugged in and follow the cleaning
instruc�ons provided in this user manual.
•
It is recommended to not use the appliance with a nonstandard extension cord to avoid electrical shock or spark.
Please read all safety instruc�ons before use to prevent the risk of injury, fire, electric shock or damage. Use your
dehumidifier safely by following the instruc�ons in this user manual.
Cau�on!
Please keep these safety instruc�ons in a safe place and always follow the
recommended instruc�ons in this user manual for any hazard preven�on to you and your device.
IMPORTANT SAFETY INSTRUCTIONS
Содержание AroDry-P10
Страница 2: ...Copyright 2019 2021 Arovec Australia All Rights Reserved...
Страница 19: ......
Страница 20: ...Ques ons or Concerns support arovec com au V1 0121...


