7
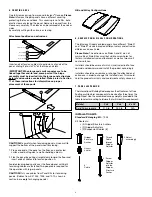
13. WALL MOUNTING OF CANOPIES
Use these hardware kits when one end of the canopy will be
attached to the wall.
Wall Attachment Kit
– 7008
Anchors canopies side-by-side to wall.
Kit Contents:
• (2) Locking Clips
• (2) Linking Rods (2-1/4")
• (1) Wall Bracket (3")
3" Wall Attachment Kit F
Wall End Attachment Kit
– 7009
Used at ends when linking single or multiple canopies.
Kit Contents:
• (1) Locking Clip
• (1) Linking Rod (2-1/4")
• (1) Wall Bracket (1-1/2")
1.5" Wall Attachment End Kit G
1.5" Wall Attachment End Kit G
1.5" Wall Attachment End Kit G
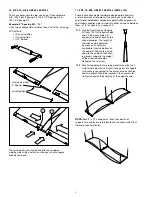
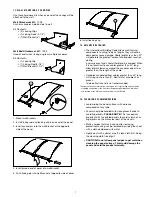
Wall Mounting / Insert Pins in Extrusion
C
1. Mount wall brackets.
2. Install linking rod and locking clip in one end of the panel.
3. Insert second pin into the wall bracket at the opposite
side of the panel.
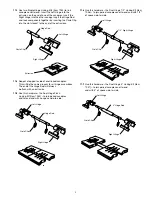
Position Panel / Engage Pins with Bracket
4. Insert pinned end of panel into wall bracket.
5. Push linking pin into wall bracket at opposite side of panel.
Engage Security Clips
C
6. Install locking clip.
14. SEISMIC RESTRAINT
1
• The International Building Code allows architectural
components to swing freely as long as they will not be
damaged or cause damage. Cable lengths less than 20"
will generate the greatest amount of pendulum reaction
during
a seismic event and should, therefore, be avoided. When
it is not practical to use cables greater than 20" long,
allow lateral clearance around the canopies equal to, or
greater than, the length of the cable.
• Canopies suspended from cables greater than 20" long
will swing no more than 8". Restraint of canopies has
proven
to be ineffective and is not recommended.
1 Pendulum reaction information is based on full-scale testing and computer
modeling conducted at the Structural Engineering Earthquake Simulation
Lab located at the State University of New York at Buffalo.
15. CLEANING RECOMMENDATIONS
• Avoid wiping the panel surfaces with abrasive
compounds of any type.
• Panels should be handled with clean gloves/hands to
avoid fingerprints.
PLEASE NOTE:
This is especially
important with the printed panels to avoid scratches or
fingerprints on the more clear part of the visuals.
• Static charges that may build up after removing
protective masking can be removed by wiping the sheet
with a cloth dampened with water.
• Lightly dust with a duster or soft, clean cloth first. Keep
the cleaning cloth free of grit.
•
CAUTION: Do not allow panel edges to get wet when
cleaning the panel surface. This would damage the
panel and void the product warranty.


