9
GB
light, moisture, dripping and splashing water.
• Do not use hard utensils on the glass surface. Do not use
water jets or steam cleaners during cleaning, do not immerse
the whole appliance in water as the parts will get wet and
electric shock might be resulted.
• Do not place articles on top of the appliance. Do not place
objects with open sources of fire (e.g. candles) on top or be-
side the appliance. Do not place objects filled with water (e.g.
vases) on or near the appliance.
• Never cover the appliance during use. This may cause a fire
hazard.
• Do not wash the appliance with water. Washing can cause
leakages and increase the risk of electric shock.
• Do not make any additional openings on the appliance. Do not
install any gadgets in the appliance.
• Do not overload the racks inside to avoid damage. Max. load-
ing of each rack is about 8kg.
• Do not attempt to climb up to the top of the appliance.
Installing the appliance
• The appliance should not be tipped over an angle of 45°. After
installing the appliance, wait for 2 hours before connecting it
to the electrical power supply. The same applies if the appli-
ance is moved at a later date.
• The appliance must always be installed in a dry environment.
• When installing, leave at least 20 cm clearance to the rear
and to the left and right for adequate ventilation. Leaving less
room for ventilation may affect the efficiency.
• We strongly recommend to install the appliance in a place
with good natural ventilation to increase ventilation proper-
ties.
Electrical components and other dangers
• No other appliances should be plugged into the same socket
as with this appliance.
• Do not place any dangerous products, such as fuel, alcohol,
paint, flammable or explosives, etc. inside or near the appli-
ance as it may result a fire hazard.
• Do not store any medications in the appliance.
• Wait about 5 minutes before switch on the appliance again
after the appliance has been switched off or unplugged from
the electrical power supply.
• Do not wash the appliance with water. Washing can cause
leakage and increase the risk of electric shock. No any parts/
accessories can be under dishwasher.
Intended use
• This appliance is designed only to keep food or beverages,
under cool state and to display them. Any other use may lead
to damage of the appliance or personal injury.
• Operating the appliance for any other purpose shall be
deemed a misuse of the device. The user shall be solely liable
for improper use of the device.
Grounding installation
This appliance is classified as
protection class I
and must be
connected to a protective ground. Grounding reduces the risk
of electric shock by providing an escape wire for the electric
current.
This appliance is fitted with a power cord with grounding plug
or electrical connections with grounding wire. The connections
must be properly installed and grounded.
Main parts of the product
(Fig.1 on page 3)
1. Glass door
2. Air suction
• Never block the suction. Air is sucked in and cold air in
circulated inside the refrigerator.
3. Main ON/OFF switch
4. Rack
• The height of rack is adjustable for various goods. For ad-
justment :
1) Take out the rack
2) Move the rack support on suitable height.
3) Put the rack on the support.
5. Air outlet
• Never block the air outlet. Let inside circulating cold air
flow out.
6. Digital temperature controller
7. Air duct outside the glass to remove the condensation water
Control panel
(Fig.2 on page 3)
8. Increase button
9. Light
10. Setting button
11. Decrease button
12. Refrigerant LED
13. Defrost LED
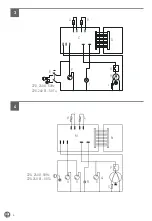
Circuit diagram
(Item 233238 v.02, 233269 v.02, 233610 v.02, 233627 v.02,
233634 v.02, 233641 v.02, 233658 v.02, 233665 v.02)
(Fig.3 on page 4)
A. Defrost probe
B. Thermostat probe
C. Digital Temperature Controller
D. Display panel
E. Power switch
F. Fan Motor
G. Over Load Protector
H. Compressor
I. Lamp
J. PTC
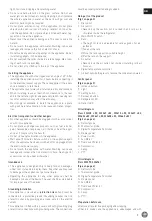
Circuit diagram
(Item 233290, 233696)
(Fig.4 on page 4)
K. Defrost probe
L. Thermostat probe
M. Digital Temperature Controller
N. Display panel
O. Fan Motor
P. Over Load Protector
Q. Compressor
R. Lamp
S. PTC
Preparation before use
• Remove all protective packaging and wrapping.
• Check to make sure the appliance is undamaged and with
Содержание 233238 v.02
Страница 3: ...3 1 4 5 6 1 2 3 7 2 C 13 12 8 9 10 11 ...
Страница 102: ...102 ...
Страница 103: ...103 ...


