O-235 | 3 - Access Point Overview | 9
Table 5. Labels: Ports
Label
Description
1
LAN1 (PoE+)
2
LAN2
3
Width of the LAN cap is 29 mm
4
Wrench to open the LAN cap
Страница 1: ...Quick Start Guide O 235 Access Point Arista Networks www arista com DOC 04356 01 ...
Страница 2: ...rademarks of Arista Networks Inc in the United States and other countries Other product or service names may be trademarks or service marks of others Headquarters 5453 Great America Parkway Santa Clara CA 95054 USA 408 547 5500 www arista com Support 408547 5502 866 476 0000 support wifi arista com Sales 408 547 5501 866 497 0000 sales arista com ...
Страница 3: ...rview 6 Front Panel 6 Side Panel 7 Rear Panel 8 Chapter 4 Install the Access Point 11 Pole Mount the AP 11 Power On the AP 16 Connect the AP to the Network 17 Connect the AP using PoE 17 Chapter 5 Access Point Troubleshooting 19 Chapter 6 Appendix A AP Server Mutual Authentication 20 ...
Страница 4: ...e O 235 outdoor access point Document Overview This guide contains the following chapters Package Content page 4 O 235 Overview page 6 Installing O 235 page 11 Access Point Troubleshooting page 19 Note All instances of the term server in this document refer to the Wireless Manager unless the server name or type is explicitly stated Product and Documentation Updates To receive important news on pro...
Страница 5: ...s point AP package must contain the components shown in the following figure Figure Package Components Table 1 Labels Package Components Label Description 1 O 235 Access Point 2 2 metal clamps for fixing the mounting bracket to the pole ...
Страница 6: ...ighten the screw 8 Earthing screw 2 6 0 2 mm 9 Earthing screw 5 8 0 2 mm 10 Earthing screw thread M4 0 5 mm Important The MAC address of the AP is printed on a label at the bottom of the product and the packaging box Note down the MAC address before mounting the AP If the package is not complete please contact Arista Networks Technical Support Team at support wifi arista com or return the package ...
Страница 7: ...rview of the O 235 and describes the Front Panel of the AP page 6 Rear Panel of the AP page 8 Side Panel of the AP page 7 Front Panel The front panel of the O 235 has 6 LEDs that indicate the status of various device functions Figure Front Panel LEDs Table 2 Labels Front Panel LEDs Label Description 1 Power 2 2 4 GHz Radio 3 5 GHz Radio 4 Third Radio ...
Страница 8: ...t receive an IP address Reduced capability indicates that the AP is getting lower than the required maximum power from the PoE switch i e 802 3af instead of 802 3at LAN1 LED ON when the corresponding interface is up LAN2 LED ON when the corresponding interface is up and either wired guest or link aggregation is configured Radio LEDs ON when the corresponding radio is operational Side Panel The sid...
Страница 9: ...P the following settings are reset Config shell password is reset to config Server discovery value is erased and changed to the default redirector online spectraguard net primary and wifi security server secondary All the VLAN configurations are lost If a static IP is configured on the AP the IP address is erased and DHCP mode is set The factory default IP address of the AP is 169 254 11 74 Rear P...
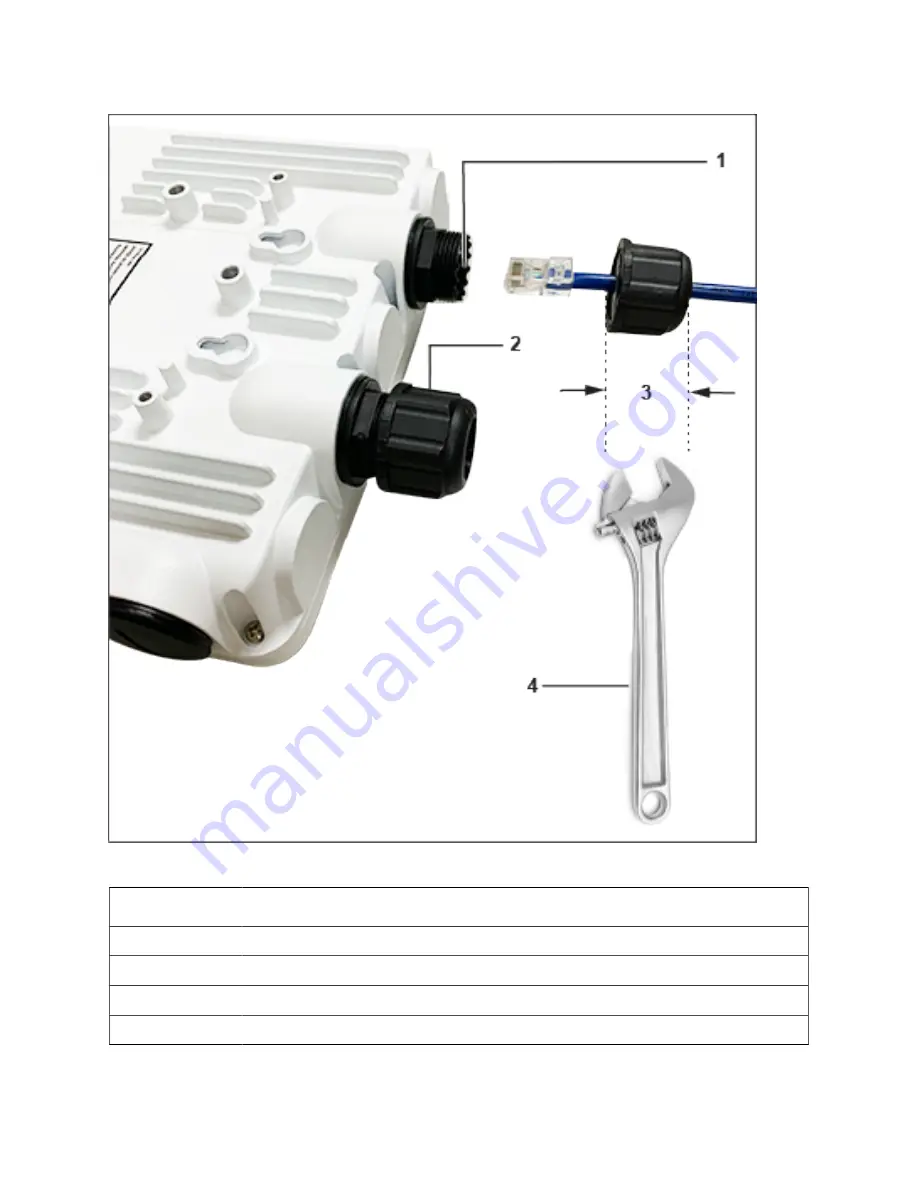
Страница 10: ...O 235 3 Access Point Overview 9 Table 5 Labels Ports Label Description 1 LAN1 PoE 2 LAN2 3 Width of the LAN cap is 29 mm 4 Wrench to open the LAN cap ...
Страница 11: ... Description Connector Type Speed Protocol LAN1 5 Gigabit Ethernet with 802 3at compliant PoE IP67 rated weatherproof RJ 45 100 1000 Mbps Ethernet 1 2 5 5 Gbps Ethernet LAN2 1 Gigabit Ethernet with 802 3at compliant PoE IP67 rated weatherproof RJ 45 100 1000 Mbps Ethernet ...
Страница 12: ...gned to Arista Networks Zero configuration cannot work if multiple APs are set up to connect to multiple servers In this case the APs must be configured manually For details on how to configure an AP manually see the Access Point Configuration Guide on our website at https www arista com en support product documentation Take a configured AP that is ensure that a static IP is assigned to the AP or ...
Страница 13: ... bracket You can insert the clams either in the horizontal or vertical slots depending on the position the pole mount bracket for use on a vertical or horizontal pole 2 Fix the bracket to a pole You can position the pole mount bracket for use on a vertical or horizontal pole ...
Страница 14: ...O 235 4 Install the Access Point 13 3 Fasten the two metal clamps into the slotted driver ...
Страница 15: ...O 235 4 Install the Access Point 14 4 Mount the AP to the bracket ...
Страница 16: ...O 235 4 Install the Access Point 15 5 Tighten the thumb screw using Philips 2 screwdriver Table 7 Labels Parts Label Description 1 Use a Philips 2 screwdriver to fasten the screw ...
Страница 17: ...ust be properly grounded using a copper earthing wire 12 10 AWG and a tin plated lug as shown in the following image The wire and the lug must be tightened at the earthing screw on the AP Note The O 235 APs are intended to be supplied with UL listed PoE power source suitable for use at 65 degree Celsius and whose output meets LPS requirements or PS2 with a rating of 48V DC 0 5A minimum The followi...
Страница 18: ...cognized by the server Single Sign On users can go to the Monitor tab in CloudVision WiFi and check whether the device is visible under the Monitor tab The AP is connected and operational Note If zero configuration fails the AP must be configured manually Important If DHCP is not enabled on a subnet the AP cannot connect to that subnet with zero configuration If the DNS entry is not present on the...
Страница 19: ...O 235 4 Install the Access Point 18 The following table shows the position of the earthing screw in the access point Item Description 1 Earthing screw ...
Страница 20: ... discovery method and ensure that you have correctly entered the DNS name wifi security server on the DNS server Ensure that the DNS server IP addresses are either correctly configured or are provided by the DHCP server The AP might fail to authenticate with the server In this case an Authentication failed event is raised on the server Refer to the event for recommended action The AP has encounter...
Страница 21: ...sing the session key The AP and server are shipped with the same default value of the shared secret Both the server and the AP have CLI commands to change the shared secret Note After the shared secret communication key is changed on the server all APs connected to the server will automatically be set up to use the new communication key You must manually configure the new communication key on an A...