Arion AC-8000HD Скачать руководство пользователя страница 30

4.3 Viewing Program Information

You  can view the 2  steps  information  window by pressing the  “INFO”  button while watching a

program. Press the “EXIT” button to hide the program information.

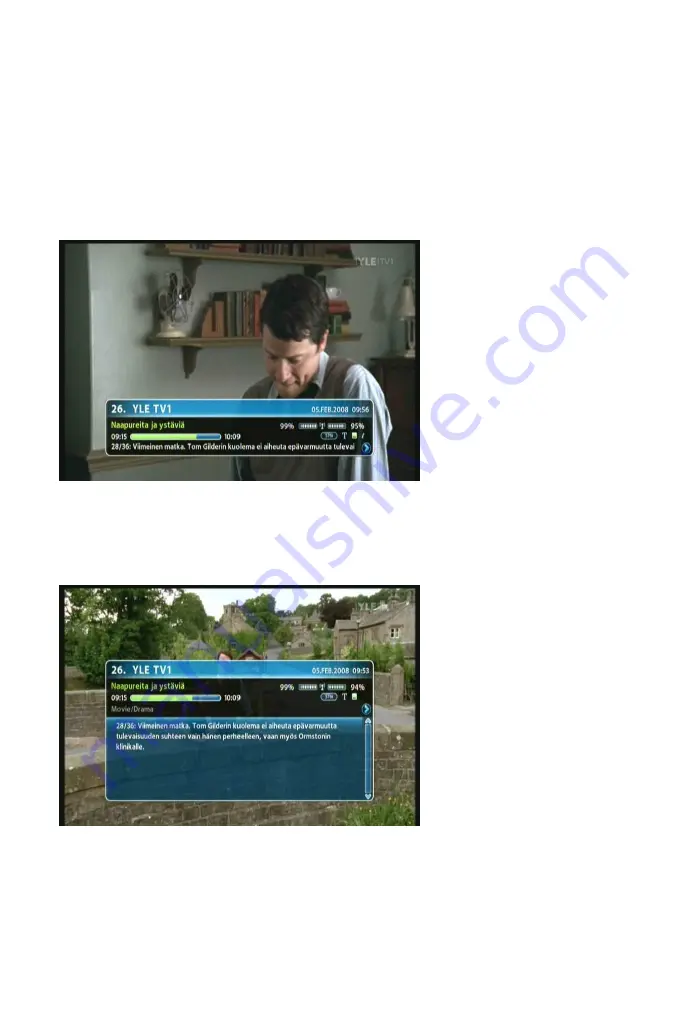
Step 1: Basic Information

The Basic Information is displayed as following on the screen.

Step 2: Detailed Information

You can see detailed information about the current program. Press the  “INFO”  button to view
detailed information during the Basic information is displayed. Press the “EXIT” button to hide the
program information.

Содержание AC-8000HD

Страница 1: ...Contents 1 ...

Страница 2: ...g information MENU Double quotation marks Indicates a button onthe remote control or the product To reduce the risk of electric shock do not remove cover or back No user serviceable parts inside Refer servicing to qualified service personnel Indicates dangerous voltage inside the product that presents a risk of electric shock or personal injury Indicates important operating and maintenance instruc...

Страница 3: ... Don tdisassemble repair orreorganizetheproduct Useandcareof the product Placetheproductinawell ventilatedarea Placetheproduct wheredustandothermaterialsdonotbuildup Don tpluginwithseveralotherpowerplugs Don tplacetheproductwherethereareextremevibrationsornearmagnetic forces Don t placeobjectsontopof theproduct Don tplacecups thatholdwaterorotherliquidsontopoftheproduct ...

Страница 4: ...4 AC 8000HDUser Manual Themain plug isused to disconnect the device Thedisconnected deviceshall remain readilyoperable ...

Страница 5: ...ng a TV VCR 16 1 Connecting aTV with HDMI If yourTV has HDMI input 16 2 Connecting aTV withYPbPr If yourTV hasYPbPr input 17 3 Connecting aTV with SCART Cable 18 4 Connecting a VCR with SCART Cable 18 2 2 Connect the Optical S PDIF 19 2 3 Starting Up 19 Basic Functions 29 4 1 Changing Channels 29 4 2Adjusting Volume 29 4 3 Viewing Program Information 30 4 4 Changing Subtitle Language 31 4 5 Changi...

Страница 6: ...0 4 12 Switching TV and Radio 41 4 13 Changing Video Format 41 5 1 Channel Search 44 5 2 Channel Manager 44 5 3 User Setting 45 5 4 Tools 45 5 5 CAS 46 6 1 Trouble Shooting 49 49 6 2 Specification 50 1 Tuner Demodulator 50 2 MPEGTSA V Decoding 50 3 A VAndData Output 51 4 ConditionalAccess Interface 51 5 System Resource Information 51 6 Power Supply 51 7 Physical Specification 51 ...

Страница 7: ...Chapter1 BeforeYouBegin ...

Страница 8: ...dy Specification MPLayer I and II CD quality audiosound S PDIF for DolbyDigitalAudioOutput Mono Left Right Stereo Audio OutputSupport PCM withDecoded MPEGI layerII Musicam Audio OutputSupport EasyAndFastAuto Programming IntuitiveUser Interface Various Video DisplayFormat WithPAL 576i 576p 720p 1080i 50Support Various VideoAspect RatioWith 4 3 Letter Box FullScreenAnd 16 9 Support CVBS HDMI SCART Y...

Страница 9: ...oreYouBegin 9 1 2 Package Contents Please check to make sure the following contents are in the product package Product contents may be subject to change Cables not specified above must be purchased separately ...

Страница 10: ...r up down in the Menu state 3 LED Option STANDBY Red light is displayed when the product is the Standby mode This light is tumed off whenthe product is in operation LOCK Green light is in displayedwhen the product is searched property REMOTE Yellow light is displayed when the remote control is in operation 4 Smart Card Slot Option Inserts a smart card ...

Страница 11: ...EO1 Connect VIDEO to video input of yourTV or VCR via a RCAcable 6 AUDIO L R ConnectAUDIO L R to the matchingAudio Inputs of yourTV VCR via aRCAcable 7 VIDEO2 YPbPr Connect Y Pb Pr output of VIDEO2 to Y Pb Pr video input of yourTV via a RCA cable 8 S PDIF Connect S PDIF to audio input of your amplifier with optical digital port via an optical cable 9 HDMI If you haveTV supporting HDMI connect HDMI...

Страница 12: ...o return to the normal mode INFO To display the information about the channel FAV To makeupfavoritegroup byTV Radio and byyour choice MENU To show the menuOSD EXIT To exit from the current menu or cancel the current operation in menu state OK To selectamenuorconfirm theuser saction anddisplay thechannel list during watching a program To change theTV radio channels Up Down To increase or decreaseTV...

Страница 13: ...n RECALL Hereafter Blue To return to thepreviouschosen channel TEXT To display the teletext information about the channel if applicable TV RADIO To switch the productTV or Radio SUBT To display theprovidedsubtitlelanguagelists of thecurrentchannel STB TV To select the input source between terrestrial andTV PAUSE To pausethevideo screen V Format To change video output formatto 1080i 720p 576i 576p ...

Страница 14: ... Angle of remote control use The remote control can be used at a distance of up to 7 to 10 meters and at an angle of 30 degrees from the remote control led ...

Страница 15: ...Chapter2 Connections ...

Страница 16: ...g on your environments If you encounter with any problems or have any questions during connecting the product please contact your local product distributor 2 1 Connecting a TV VCR 1 Connectinga TVwith HDMI If yourTVhasHDMIinput 1 Connect theTV cable to the CABLE IN of the product 2 Connect the HDMI output to HDMI input of your TV ...

Страница 17: ...ctions 17 2 Connectinga TVwith YPbPr If yourTVhasYPbPrinput 1 Connect theTV cable to the CABLE IN of the product 2 Connect the VIDEO2 YPbPr toYPbPr input of yourTV 3 Connect theAUDIO L R toAudio input of yourTV ...

Страница 18: ...aTVwithSCART Cable 1 Connect theTV cable to the CABLE IN of the product 2 Connect theTV Scart output toSCARTinput of yourTV 4 Connectinga VCR withSCART Cable 1 Connect the VCR SCARToutput to SCARTinput of your VCR ...

Страница 19: ...d of the product to a power outlet and press the Power button at the rear panel to turn the product on 2 The first time you power up the product it will display the initial screen then some parameters for system configuration should be set Refer to the following chapter for detailed information about the basic settings Installation Notice Connecting your TV directly to the audio video output of yo...

Страница 20: ......

Страница 21: ...Chapter3 BasicSettings ...

Страница 22: ...e setting procedures you may not watch anybroadcasting normally If there is any disagreement between the current setting and TV type any picture will not appear You should change the video format by pressing the V Format Press the V Format button twice until youcan see anypicture onTV screen 1 Turn on your TV and the product Follow the instruction on the screen Press the Blue button to start to pe...

Страница 23: ...uttonto move to the next setting 4 Select the installation method using the button and press the Blue button If you select the advanced method you should select primary audio secondary audio primary subtitle and secondarysubtitle the button ...

Страница 24: ...5 Select theAudio Subtitle language the button and press the Blue button 6 Select the screen mode the button and press the Blue button ...

Страница 25: ...message will appear If you encounter with any problems or have any questions when setting up the antenna please contact your local product installer or distributor Now you have completed all steps required for watching TV or listening to radio Press the MENU button to exit the basic settings For detailed information about how to use the product refer to Chapter 4 ...

Страница 26: ......

Страница 27: ......

Страница 28: ...Chapter4 Operations ...

Страница 29: ...ote control to move to the previous channel Enter your desired channel number using the 0 9 button directly Press the EXIT button to hideTV channel list 4 2 Adjusting Volume You can change the volume level of the current channel Press the button to adjust the volume Press the MUTE button to turn the sound off andon again Press the OPTION button to change the audio mode During setting up the Menu e...

Страница 30: ... tohide the program information Step 1 Basic Information The Basic Information is displayed as followingon the screen Step 2 Detailed Information You can see detailed information about the current program Press the INFO button to view detailed information during the Basic information is displayed Press the EXIT button to hide the program information ...

Страница 31: ...ist 2 Select the desired subtitle language using the button and press the OK button The subtitle language will be displayed at the bottom of the screen 3 Select OFF from the subtitle language list not to display subtitle from the screen You can select a default subtitle language by pressing the MENU button and selecting the User Setting Language Primary Subtitle menu in order Subtitle language ...

Страница 32: ...lay the audio language list If the mode is not the audio language press the button 2 Select the desired audio language using the button and press the OK button The audio language will be changed immediately You can select a default audio language by pressing the MENU button and selecting the User Setting Language PrimaryAudio menu in order Audio language ...

Страница 33: ...s the OK button while watching a program to display the selected channel list FAV Shows the favorite channel lists Green Edits the channel lists 2 Move to the desired channel using the or P button and press the EXIT button to change the channel Press the FAV button to switch among the channel modes such as ALL FAV1 4 etc Refer to Chapter 4 7 Managing Favorite Channel Lists for more information ...

Страница 34: ... OK button while watching a program to display the selected channel list 2 If the channel list is not the favorite channel press the button to select the favorite channel list 3 Press the Red button to select the sorting mode such as alphabetic order date and etc 4 Press the PAGE button to moveto the previous next page ...

Страница 35: ...d channel list 2 Press the Green button to edit the channel 3 You can lock rename and change to other favorite groups each channel Move to the desired menu using the button and press the OK button 4 Whenever you press the EXIT button after completing channel edit the confirmation message will appear Move cursor to the OK button and press the OK button to save the changes ...

Страница 36: ...and press the OK button Select the Edit Favorite menu using the button and press the OK button 3 Press the FAV button to view the favorite channel groups Red Locks unlocks channel s FAV Selects the favoritegroup OK Adds deletes the channel s to the desired favorite group EXIT Exits to save the changes FAV1 4 are default name You can also rename them for your convenience ...

Страница 37: ...ress the MENU or EXIT button after editing favorite channel SwitchesRightcolumn Red Locks unlocks channel s Green Renamesachannelname FAV Selectsthefavoritegroup OK Adds deletes the channel s to the desiredfavoritegroup EXIT Exitstosavethechanges SwitchesLeftcolumn OK Deletesthechannel s infavoritegroup RED Locks unlocks channel s Green Moveschannel s tothedesiredlocation Yellow Renamesagroupname ...

Страница 38: ...group s 1 Press the MENU button 2 Move to the ChannelManager menu using the button and press the OK button Select the Edit Channel menu using the button and pressthe OK button Red Locks unlocks channel s Green Deletes channel s Blue Change channel name Renames a channel name ...

Страница 39: ...ing to the current channel mode 2 Select the channelmode usingthe button and press the OK button 4 10 Viewing Program Guide The Program Guide shows program information about each channel by date andtime 1 Press the EPG button Red Changes the schedule mode Green Views the channel group s Yellow Moves to the Next Day Blue Makes a reservation INFO Viewsdetail EPG ...

Страница 40: ... Teletext Service is text data service from Service Provider It is available only when the program provides teletext data service 1 Press the TEXT or OPTIONS button Teletext Service Data is displayed 2 Select the page using the 0 9 buttons 100 899 3 Press the EXIT button to the previous screen ...

Страница 41: ...ings 41 4 12 Switching TV and Radio Press the TV RADIO button toswitchTV and Radio 4 13 Changing Video Format Press the V Format button You can select the video output format among 576i 576p 720p 1080p and auto ...

Страница 42: ...Chapter5 Settings ...

Страница 43: ...ools 1 Press the MENU button to display the Menu OSD 2 Move to the appropriate Menu using the button and then press the OK button to select the sub menu Press the EXIT button to return to the previousstage Press the MENU button to exit the setting menu The menu program shows buttons that can be used at every stage of setup ...

Страница 44: ...OK button Please wait for finishing the Search If you want to stop the Search press the EXIT button anytime If the Search is stopped or finished the searched information is automatically saved 5 2 Channel Manager You can edit channel s and favorite channel s Edit channel Editchannel Edit Favorite Creates edits favoritechannel Move to the Channel Manager menu using the button and press the OK butto...

Страница 45: ...s the time and timer Lock Sets the age lock and password Move to the User Setting menu using the button and pressthe OK button Move to the desired sub menu using the button and press the OK button 5 4 Tools You can view the system information signal level system reset s w upgrade and HDMI information SystemInformation Showsthe systemversion SignalLevel Showsthesignal level SystemReset Restores tot...

Страница 46: ...nu using the button and press the OK button 5 5 1 Status of Smart Card Subscription status Event Status Tokens Status ChangeCAPIN Maturity Rating About Conax CA Show conax pairing id CHIP_ID and Smart card id Card Number Move to the CAS sub menu using the button and press the OK button Move to the desired sub menu using the button and press the OK button ...

Страница 47: ...Ch5 Settings 47 ...

Страница 48: ...Chapter6 Appendix ...

Страница 49: ...e no sound Wrong connection of the audio video output oftheproduct toTV Connect the audio video output of the product toTVcorrectly TV poweroff TurnTVon The productis standby mode Change the mode to the normal mode No or Bad signalmessageappears Connect the antenna cable correctly The remote control unit RCU doesnotworking No Batteries Change the batteries both The RCUisincorrectly aimed Aim theRC...

Страница 50: ...0 Msps 7 0 Msps Roll Off Factor 0 13 0 15 SupportingSystem Compliant Nordig Unified 1 0 3 European digital cable standard ETSIEN300 429 Cable Ready Loop Through output Full band Compliant with Cable Ready Specification 2 MPEGTSA VDecoding TransportStreamFormat MPEG 2 MPEG 4 Part10AVC H 264 HD HP L4 0 1920x1080 50Hz MPEG 2 ISO IEC13818Transportstream Specification Profile Level MPEG 2 MP HL MPEG 4 ...

Страница 51: ...ax CAS v7Embedded PCMCIA N A 5 SystemResourceInformation MainProcessor ST40 32 bitSuperscaler RISC CPU_400Dhrystone 2 1 MIPS 266MHz FlashROM Default8Mbytes SecureFlash Program Graphic DDRSDRAM Default128Mbytes Program64Mbytes Graphic 64Mbytes SerialEEPROM Default128Kbits 6 PowerSupply Input Voltage AC 100 240V 50 60Hz PowerConsumption Maximum 20Watts Under2Watts inStandby Mode Protection Separate ...

Страница 52: ......

Страница 53: ...Ch6 Appendix 53 ...

Страница 54: ......

Страница 55: ...ted by U S patents and other intellectual property rights Use of this copyright protection technology must be authorized by Macrovision and is intended for home and other limited viewing uses only unless otherwise authorized by Macrovision Reverse engineering or disassembly isprohibited C TSR AC8000HD_GP7_REV1 0_EN ...

Отзывы: