background image

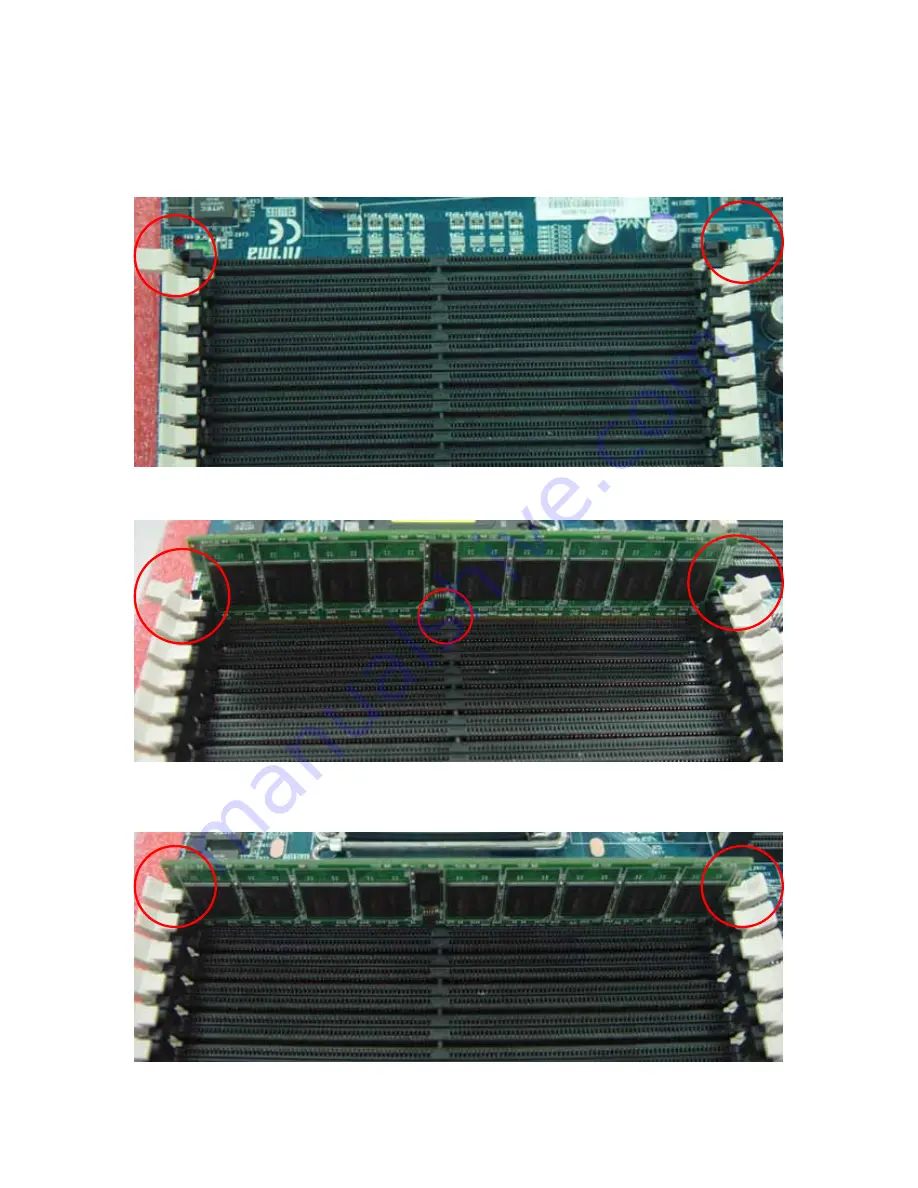
2.4.2  Installing DIMM modules 


1.  Open up the brackets on the sides by flicking them to the sides: 


2.  Line up the memory with socket.  Make sure the gap fits into the socket. 


3.  Push the memory stick down until the brackets on the sides snap to secure the memory module in place.  
Make sure the brackets are locked into the memory module. 


21

Содержание SW44X

Страница 1: ...SW44X USER MANUAL Arima Computer Corp Building Your Competitive Advantage 1 ...

Страница 2: ...RATION 23 2 5 1 Clear CMOS header 23 2 5 2 Enable onboard VGA header 24 2 5 3 PCI X Frequency Setting 25 2 5 4 Onboard Buzzer 26 2 6 POWER SUPPLY 27 2 6 1 ATX 24 pin power connector and CPU 8 4 pin connector 27 2 7 CABLES CONNECTORS 29 2 7 1 Front Panel Connectors 29 2 7 2 Floppy disk drive connector 31 2 7 3 IDE connectors 33 2 7 4 Rear Panel I O ports 34 2 7 5 Back Panel LAN LED 35 2 7 6 Front U...

Страница 3: ...3 6 SECURITY MENU 49 3 7 POWER MENU 50 3 8 BOOT MENU 51 3 9 SERVER MENU 52 3 10 EXIT MENU 53 APPENDIX I GLOSSARY 54 3 ...

Страница 4: ...oftware on equipments that are not manufactured by Arima Computer Corp Copyright Notice This document contains proprietary information that is protected by copyright All rights are reserved No part of this publication may be reproduced transcribed stored in a retrieval system translated into any language or computer language or transmitted in any form whatsoever without the prior written consent o...

Страница 5: ...te can be found at http www arima com tw server Or contact our support staff at server arima com tw About this User Guide This manual contains some special icons that accompany special sections that are meant to help you along in the installation process The special sections contain useful and or critical information that you should know Watch for these icons as you read through the manual Type of...

Страница 6: ...g installation Do not have liquid nearby as electrical shock can occur if liquid spills onto the equipment Operating temperature 10ºC to 35ºC or 50ºF to 95ºF Pay attention to the warnings in the installation instructions when appropriate In the following cases do not try to fix the problem yourself contact a party in Technical Support The power cord or plug is damaged Liquid has been spilled onto ...

Страница 7: ...ficient bus management to date It provides versatility performance value and dependability for today s computing environment In just a couple of pages a detailed specification will provide you with a comprehensive view of the capabilities of SW44X Thank you for purchasing Arima Computer Corp family of products 1 2 Unpacking Arima Computer Corp provides a number of accessories for your convenience ...

Страница 8: ... A 9 10 N A CN36 only supports one USB CN35 Hard Drive Backplane LED Board Connector Pin Description Pin Description 3 SMB ALERT 2 SMbus 5 CLR SW 4 7 FP_ID LED 8 SATA1 LED 9 SATA2 LED 10 SATA3 LED 11 SATA4 LED 12 LAN Connector Indicator Light Indication Meaning Activity LED flashing Data activity Link LED lighting up Connected to network 1 2 1 Quick Installation Guide Recommended Memory Configurat...

Страница 9: ...EM MEMORY 8x 240 pin 1 8 Volt DDR2 DIMM sockets EXPANSION SLOTS One PCI Express x1 slot two PCI Express x8 slots two PCI X 133 100MHz slots STORAGE Total support of hard disk formats from SATA II to ATA INTEGRATED LAN CONTROLLER ServerWorks HT2000 integrated dual Gigabit Ethernet ports SYSTEM MANAGEMENT Arima SmartWatch server management application OPMA connector 9 ...

Страница 10: ...mory Support Registered ECC type memory modules only Support up to 32GB Support Chipkill Parity On line spare BIOS 4Mb Phoenix BIOS Legacy USB support MP 1 1 1 4 compliant SMBIOS 2 3 3 and DMI 2 0 compliant Soft Power down Multiple boot support with BIOS Boot Specification v3 1 BBS support Expansion Slots 2 x PCI E x8 slots Connected to HT2000 1 x PCI E x1 slot Connected to HT2000 2 x PCI X 133 10...

Страница 11: ...ports OPMA Super I O National Semiconductor Super I O PC87417 chip One standard type floppy connector supports two drives PS 2 mouse and PS 2 keyboard rear panel connectors Two 9 pin serial ports one rear one header Rear Panel I O Stacked PS 2 mouse and PS 2 keyboard rear panel connectors Stacked two USB 2 0 connectors 9 pin serial and DB15 Video connectors Two RJ 45 connectors with LEDs System Ma...

Страница 12: ...1 5 Motherboard Layout Major Components The following diagram indicates all the major components of the motherboard 12 ...

Страница 13: ...motherboard Before touching the motherboard discharge any static build up in yourself by touching a grounded object Disconnect your computer from any power supply if disassembly is needed Try to avoid touching the surface or back of the motherboard for chips and other components on the motherboard are very fragile Before the motherboard is ready for immediate installation place the motherboard on ...

Страница 14: ...2 2 Block Diagram 14 ...

Страница 15: ...instructions that came with the CPU Follow the procedures below step by step 1 Locate the processor socket on the motherboard and carefully remove the protective cover 2 Pull the lever out of its locked position and let it spring into its open position 15 ...

Страница 16: ...the bottom right of the socket as shown there are two gaps on both sides of the CPU make sure they fit perfectly into the socket If it is placed correctly the CPU pins should be able to fit into the socket perfectly The CPU will not fit if the orientation is wrong Do not try to force the CPU into the socket it could result in irreparable damage to the CPU 16 ...

Страница 17: ...5 Close the metal cover and return the lever into its original locked position 6 Now rest the motherboard into the chassis align the two holes of the backplate with the two bolts of the chassis 17 ...

Страница 18: ... much thermal grease will spill onto the CPU circuit and damage the CPU 7 First align the two pegs with the two mounting holes on the motherboard After you have made sure that the pegs are in their proper positions lock the pegs into the mounting holes To remove the heatsink gently turn the pegs until they loosen themselves from the mounting holes Gently pull up the heatsink to prevent any damage ...

Страница 19: ...2 4 Installing the Memory 2 4 1 DIMM Combination The diagram below shows the 8 DIMM slots from 1 to 4 for both CPU1 and CPU2 19 ...

Страница 20: ...cification of the SW44X Key Notes DDR2 Memory Modules Supported 256MB 4GB Registered ECC Only Installed memory will all be automatically detected No jumpers or settings are needed SW44X supports up to 32GB in total Unbuffered memory is NOT supported 1 DIMM H1 Bank Slot 3 2 DIMMs H1 Bank Slot 3 4 Single Processor H1 Bank Slot 1 2 3 4 4 DIMMs Dual Processor H1 Bank Slot 3 4 H2 Bank Slot 3 4 6 DIMMs ...

Страница 21: ...s by flicking them to the sides 2 Line up the memory with socket Make sure the gap fits into the socket 3 Push the memory stick down until the brackets on the sides snap to secure the memory module in place Make sure the brackets are locked into the memory module 21 ...

Страница 22: ...These pictures only show the procedures for the installation of one memory module Please refer to section 2 4 1 to make sure the memory module combination is qualified for the motherboard 22 ...

Страница 23: ...ard as it appears in the following diagram To clear CMOS 1 Turn off the system and make sure the standby power on the power supply has been turned off too 2 Short pin 2 and pin 3 using a jumper for a few seconds and switch back to pin 1 and pin 2 as default 3 Turn on the system and reconfigure the BIOS 23 ...

Страница 24: ...r Header CN25 controls the onboard VGA setting CN25 has the default set as enabled where pin 2 and pin 3 are short and switch the jumper to pin 1 and pin 2 will disable onboard VGA Refer to the following diagram for CN25 location 24 ...

Страница 25: ...2 5 3 PCI X Frequency Setting The default frequency setting of PCI X Slot is 100MHz where pin 1 and pin 2 on header CN38 are shorted Switch to pin 2 and pin 3 will change the frequency to 133MHz 25 ...

Страница 26: ...2 5 4 Onboard Buzzer Header CN30 setting controls the on and off state of the onboard buzzer Set jumper on 1 2 to enable the buzzer 26 ...

Страница 27: ... up the CPU BOTH must be connected in order for the system to boot up Make sure the plugs are inserted into the connectors properly to prevent any damage Please make sure your power supply can support at least 2 amps standby power for the Advanced Configuration and Power Interface ACPI functions Make sure the AC adapter is not plugged into the wall outlet during installation The electric current c...

Страница 28: ...28 ...

Страница 29: ... User can customize the button to perform a particular function 5 VSB This connector provides the user with power to any extra devices that uses 5 volt power Cooling Fault LED This connector connects to the LED that lights up when a problem arises with cooling system System Fault LED This connector connects to the LED that lights up when a problem arises with the system NIC 1 Activity LED This con...

Страница 30: ...30 ...

Страница 31: ... floppy drive first refer to the instructions that come with the floppy drive Then follow the instructions here Attaching a floppy drive can be done in a similar manner to an IDE drive Most of the current floppy drives on the market require that the cable be installed with the colored stripe positioned next to the power 31 ...

Страница 32: ...lly detected Usually caused by faulty cables cables put in backwards or a bad floppy drive or motherboard Try another floppy drive to verify the problem if the cable is properly installed or try replacing the actual cable Also check to see if the onboard floppy controller is enabled in the BIOS setup Drive Fail message at boot up The cable floppy drive or motherboard may be faulty Try another driv...

Страница 33: ...sult the instructions here For Parallel ATA installing IDE drives has become simpler over the years The cables are now keyed to guide the user to the correct installation configuration Each IDE connector can support two IDE drives Remember to set BIOS to match the configuration that you implement here Go to Advanced Menu section of BIOS for detail 33 ...

Страница 34: ...rd plugs You may use a DIN to mini DIN adapter on standard AT keyboards USB Ports Four external USB 2 0 ports that allow simultaneous connections of 2 USB devices Serial Port connector 9 pin male This serial port can be used for pointing devices or other serial devices See BIOS setup VGA connector 15 pin female The VGA port connects display devices such as a monitor See the BIOS setup Gigabit Ethe...

Страница 35: ... LAN LED Back Panel LAN LED The table below will allow the user to monitor LAN activities from the back of the system Indication Meaning Activity LED flashing Data activity Link LED lighting up Connected to network 35 ...

Страница 36: ...2 7 6 Front USB Connector Header CN36 controls only one front USB connection To activate the front USB connect the USB wire to CN36 Refer to the following diagram for the location of CN36 36 ...

Страница 37: ... Port Connector Header CN34 controls the activation of front panel serial port In the specification front panel serial port is COM2 the back panel is COM1 Refer to the following diagram for location and orientation of CN34 37 ...

Страница 38: ...38 ...

Страница 39: ...ustry standard BIOS The rest of the chapter will list all the menus and sub menus in the BIOS Along with them you can also find the list of varieties for any configurable item in the BIOS 3 1 Entering BIOS Setup The PhoenixBIOS is activated when the system powers on The BIOS reads the system information contained in the CMOS and begins the process of checking the system and configuring it After fi...

Страница 40: ...dow will appear to allow setting of the item s value If the item has a in front of it it means that the item leads to a sub menu Pressing Enter will take you to the sub menu Increase the numeric value or goes to the previous setting value Decrease the numeric value or goes to the next setting value F1 General help on setup navigation keys Press F1 key to pop up a small help window that describe th...

Страница 41: ...ot be booted after some changes in BIOS use the clear CMOS jumper setting to reset the BIOS to default See Page 23 To avoid such problem configure only the items that you thoroughly understand and refrain from modifying the advanced settings 41 ...

Страница 42: ...at you can customize on under the Main menu page Item Options Description System Time No options Shows the time of the day in the format of Hour Min Sec System Date No options Shows the date in the format of MM DD YYYY BIOS Version No options Version of the BIOS Legacy Diskette A Disabled 360 Kb 5 1 4 1 2 MB 5 1 4 720 Kb 3 1 2 1 44 1 25 MB 3 1 2 2 88 MB 3 1 2 Selects floppy type Note that 1 25 MB ...

Страница 43: ... area F1 Help Select Item Change Values F9 Setup Defaults Esc Exit Select Menu Enter Select Sub Menu F10 Save and Exit The following table shows the items that you can customize on the Advanced menu page Item Options Description Reset Configuration Data No Yes Select Yes if you want to clear the Extended System Configuration Data ESCD area QuickBoot Mode Disabled Enabled Allows the system to skip ...

Страница 44: ...nge Values F9 Setup Defaults Esc Exit Select Menu Enter Select Sub Menu F10 Save and Exit The following table shows the items that you can customize on the Chipset Configuration sub menu page Item Options Description ACPI SRAT Table Disabled Enabled Enable ACPI 2 0 static resources affinity table for ccNUMA systems NOTE This cannot be enabled if node interleave is also enabled Table will not be cr...

Страница 45: ...rimary Master 100GB Primary Slave CD ROM Embedded SATA enable or disable F1 Help Select Item Change Values F9 Setup Defaults Esc Exit Select Menu Enter Select Sub Menu F10 Save and Exit The following table shows the items that you can customize on the Disk Configurations sub menu page Item Options Description Embedded SATA Disabled Enabled Embedded SATA enable or disable SATA mode IDE MMIO select ...

Страница 46: ...s installed here F1 Help Select Item Change Values F9 Setup Defaults Esc Exit Select Menu Enter Select Sub Menu F10 Save and Exit Primary Slave sub menu Phoenix TrustedCore tm Setup Utility Advanced Primary Slave CD ROM Item Specific Help Type Auto Multi Sector Transfers Disabled LBA Mode Control Disabled 32 Bit I O Disabled Transfer Mode Fast PIO 4 Ultra DMA Mode Mode 2 User you enter parameters ...

Страница 47: ...ion sub menu Item Options Description Serial port A Disabled Enabled AUTO Disabled No configuration Enabled User configuration Auto BIOS or OS chooses configuration OS Controlled Displayed when controlled by OS Serial port B Disabled Enabled AUTO Disabled No configuration Enabled User configuration Auto BIOS or OS chooses configuration OS Controlled Displayed when controlled by OS Floppy disk cont...

Страница 48: ...llowing table shows the items that you can customize on the Console Redirection sub menu page Item Options Description Com Port Address Disabled On board COM A On board COM B If enabled it will use a port on the motherboard Baud Rate 300 1200 2400 9600 19 2K 38 4K 57 6K 115 2K Enables the specified baud rate Console Type vt100 vt100 8bit ANSI 7bit ANSI vt100 plus UTF8 ASCII Enables the specified c...

Страница 49: ...setup utility F1 Help Select Item Change Values F9 Setup Defaults Esc Exit Select Menu Enter Select Sub Menu F10 Save and Exit The following table shows the items that you can customize on the Security Menu page Item Options Description Set Supervisor Password Enter New Password Confirm New Password Supervisor Password controls access to the setup utility Set User Password Enter New Password Confi...

Страница 50: ...st State returns the system to the state it was in before power failure F1 Help Select Item Change Values F9 Setup Defaults Esc Exit Select Menu Enter Select Sub Menu F10 Save and Exit The following table shows the items that you can customize on the Power Menu Item Options Description After Power Failure Stay Off Last State Sets the mode of operation IF an AC Power Loss occurs Stay off returns th...

Страница 51: ...der 1 Legacy Floppy Drives 2 IDE 0 Maxtor 6L100P0 PM 3 IDE CD COMBO COB 1H4816 PS 4 5 6 7 8 Excluded from boot order PCI BEV MBA v8 2 5 Slot 0420 PCI BEV MBA v8 2 5 Slot 0421 ALL USB KEY All USB Floppy All USB HDD All PCI SCSI Legacy Network Card Keys used to view or configure devices Up and Down arrows select a device and moves the device up or down f and r specifies the device fixed or removable...

Страница 52: ...d Security Power Boot Server Exit Item Specific Help Display without KB Err Msg No Yes No Control the Post Error Message display or not when without KB F1 Help Select Item Change Values F9 Setup Defaults Esc Exit Select Menu Enter Select Sub Menu F10 Save and Exit 52 ...

Страница 53: ...Server Exit Item Specific Help Exit Saving Changes Exit Discarding Changes Load Setup Defaults Discard Changes Save Changes Exit System Setup and save your changes to CMOS F1 Help Select Item Change Values F9 Setup Defaults Esc Exit Select Menu Enter Select Sub Menu F10 Save and Exit 53 ...

Страница 54: ...hone line or other electrical path can carry Greater bandwidth results in greater speed BIOS Basic Input Output System the program that resides in the ROM chip which provides the basic instructions for controlling your computer s hardware Both the operating system and application software use BIOS routines to ensure compatibility Buffer a portion of RAM which is used to temporarily store data usua...

Страница 55: ...le fits into one DIMM socket which is capable of acting as a memory bank DMA Direct Memory Access channels that are similar to IRQs DMA channels allow hardware devices like soundcards or keyboards to access the main memory without involving the CPU This frees up CPU resources for other tasks As with IRQs it is vital that you do not double up devices on a single line Plug n Play devices will take c...

Страница 56: ...vice hooked up to each IRQ line doubling up devices on IRQ lines can lock up your system Plug n Play operating systems can take care of these details for you Latency the amount of time that one part of a system spends waiting for another part to catch up This occurs most commonly when the system sends data out to a peripheral device and has to wait for the peripheral to spread peripherals tend to ...

Страница 57: ...data alternately from one set of addresses and then the other SDRAM cuts down on the delays associated with non synchronous RAM which must close one address bank before opening the next Serial port called as such because it transmits the eight bits of a byte of data along one wire and receives data on another single wire that is the data is transmitted in serial form one bit after another Sleep Su...

Страница 58: ...ZCR Zero Channel RAID ZCR card provides RAID 5 solution by working with the onboard SCSI SATA SATA II chip through special PCI X slot with Intel RAIDIOS logic thus lowering cost of RAID 5 solution 58 ...

Отзывы: