background image

ARIESAUTOMOTIVE.COM  

•  

NEED ASSISTANCE?  •  800.798.0813  •  2500201-INS-RF  •  PAGE 4

Step 10

Congratulations on the installation 

of your new ARIES fender flares.

With the fender flares installed, periodic 

inspections should be performed to ensure 

all mounting hardware remains tight.

To protect your investment, see the 

'Notes and Maintenance' section on 

the first page of this instruction manual.

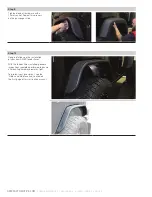
Step 9

Tighten down all hardware with a 

10mm socket. Repeat this process 

on the passenger side.

Содержание 2500201

Страница 1: ...le to the left when securing hardware during the installation process to help prevent damage to the product or vehicle Torque Specifications METRIC M6 bolt 3 ft lbs M8 bolt 7 ft lbs M10 bolt 16 ft lbs M12 bolt 28 ft lbs SAE 1 4 bolt 3 ft lbs 5 16 bolt 7 ft lbs 3 8 bolt 16 ft lbs 7 16 bolt 20 ft lbs 1 2 bolt 28 ft lbs Use above torque setting unless otherwise noted PAGE 1 2500201 INS RF 800 798 081...

Страница 2: ...cation Drill a new hole at the marked location using a 25 64 or 10mm drill bit Check to make sure that the threaded metal insert will fit Do not make the holes larger than required or the rivnuts my fail to install Step 4 If a plier style thread set will be used to install the rivnuts proceed to the installation locations in step 5 Screw the left handed nut completely onto the thread set tool Slid...

Страница 3: ...acer contact the M6 washer and rivnut After tension is felt carefully compress the rivnut in the hole while applying slight pressure to keep it seated approximately two full rotations WARNING Over tightening the rivnut may damage the thread set tool and or vehicle rocker panel Only compress the rivnut enough to seat in the hole without rotating Step 7 Lift the ARIES rear fender into place and thre...

Страница 4: ...ender flares With the fender flares installed periodic inspections should be performed to ensure all mounting hardware remains tight To protect your investment see the Notes and Maintenance section on the first page of this instruction manual Step 9 Tighten down all hardware with a 10mm socket Repeat this process on the passenger side ...

Отзывы: