15
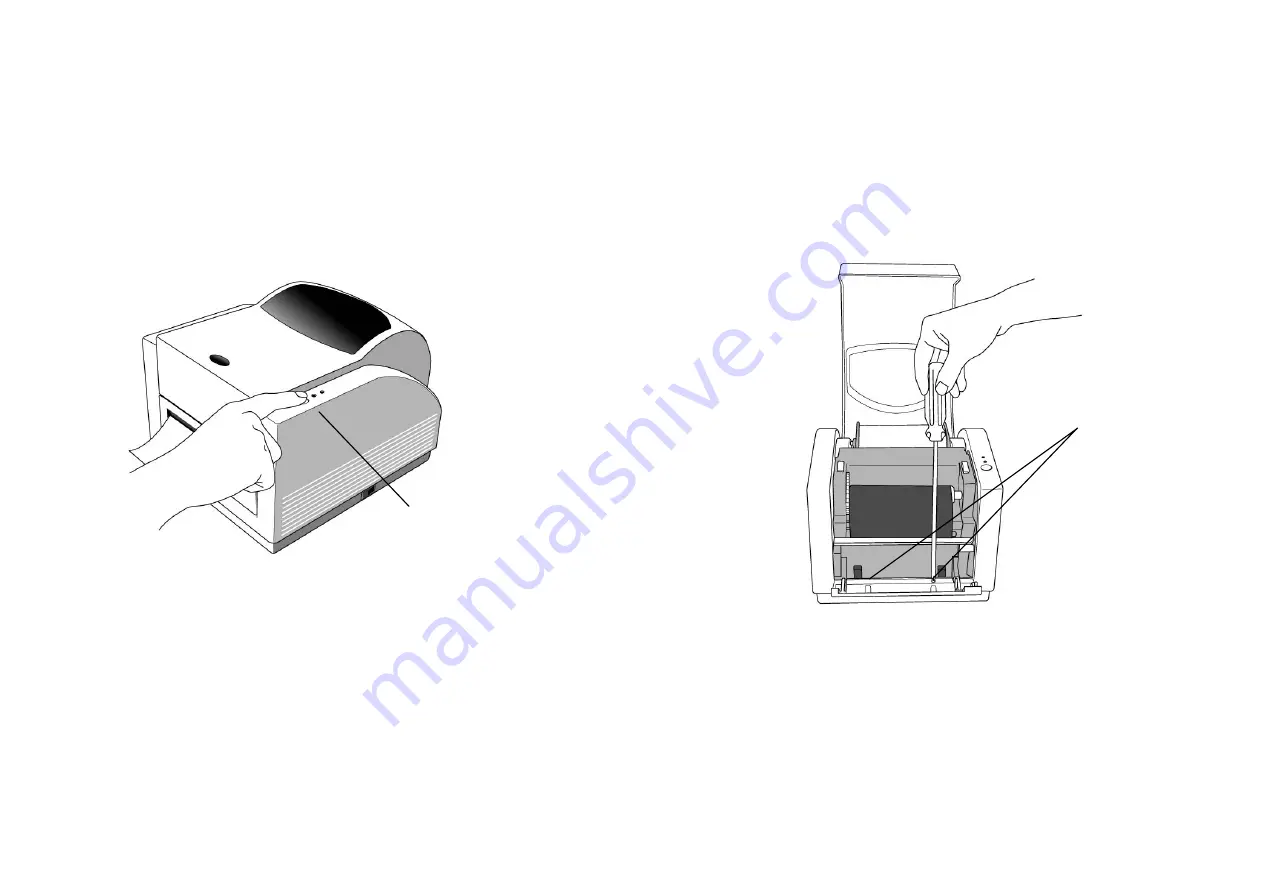
8. Close the top cover and turn on the printer or press the feed
button if the printer is already on.
Feed Button
16
Peel Off Mode
1. Loose two attached screws on the back of peeler cover. 2. Remove the peeler cover.
Screw
Страница 1: ... cover of the printer to see if the media compartments are in order If damages did occur immediately file the claim to the shipping company for settlement Having performed the primary inspections next step please check whether you have received the following accessories together with the printer If there is any item missing contact your local dealer to get it 2 Not available for A 50 Power Adapter...
Страница 2: ... the printer 2 Plug the other end of the cord into an appropriate AC electrical outlet 3 When plugging the connector into power jack please leave the power switch at O position and don t touch the 36 pin parallel connector Power Switch Barrel Connector Power Jack Power Adapter AC Electrical Outlet 36 Pin parallel connector 4 3 Parts and Features Top Cover Power Switch Power Indicator Ready Indicat...
Страница 3: ...bbon Pick up Holder Release Levers Media Hanger Ribbon Supply Holder Thermal Printhead 6 4 Loading the Ribbon Note This section is not applicable to the direct thermal printing 1 Lift the top cover to expose the media compartment ...
Страница 4: ...se the ribbon supply holder Media Compartment Release Lever Print Head Module 8 4 Unwrap the ribbon roll pack and separate the ribbon roll and the bare core 5 Attach the edge of the ribbon on the bare core and wind it a little bit onto the core 6 Insert the ribbon roll into the supply holder First snap in the left side and then the right side Ribbon Roll Bare Core ...
Страница 5: ... core into the pick up holder First snap in the left side then the right side 10 8 Turn the wheel of the print head module to ensure the ribbon is tightly wound 9 Press down the print head module on both sides firmly till you hear a snap Wheel Print Head Module ...
Страница 6: ... is printed After the former label is removed the next one will be printed In cutter mode the printer automatically cuts the label after it is printed Standard Mode 1 Lift the top cover to expose the media compartment 12 2 Remove the media hanger 3 Load the media roll onto the hanger 4 Unlatch the print head module 5 Left the peeler cover easy for label easy into the slot Media Compartment Media H...
Страница 7: ...the media guides with the other hand The media guide can be adjusted centrality to well fit with different label width Media Guides 14 7 Press down the print head module firmly on both sides till you hear a snap Print Head Module ...
Страница 8: ...e the top cover and turn on the printer or press the feed button if the printer is already on Feed Button 16 Peel Off Mode 1 Loose two attached screws on the back of peeler cover 2 Remove the peeler cover Screw ...
Страница 9: ...ser connecter 4 Mount the dispenser module Dispenser Connecter Dispenser Module 18 5 Secure two attached screws on the back of peeler cover 6 Lead the label through the media guides and dispenser Media Guides Dispenser Screw ...
Страница 10: ... the feed button if the printer is already on Feed Button 20 9 Press the feed button and the label backing paper will come out from the slot under dispenser Note The feed button will not drive the printer to peel The peeling function can be executed only when the software setting is ready Label Backing Paper Feed Button ...
Страница 11: ...tter baby board in JP29 on the main board 2 Loose two attached screws on the back of peeler cover 3 Remove the peeler cover Peeler Cover Screw 22 4 Loose the screw on the printer module 5 Remove the dispenser bar Screw Dispenser Bar ...
Страница 12: ...re the screw of cutter module Cutter Connecter Cutter Module Screw 24 Media Guides 8 Lead the label through the media guides and the slot of cutter 9 Press down the print head module firmly on both sides till you hear a snap Print Head Module ...
Страница 13: ...r should be turned off before connect or disconnect the communication cables and power cables Feed Button Advance the label media to first printing position 1 Press to advance a label 2 Press to take the printer out of a pause condition 3 Keep pressing while turning on the power to print out a configuration profile Ready Indicator Show the printers status 1 Green printer is ready to operate 2 Blin...
Страница 14: ...n while turning on the power until the printing motor becomes activated 2 The calibration has been performed while the printer automatically feed label stock for certain length Note This step is very important and must always be carried out whenever media is changed Fail to do so will result in miss detection of the label sensor ...
Страница 15: ...At PPLB emulation the printer will enter character dump mode To exit from dump mode just re start the printer again 30 9 Returning to Factory Default Settings 1 Turn on the printer and wait for 5 or more seconds 2 Press the feed button for about 10 seconds then the ready indicator and the power indicator will go off in order 3 While two indicators become lit again release the feed button 4 At this...
Страница 16: ...ith FCC Rules and Regulations Part 15 for Class A Equipment using fully shielded six foot data cables Use of longer cables or unshielded cables may increase radiated emissions above the Class A limits Serial RS 232 Interface Requirements The required cable must have a nine pin D type male connector on one end which is plugged into the mating serial port located on the back of the printer The other...
Страница 17: ...short as possible 6ft 1 83m recommended Do not tightly bundle the data cables with power cords Do not tie the data cables to power wire conduits Notes 1 Using Centronics allows for a much higher speed communication than the use of a serial 2 It is not necessary to set the switch or send any command to select the parallel or serial port The printer can automatically detect it 3 The default settings...
Страница 18: ...Windows 98 only Install USB driver Properties menu Right click to get pop up menu Notes Uninstall printer driver before installing USB driver Select Driver Click Update Driver 36 Click Next Select Specify a location Click Next ...
Страница 19: ...rial port select COM1 or COM2 for USB port select USB001 USB002 9 After the related files have been copied to your system the installation is complete 10 If you need to print from the label printer set Label Dr 200 or Label Dr 300 as the Default Printer 38 Notes 1 If you are just updating your driver make sure to delete the previous version first 2 Uninstall printer driver before installing USB dr...
Страница 20: ... mode and D T for direct thermal mode without ribbon Media choice Darkness Set the heat value or darkness from this field The darkness value ranges from 0 to 15 Copies This function designates the number of printed copies of each page More option Accessory setting To use the cutter and peeler function you still need to enter More Options and select one of the items Device options Speed Set the pri...
Страница 21: ...per Click more option Select Enable without cutter peeler Click OK Print quality Speed Properties menu Click Device Options Select parameters Click OK 42 Create a new size Properties menu Click Paper Select Custom User Define size Set up a new size Click OK ...
Страница 22: ...u Select Printing Reference Click Paper Quality select media type Click OK 44 Orientation Printing Reference menu Click Layout Select Portrait or Landscape Click OK Paper size Copies Media choice Accessory setting Paper Output Speed Print quality Darkness Printing Reference menu Click Layout Click Advanced button Click each item to select the parameters Click OK ...
Страница 23: ... for Reset the paper size in the specific squares of the Measurements Click OK 46 For NT 4 0 Ports Properties menu Label Dr Click Ports Select the IO port Click OK Paper size Orientation Paper source Media type Copies Media choice Accessory setting Printer s menu Right click to get pop up menu Select Document Defaults Click Advanced button Click each item to ...
Страница 24: ...red parameter Click OK Create a new size Please refer to the procedure of create a new size on Win 2000 48 For Win XP Ports Properties menu Click Ports Select the IO port Click OK Paper source Media type Back to Printers menu Label Dr Right click to get pop up menu Select Printing Reference Click Paper Quality Select media type Click OK ...
Страница 25: ...rint quality Darkness Printing Reference menu Click Layout Click Advanced button Click each item to select the parameters Click OK 50 Create a new size Printer menu Right click to get pop up menu in blank space Select Server Properties Enter a form name for the new form in Form name Reset the paper size in the specific squares of the Form description Click OK ...
Страница 26: ...el stock out Supply the label roll out Label stock not installed Install the label roll Label jam Recover the jam 52 B Power and Ready LEDs blink alternately Power LED Ready LED ON OFF OFF ON Possible Problems Solutions Remarks Ribbon out Supply the ribbon roll Ribbon jam Recover the jam Ribbon sensor error Replace the ribbon sensor Not applicable to direct thermal type C Only the Power LED blinks...
Страница 27: ...ive printer driver if Label Dr for your Windows system and the label printer has been selected Vertical streaks in the printout usually indicate a dirty or faulty print head Refer to the following example Clean the print head first if they still persist replace the print head 54 Poor printout quality The ribbon may not be qualified The media may not be qualified Adjust the Darkness heat temperatur...
Страница 28: ...e printing quality Clean the print head with methanol or isopropyl alcohol with a cotton bud Do not touch the heater element with your fingers Debris or dirt on the roller should be cleaned with alcohol Paper Sensor Debris or dirt on the paper sensor will cause a miss read or unstable detection of the label gap Clean with a cotton bud dampened with alcohol 56 Replacing Thermal Print Head 1 Switch ...
Страница 29: ... 3 ips 51 75mm s 2 4 ips 51 102 mm s Printing length 1 8 25mm 203mm 1 45 25mm 1143mm Printing width Max 4 1 104 mm Memory 512KB DRAM 512KB Flash ROM 2MB DRAM 2MB Flash ROM CPU type 16 bit CISC microprocessor 32 bit RISC microprocessor Media sensor Reflective Reflective See through Display LED indicators x 2 Operation interface Button x 1 Communication interface Centronics RS 232 serial Centronics ...
Страница 30: ...lock card ArgoNet print server ArgoKee 2MB Asian Font card Traditional Chinese Simplified Chinese Korean and Japanese 60 Fonts Bar Codes and Graphics Specification The specifications of fonts bar codes and graphics depend on the printer emulation The emulation PPLB is a printer programming language through which the host can communicate with your printer Printer Programming Language B PPLB Specifi...
Страница 31: ...ey cannot function at the same time 62 Interface Specifications USB Interface Requirement Pin Signal Name 1 VBUS 2 D 3 D 4 GND Serial The RS232 connector on the printer side is a female DB 9 Pin Direction Definition 1 In DSR 2 In RxData 3 Out TxData 5 Ground 6 Out DTR 7 Out RTS 8 In CTS 9 Out 5V Note Pin 9 are reserved for KDU keyboard device unit therefore do not connect these pins if you are usi...
Страница 32: ...pin 7 pin 20 pin 8 The most simple way to connect to other hosts not PC compatible or terminals is Printer Terminal Host Pin 2 RxData TxData 64 Pin 3 TxData RxData Pin 5 Ground Ground In general as long as the data quantity is not too large and you use Xon Xoff as flow control it will be problem free Baud rate 2400 4800 9600 19200 and 38400 programmable by command Data format always 8 data bits 1 ...
Страница 33: ... Out BUSY 12 Out PE Auto Polling Both the serial port and parallel port of this printer can be activated at the same time i e the printer can simultaneously communicate with two PC via different port However as no port contention is made for this printer if both PC transmit data at the same time to this printer the data may become damaged in the receiving buffer 66 ASCII TABLE NUL 0 P P SON XON 1 ...