Finished
front edge
1
Finished
front edge
1
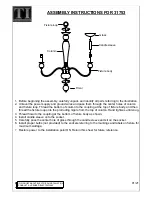
Assembly Instructions
6
Step
8
Prepare the left side
a:
Place a runner on
the left side . Slide
back the top of the
runner and use the 2nd
hole from the front to fit
the 1st screw .
Screw 6 metal dowels
into the left side .
b:
Slide the runner
back the other way and
fit the 2nd screw into
the corresponding hole
in the left side .
K
1
Finished
front edge
H
K
H
a:
a:
b:
b:
B
1
K
H
1
Finished front edge
H
K
Step
9
Prepare the right side
a:
Place a runner on
the right side . Slide
back the top of the
runner and use the 2nd
hole from the front to fit
the 1st screw .
Screw 6 metal dowels
into the right side .
b:
Slide the runner
back the other way and
fit the 2nd screw into
the corresponding hole
in the right side .
K
2
H
B
2
K
H
2
H
K
B
B
B
B
B
B
H
Finished
front edge
Finished
front edge
H
K
B
B
B
B
B
B
H
2
2