Argos CDT16120 Скачать руководство пользователя страница 8

HELPLINE NO 08707252949

8

RECHARGING BATTERIES


NOTE:

 Before using the tool, read 

the instruction book carefully.

1. BEFORE USING YOUR CORDLESS 

DRILL

Your battery pack is UNCHARGED and 

you must charge once before use. Your 

battery pack will not be fully charged 

until you have performed several charge 

and discharge operations by charging 

& working with your drill. After this your 

battery pack performance will improve.


WARNING: 

The charger and 

battery pack are specifically 

designed to work together so do not 

attempt to use any other devices. Never 

insert or allow metallic objects into your 

charger or battery pack connections 

because an electrical failure and hazard 

will occur.

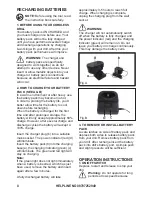
2. HOW TO CHARGE YOUR BATTERY 

PACK (SEE A & B)

In a warm environment or after heavy use, 

the battery pack may become too hot, 

in order to prolong the battery life, you’d 

better allow time for the battery to cool 

down before recharging.

When the battery is charged for the first 

time and after prolonged storage, the 

battery will only accept approximately 60% 

charge. However, after several charge and 

discharge cycles the battery will accept a 

100% charge.

Insert the charger plug (b) into a suitable 

mains socket. The power indicator (red) (d) 

will illuminate.

Insert the battery pack(8) into the charging 

base(a), the charging indicator (green) (c) 

will illuminate. The green and red light will 

stay on charging.

Note:

If the green light does not light immediately 

when a battery is inserted, which has just 

been used, remove the battery and insert 

again after a few minutes.

A fully discharged battery will take 

approximately 3-5 hours to reach full 

charge. When charging is complete, 

unplug the charging plug from the wall 

socket.

 WARNING:

The charger will not automatically switch 

off when the battery is fully charged, and 

the power indicator (red) and the charging 

indicator (green) will remain on. Do not 

leave your battery on charge continuously. 

This may damage the battery cells.

Fig.A

Fig.B

3. TO REMOVE OR INSTALL BATTERY 

PACK

Locate latches on side of battery pack and 

depress both sides to release battery pack 

from your drill. Remove battery pack from 

your drill. After recharge insert the battery 

pack into drill’s battery port. A simple push 

and slight pressure will be sufficient.


OPERATION INSTRUCTIONS
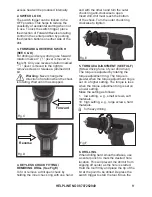
1. ON/OFF SWITCH

Depress to start and release to stop your 

drill.


Warning:

 Do not operate for long 

periods at low speed because 

Содержание CDT16120

Страница 1: ...12V Cordless Drill Driver instruction manual CDT16120 ...

Страница 2: ...cords increase the risk of electric shock e When operating a power tool outdoors use an extension cord suitable for outdoor use Use of a cord suitable for outdoor use reduces the risk of electric shock f If operating a power tool in a damp location is unavoidable use a residual current device RCD protected supply Use of an RCD reduces the risk of electric shock 3 Personal safety a Stay alert watch...

Страница 3: ...ctions taking into account the working conditions and the work to be performed Use of the power tool for operations different from those intended could result in a hazardous situation 5 Battery tool use and care a Recharge only with the charger specified by the manufacturer A charger that is suitable for one type of battery pack may create a risk of fire when used with another battery pack b Use p...

Страница 4: ...contact hidden wiring Contact with a live wire will also make exposed metal parts of the tool live and shock the operator WARNING If a small amount of electrolyte should leak from the battery pack under extremes of temperature or after heavy use then wash off immediately from your skin and hands using clean water For eye contact rinse thoroughly with clean water and seek medical treatment immediat...

Страница 5: ...ONENT LIST 1 On Off switch 2 Forward Reverse rotating control 3 Keyless chuck 4 Torque adjustment ring 5 Handle 6 Double ended bits 7 Battery pack unlocking button 8 Battery pack ACCESSORIES 1pc 3 5hrs charger 2pcs double ended bits ...

Страница 6: ...ations on how the tool is used How the tool is used and the materials being cut or drilled The tool being in good condition and well maintained The use the correct accessory for the tool and ensuring it is sharp and in good condition The tightness of the grip on the handles and if any anti vibration accessories are used And the tool is being used as intended by its design and these instructions Th...

Страница 7: ... appropriate If the tool is to be used regularly then invest in anti vibration accessories Avoid using tools in temperatures of 100 C or less Plan your work schedule to spread any high vibration tool use across a number of days ...

Страница 8: ...ttery will accept a 100 charge Insert the charger plug b into a suitable mains socket The power indicator red d will illuminate Insert the battery pack 8 into the charging base a the charging indicator green c will illuminate The green and red light will stay on charging Note If the green light does not light immediately when a battery is inserted which has just been used remove the battery and in...

Страница 9: ...ve a drill open chuck by holding the inner chuck ring with one hand and with the other hand turn the outer chuck ring anti clockwise to open Insert drill drill must reach the bottom of the chuck Turn the outer chuck ring clockwise to tighten Fig E 5 TORQUE ADJUSTMENT SEE FIG F Screw driving force of your drill driver The torque is adjusted by rotating the torque adjustment ring The torque is great...

Страница 10: ...E DRILL STOPS BEFORE THE SCREW IS COMPLETELY TIGHTENED WHY Verify the torque position of the variable clutch you can find the variable clutch between the chuck and the drill body Position 1 is the lowest torque screw driving force and position 16 is the highest torque screw driving force Position is for drill operation Regulate the variable clutch to a higher position to reach the best result 3 I ...

Страница 11: ...t manufacturing defects for a period of 12 months This does not cover the product where the fault is due to misuse abuse use in contravention of the instructions or where the product has been the subject of unauthorised modifications or alterations or has been the subject of commercial use In the event of a problem with the product within the guarantee period please return it to your nearest Argos...

Страница 12: ......

Отзывы: