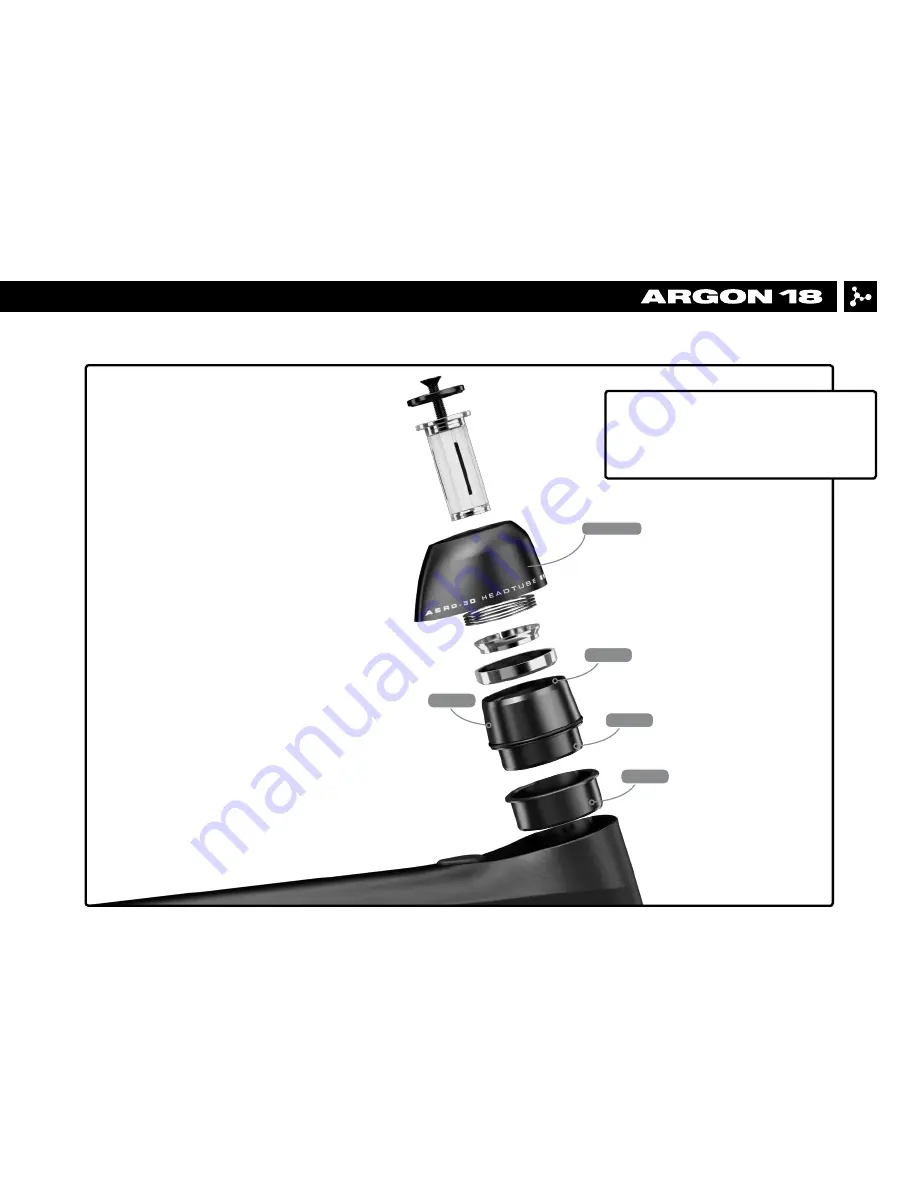
Install the 3D headset (16.3 & 16.4)
according to the AERO Pressfit assembly
guide. You can choose from 3 different
heights: 25mm, 15mm or 0mm.
7
NITROGEN DISC 286A: 4.1. Headset Installation
16.3 & 16.4
GREASE
Страница 1: ...NITROGEN DISC 286A ASSEMBLY GUIDE Valid for MY2019 Nitrogen Disc 286A Revision 1 0 07 26 2018...
Страница 2: ...tion 14 16 4 7 Electronic Di2 groupset specification 17 21 4 8 Electronic Wireless groupset specification 22 For the warranty to be valid the bicycle must be fully assembled by an authorized Argon 18...
Страница 3: ...Gauge Park Tool Item DAG 2 or DAG 2 2 7 Cables and Housing Cutter 8 Carbon Paste 9 Loctite 242 10 Torque Wrench First Aid Kit Essential parts to always have on hand IN CASE OF EMERGENCY THIS MIGHT SA...
Страница 4: ...eed to adjust these parts according to their torque specifications NITROGEN DISC 286A 2 Frame Inspection 4 BEFORE ASSEMBLING YOUR NEW NITROGEN DISC MAKE SURE THAT YOU HAVE ALL THE FOLLOWING 1 Frameset...
Страница 5: ...T_D 286A 38881 38879 39009 80375 80478 80374 80477 running change Images are for reference only Proportions are not accurate Argon 18 reserves the right to modify change parts of the frameset at any m...
Страница 6: ...39009 1 Set 20 Internal Di2 Battery Support Seat Post 38757 1 Set 21 8mm Wrench for Seat Clamp 38543 1 22 HT Rear Brake Grommet Di2 Frame 81000 1 23 HT Rear Brake Grommet Frame 80999 1 24 Direct Mount...
Страница 7: ...e 3D headset 16 3 16 4 according to the AERO Pressfit assembly guide You can choose from 3 different heights 25mm 15mm or 0mm 7 NITROGEN DISC 286A 4 1 Headset Installation 16 3 16 4 GREASE GREASE GREA...
Страница 8: ...lightly grease the bottom section of the 3D bearing holder 6 and insert the plastic sleeve 7 3 STEP Position the headset inside the head tube Place the top 3D assembly with the headset bearing inside...
Страница 9: ...sion ring Bearing 3D bearing holder Plastic sleeve no need for 0mm setup Top cap for 0mm setup 1 2 3 4 4 5 5 6 6 7 7 8 Press Fit 3D system tool 1 1 4 Bearing Cup Press Park Tool HHP 2 IMPORTANT Use th...
Страница 10: ...y gel has been applied 3 Position the seatpost to the desired height 4 Apply a drop of blue Threadlocker n 242 on the bolt s thread 5 Tighten the set screw at max 5 5Nm while leaving a space between t...
Страница 11: ...10 3 9 3 6 3 5 1 Install the saddle on the rocker 3 4 and tighten the rail clamp 3 3 up to 6Nm with M5 screw 3 10 2 Adjust the angle and the offset of the saddle by hand tightening the thumb screw 3...
Страница 12: ...The front derailleur hanger 6 can be adjusted according to the front derailleur angle to get an equal curve between the derailleur and the big chain ring Once at the right angle use blue 242 Loctite a...
Страница 13: ...ending on the type of derailleur that you have Direct mount 15 Regular mount 1 2 Make sure to align the rear derailleur hanger 3 Use Derailleur Hanger Alignment Gauge like Park Tool Item DAG 2 For any...
Страница 14: ...6A 4 6 Mechanical groupset specification The rear derailleur cable and rear brake housing must be routed inside the frame passing over the BB sleeve axle Red line brake cable housing Yellow line derai...
Страница 15: ...ical groupset specification Rear brake Pass the brake hose through the holes on the chain stay CS and headtube HT Secure the brake hose with the Oblong Cable Guide 28 on the CS and the HT Rear Brake B...
Страница 16: ...he cable guide 9 under the bottom bracket Pass the cable housing inside the downtube until it comes out the top tube Add a plastic cap at the end of the housing pass the rear derailleur cable inside t...
Страница 17: ...specification 17 Option 2 Di2 cable routing can be done through the top tube hole Option 1 Di2 cable routing can be done through the head tube hole along with the rear brake housing Red line brake cab...
Страница 18: ...groupset specification The Di2 cable routing can be achieved easily using this simple trick use a gear cable and a metal cable end to fix the Di2 cable For more information on Shimano Di2 electronic...
Страница 19: ...2 to secure both the Di2 cable and the rear brake hose to the HT Use the TT Di2 Plug 27 to plug the top tube hole For Di2 cable routing Option 2 Use the TT grommet Di2 31 to secure the Di2 cable in th...
Страница 20: ...20 When using an electronic drive train use the grommet 13 to fix the front derailleur cable 13 NITROGEN DISC 286A 4 7 Electronic Di2 groupset specification...
Страница 21: ...en in the seatpost use the Di2 battery holder 2o to fix the battery correctly Apply a slight amount of grease on both parts 20 GREASE CARBON FIBER ASSEMBLY COMPOSITE NITROGEN DISC 286A 4 7 Electronic...
Страница 22: ...EN DISC 286A 4 8 Electronic Wireless groupset specification 22 In the wireless groupset configuration use the TT Di2 Plug 27 to plug the top tube hole and the Round Plug 30 to plug the chain stay hole...