V 11/21
36
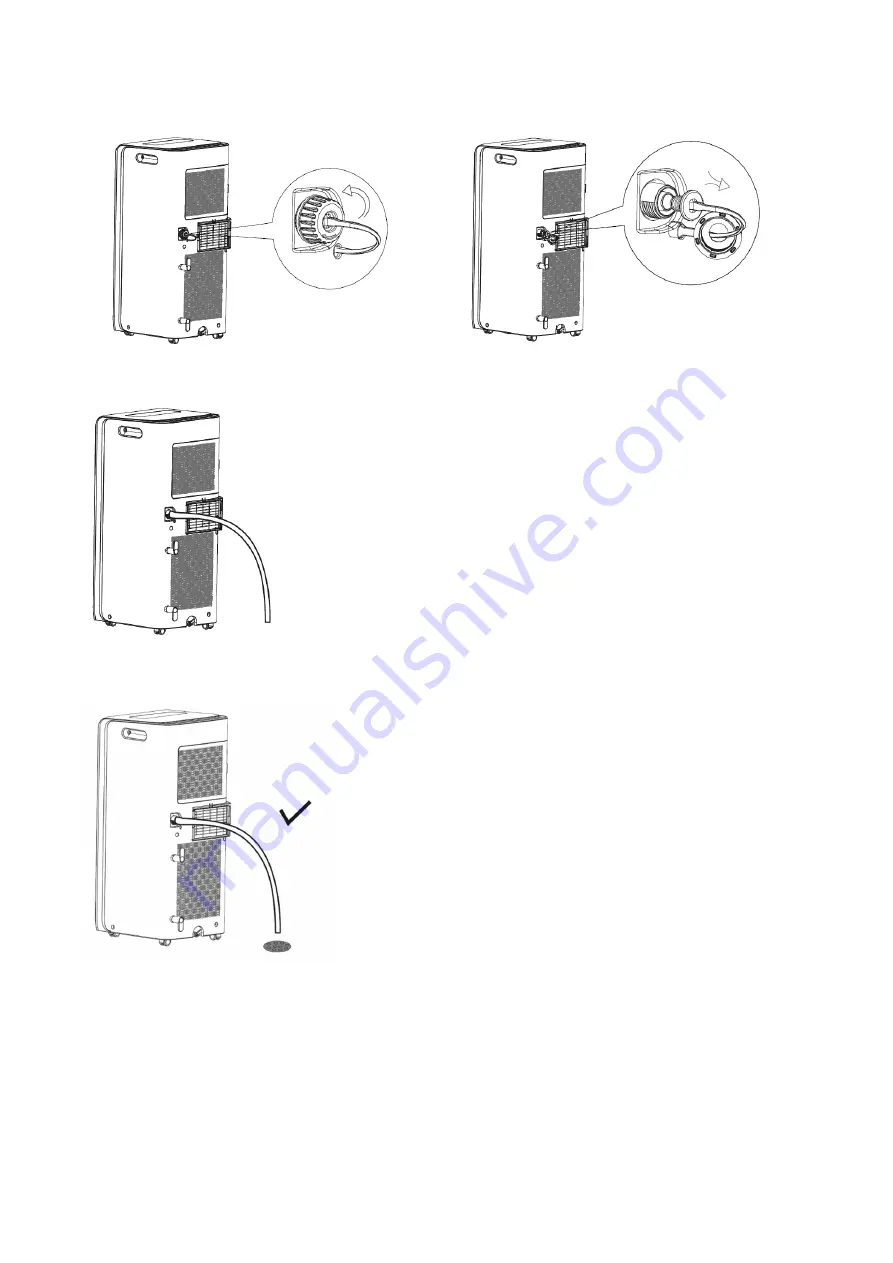
1. Remove the continuous drain cap by turning it 2. Remove the rubber plug counter clockwise
3. Insert the drainage hose into drain connector
Avoid bends in the drainage tube.
Страница 1: ...S Read the instructions carefully before operating the appliance or carrying out maintenance work Observe all the safety instructions failure to observe the instructions may lead to accidents and or damage Store these instructions in a safe place for future reference EN ...
Страница 2: ...n different ways other than those recommended by the manufacturer Should repair be necessary contact your nearest authorized Service Centre Any repairs carried out by unqualified personnel may be dangerous The appliance has to be stored in a room that doesn t have any continuously operating ignition sources for example open flames an operating gas appliance or an operating electric heater Do not p...
Страница 3: ...ot be made by children without supervision Ensure that the electricity system is able to deliver the operating current required by the air conditioner in addition to that normally absorbed by other appliances household appliances lighting system etc Please refer to the maximum power input data indicated on the air conditioner s data plate Connection to the electricity grid must take place in accor...
Страница 4: ... similar qualifications in order to prevent any risk The appliance must be installed in accordance with national wiring regulations If the power supply cord is damaged it must be replaced by the manufacturer dealer or a similarly qualified person so as to avoid any safety risks Keep the unit away from fire possible fire sources inflammable or explosive objects Do not leave the unit unattended whil...
Страница 5: ...and unplug it from the socket Do not dismantle or attempt to repair or modify the product In the event of a malfunction contact the service centre directly WARNING Do not expose the air conditioner to direct sunlight as the colour of the materials may change moreover the appliance may overheat causing the protection mechanism to intervene and switch the appliance off Do not use insecticides oils d...
Страница 6: ...OL 2 HORIZONTAL FINS 3 WHEELS 4 AIR FILTER 5 AIR EXPULSION HOSE END FITTING 6 AIR EXPULSION HOSE 7 REAR CLIP 8 POWER CORD 9 CORD HOOK 10 REMOTE CONTROL Min max operating limits internal temperature Cooling 16 C DB 35 C DB Dehumidification 16 C DB 35 C DB Cooling mode room temperature adjustment range 16 C DB 30 C DB 10 ...
Страница 7: ...iciency of the portable air conditioner APPLIANCE START UP Open the packaging and remove the box from above Remove the product and the other elements supplied illustrated in the box below LCD remote control Type AAA batteries for the remote control Round fitting for window 1 to be positioned between the end of the tube and the end fitting for the window in the packing it s the same fitting install...
Страница 8: ...ap C Position the product vertically on a flat and stable surface as close as possible to a window and at least 50 cm from walls or other nearby obstacles INSTALLATION OF CORD WINDER HOOKS Install the cord winder hooks to the back of the unit using the screws as shown in the figure The hooks must be positioned facing upwards and downwards When the appliance is not being used wind the power cord ar...
Страница 9: ...ndow 2 previously obtained by joining parts A and B Open the windows and lock one of the two leaves with the handle Place the end fitting against the fixed leaf of the window and draw the other leaf towards it USE WITH WINDOW UNIT KIT 1 To make the hole in the glass it is advisable to take the porthole kit accessory to the glazier 2 Insert the window unit into the window 3 Insert the round fitting...
Страница 10: ...m above the ground Avoid tight curves or bends in the flexible hose 8 If the air conditioner is not used for prolonged periods disconnect the pipe and plug the window unit Connect the power cord to a suitable electric socket 220 240V Insert the supplied batteries into the remote control and make sure the poles match Select the desired operating mode from the remote control OK NO ...
Страница 11: ...In this mode the fan speed can be adjusted and the fan speed Timer and SLEEP functions can be set For more silent operation run the fan at low speed 2 DEHUMIDIFICATION MODE DRY Press the MODE button to select Dry The temperature is controlled by the PCB and cannot be regulated In this mode whenever the ON OFF button is pressed the unit switches off the appliance saves the settings and when switche...
Страница 12: ...t into the appropriate hole and drain the water into a basin After you have finished replace the cap Turn on the appliance Dehumidification WARNING When using the air conditioner in dehumidification mode we recommend always ensuring continuous drainage in order to maximise dehumidification efficiency Use the drainage outlet on the appliance The water can be drained into a drain by simply connectin...
Страница 13: ...V 11 21 36 1 Remove the continuous drain cap by turning it 2 Remove the rubber plug counter clockwise 3 Insert the drainage hose into drain connector Avoid bends in the drainage tube ...
Страница 14: ...ing and the battery must be replaced 12 Battery waste must be disposed of properly Note The image is a general remote control it contains almost all the function keys They may be slightly different for the material depends on the model INFORMATION FOR CORRECT DISPOSAL OF THE BATTERIES PURSUANT TO EUROPEAN DIRECTIVE 2006 66 EC and amendments Directive 56 2013 EC Replace the batteries when depleted ...
Страница 15: ...g I X FAN function L Signal transmission N T OFF off timer M T ON on timer X A B C N M L I H G F D E Signal receiver Display FOR OPTIMUM OPERATION OF THE REMOTE CONTROL ADDRESS THE TRANSMITTER HEAD TOWARDS THE RECEIVER LOCATED ON THE AIR CONDITIONER To operate the remote control press the ON OFF button on the handset The icon on the remote control display will flash once and you will hear a sound ...
Страница 16: ...mode and is fixed at low ADJUSTMENT BUTTONS on remote control and on the unit These buttons can be used to adjust the temperature and set the Timer The temperature can be adjusted to between 16 C and 30 C Increase temperature 1 Allows for adjusting the desired temperature in cooling COOL mode 2 Whenever the button is pressed the set temperature increases by 1 C Decrease temperature 1 Allows for ad...
Страница 17: ...he T OFF icon remains on and indicates that the shutdown TIMER is on Canceling the timer If TIMER is set press TIMER to view the set timer Press TIMER again to cancel the set TIMER To speed up the time selection interval hold down the or buttons for two seconds X FAN BUTTON only on remote control In cooling and dehumidification mode it is possible to activate the X FAN function After pressing the ...
Страница 18: ...oner 2 Cleaning the casing Use a soft damp cloth to clean the outer surface of the air conditioner Do not use excessively hot water solvents petrol or other aggressive chemical compounds talcum powder and brushes they may damage the surface or colour of the casing Remove any stains using warm water with a little neutral detergent Do not pour water onto the air conditioner to clean it this may dama...
Страница 19: ...re INFORMATION FOR THE CORRECT DISPOSAL OF THE PRODUCT IN ACCORDANCE WITH EUROPEAN DIRECTIVE 2012 19 EU This appliance may not be scrapped with domestic waste at the end of its life cycle We call your attention to the crucial role played by the consumer in the re use recycling and other forms of recovery of such waste The appliance must be scrapped by a sorted waste disposal centre or by returning...
Страница 20: ...e of potentially toxic or flammable atmospheres Ensure that the leak detection equipment being used is suitable for use with all applicable refrigerants i e non sparking adequately sealed or intrinsically safe Presence of fire extinguisher lf any hot work is to be conducted on the refrigeration equipment or any associated parts appropriate fire extinguishing equipment shall be available to hand Ha...
Страница 21: ...e to originai specification damage to seals incorrect fitting of glands etc Ensure that the apparatus is mounted securely Ensure that seals or sealing materials have not degraded to the point that they no longer serve the purpose of preventing the ingress of flammable atmospheres Replacement parts shall be in accordance with the manufacturer s specifications NOTE The use of silicon sealant can inh...
Страница 22: ...ures the following requirements shall be followed Ensure that contamination of different refrigerants does not occur when using charging equipment Hoses or lines shall be as short as possible to minimise the amount of refrigerant contained in them Cylinders shall be kept upright Ensure that the refrigeration system is earthed prior to charging the system with refrigerant Label the system when char...
Страница 23: ...very equipment shall be in good working order with a set of instructions concerning the equipment that is at hand and shall be suitable for the recovery of all appropriate refrigerants including when applicable flammable refrigerants In addition a set of calibrated weighing scales shall be available and in good working order Hoses shall be complete with leak free disconnect couplings and in good c...