V 11/21
83
4. Add EWPE app account
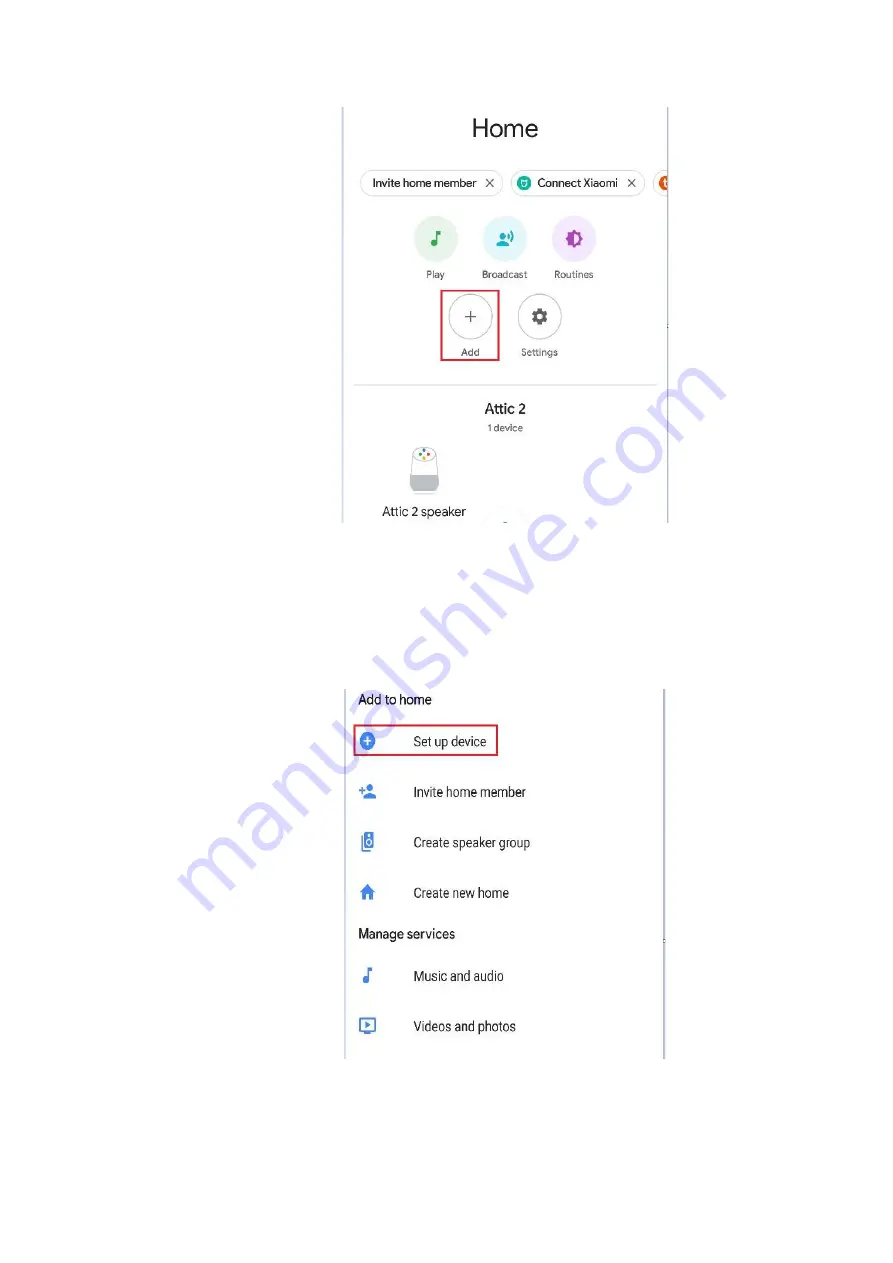
In Google Home App homepage, click “+” button.
Click “Set up device”.
Страница 1: ...reference V 11 21 USER and INSTALLATION MANUAL ECOLIGHT PLUS SINGLE SPLIT AIR CONDITIONERS R32 INDOOR UNIT OUTDOOR UNIT ECOLIGHT PLUS 9000 UI ECOLIGHT PLUS 9000 UE ECOLIGHT PLUS 12000 UI ECOLIGHT PLU...
Страница 2: ...Post installation checks 100 Testing and operation Functional testing 100 Appendices Piping configuration 101 Safety operation of flammable refrigerant 103 Procedure for extending the piping 104 Warni...
Страница 3: ...her than those recommended by the manufacturer Should repair be necessary contact your nearest authorized Argoclima Service Centre Any repairs carried out by unqualified personnel may be dangerous The...
Страница 4: ...e or perform user maintenance To prevent the risk of fire do not connect the air conditioner to a multifunction socket Always disconnect the power before servicing or cleaning the unit To prevent the...
Страница 5: ...ssor vibrates strongly if the voltage is too low causing damage to the cooling system The electrical components are easily damaged if the voltage is too high Do not attempt to repair the air condition...
Страница 6: ...15 C to 43 C outdoor temperature Heating mode from 15 C to 24 C outdoor temperature Description of components Indoor unit The display may vary from the graphic above Please refer to the purchased prod...
Страница 7: ...e up down swing mode 5 I FEEL Set the I FEEL function 6 TEMP Switches the type of temperature display on the unit display 7 Set the Health function and the Scavenging function not available 8 LIGHT Se...
Страница 8: ...ing sequence AUTO COOL cooling DRY dehumidification FAN ventilation HEAT heating By selecting the Auto mode the air conditioner operates according to the factory settings Press the FAN button to adjus...
Страница 9: ...on of mold When the unit is switched on the X fan function is not set by default This function is not available in AUTO fan and heat modes If you want to stop the X fan function press and hold the FAN...
Страница 10: ...8 display When indoor or outdoor room temperature display is selected the indoor temperature indicator displays the corresponding temperature and automatically turns to display the set temperature aft...
Страница 11: ...the power saving function press the TEMP and CLOCK buttons and is not displayed In this mode the fan speed is fixed in Automatic mode and cannot be adjusted The temperature cannot be set If you press...
Страница 12: ...eption sensitivity 4 If the remote control sends the signal the icon blinks for 1 second When the main unit receives the valid remote control signal it emits a sound 5 If the wireless remote control d...
Страница 13: ...may vary depending on the operating system used or the update in use Refer to the current version 5 If the access protection on your Router is active in the MAC Filter MAC address filter item enable...
Страница 14: ...icon of the little man opens a menu that includes among other things the Help function Follow the instructions that appear on your device to add the unit or add a new unit press in the upper right cor...
Страница 15: ...of the unit Different unit reset systems can be chosen depending on the type of unit system and remote control with or without wifi key Follow step by step the operative instructions depending on the...
Страница 16: ...n the unit beeps it means that the reset has been successful NB The configuration must be done within 2 minutes If it does not happen within 2 minutes repeat the reset operation REMOTE CONTROL WITHOUT...
Страница 17: ...lect the desired network and continue the configuration After performing the electrical reset of the unit and entering the information perform a search for the unit Search appliance and continue the c...
Страница 18: ...nd access the operating interface of it 1 Select operating mode temperature and fan speed Mode Temperature for each mode just slide your finger on the indicated temperature 1 Ventilation speed for eac...
Страница 19: ...ick Function Func in the lower left corner of the interface to enter the advanced settings X FAN function Vertical flap swinging Horizontal flap swinging if available Sleep function Light on indoor un...
Страница 20: ...he arrow in the lower right corner of the icon to go to the next screen and set the swing level List of Preselections Clic Timer Then clic and make adjustments Other functions 1 Homepage menu the uppe...
Страница 21: ...the group name to hhh and set up the devices in the group list When this group is working you can change the settings of the whole group 3 Home Management Click Home Management to create or manage a f...
Страница 22: ...unit with the remote control and disconnect the air conditioner power for at least 10 seconds Reconnect the power supply After 1 minute press the WiFi and Mode buttons simultaneously If the air condit...
Страница 23: ...ditions Your mobile phone has installed the latest version of Google Home app or Google app for Android only Your mobile phone has installed the latest version of EWPE app 2 Complete device networking...
Страница 24: ...79 It will give out a sound to confirm that you have connected to the right device After hearing the sound click Yes to enter the next step Join in Help Improve Google Home and click Yes I m in or No...
Страница 25: ...21 80 Distinguish the room of Google Home from the other Google device areas click NEXT revise room name and click Continue Then select Wi Fi network and click NEXT to wait for device network connect...
Страница 26: ...V 11 21 81 Set Google Home and click More Click I AGREE...
Страница 27: ...choose if you agree the corresponding operation if it displays Google Home is ready choose Continue to the next step Here comes the language control guidance course after listening click Finish setup...
Страница 28: ...V 11 21 83 4 Add EWPE app account In Google Home App homepage click button Click Set up device...
Страница 29: ...t Works with Google Search Ewpe SmartHome Search Ewpe SmartHome on the list and click it choose the country where your Ewpe Smart App account is input EWPE App account and password and click Ewpe Smar...
Страница 30: ...ow you can use Google Home to control your intelligent device Take Air Conditioning as an example the supporting instruction includes Ok Google turn on off Air Conditioning AIR SPEED Ok Google set the...
Страница 31: ...lcum powder or brushes These may damage the colour or surface of the casing To remove stains use warm water with a little neutral detergent Do not pour water onto the air conditioner to clean it This...
Страница 32: ...t from the power supply before contacting your local Technical Service Centre Carry out the following checks before contacting your Technical Service Centre Fault Check Solution The indoor unit does n...
Страница 33: ...temperature fall outside the available temperature range The available temperature range is 16 30 C The desired level of heating cooling cannot be achieved Is the voltage too low Wait for the voltage...
Страница 34: ...ntact a qualified technician for assistance H3 It can be eliminated switching off the unit and switching it back on If this doesn t work contact a qualified technician to assist H6 It can be eliminate...
Страница 35: ...V 11 21 90 INSTALLATION INSTRUCTIONS Installation diagrams...
Страница 36: ...uirements Indoor unit Do not install the unit in the following locations Otherwise a fault may occur 1 Locations with extreme heat sources or flammable or explosive gases or vapours 2 Locations with h...
Страница 37: ...the unit is always properly earthed Otherwise electric shock may result 2 The green yellow wire of the air conditioner is the earthing wire and may not be used for other purposes 3 The earth resistan...
Страница 38: ...sures when drilling the hole and do not allow dust to enter The plastic wall plugs are not supplied but must be purchased on site Step four outlet pipe The pipe can be brought out in various different...
Страница 39: ...n insulating tube to the indoor drain pipe to prevent condensation The plastic wall plugs are not supplied Step seven connect the indoor unit electrical cable 1 Open the panel Remove the screw that se...
Страница 40: ...accessible upon completion of installation For air conditioners without a plug install a circuit breaker on the line The circuit breaker must be single pole and the contact gap must be greater than 3m...
Страница 41: ...r unit support in the chosen position N B Take the appropriate safety measures when installing the outdoor unit Make sure that the bracket can support at least four times the weight of the unit The ou...
Страница 42: ...the pipe joint in the bellmouth of the pipe 4 Tighten the union nut with the wrench according to the following table Hex nut diameter Tightening torque Nm 6 35 15 20 9 52 30 40 12 7 45 55 15 88 60 65...
Страница 43: ...cure Never cut the power cable to extend or reduce the distance Step six tidy up the pipes 1 The pipes should be routed along the wall bent only as much as is necessary and if possible hidden from vie...
Страница 44: ...refrigerant charge bore of the gas valve Then connect the other charge pipe to the vacuum pump Open the piezometer completely and let it run for 10 15 minutes to check if the pressure of the piezomet...
Страница 45: ...the piping and electrical wiring been installed correctly Risk of malfunction or damage to components Has the unit been properly earthed Risk of electric leakage Does the power cable meet requirements...
Страница 46: ...nt charge per metre Connecting pipe diameter Additional refrigerant Liquid pipe mm Gas pipe mm g m 6 35 9 52 16 9 12 18K 6 35 12 7 16 24K Safety operation of flammable refrigerant Qualification requir...
Страница 47: ...there aren t any free flames near the outlet of the vacuum pump and that it s well ventilated Filling the refrigerator circuit Use refrigerant filling appliances specialized for R32 Make sure that di...
Страница 48: ...th a file ensuring they do not go into the pipe 3 Secure an insulating tube 4 Install a union nut Remove the union nut on the indoor connecting pipe and outdoor valve Install the union nut on the pipe...
Страница 49: ...until it is satisfactorily resolved If the fault cannot be remedied immediately but operation must continue a suitable interim solution must be used This must be reported to the owner of the equipment...
Страница 50: ...to gaskets incorrect assembly of cable glands etc Make sure the appliance is mounted securely Ensure that gaskets or sealing materials are not degraded to the point that they no longer serve the purp...
Страница 51: ...e sure the correct number of cylinders are available to maintain full system charge All cylinders to be used are designated for the recovered refrigerant and labeled for that refrigerant i e special c...
Страница 52: ...This process must be repeated until there is no more refrigerant in the system When the final OFN charge is used the system must be vented to atmospheric pressure to allow the work to be carried out T...
Страница 53: ...th global warming potential GWP 675 Do not release R32 into the atmosphere ECOLIGHT PLUS 9000 UE Kg 0 5 0 337 Tonn CO2 equiv ECOLIGHT PLUS 12000 UE Kg 0 55 0 371 Tonn CO2 equiv ECOLIGHT PLUS 18000 UE...