


Arecont Vision HSG2 Installation Manual
7 | P a g e
HSG2 Corner Mount Adapter (MD-CRMA) Installation Instructions
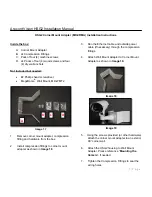
Inside the box:
A. Corner
Mount
Adapter
B. 2x Compression Fittings
C. Pack of four (4) machine screws
D. 2x Packs of four (4) wood screws and four
(4) dry wall anchors
Not included but needed:
#2 Phillips head screwdriver
MegaDome
®
Wall Mount, MD-WMT2
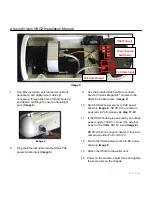
Image 17
1.
Remove corner mount adapter, compression
fitting and hardware from the box.
2.
Install compression fittings to corner mount
adapter as shown in
Image 18
.
3.
Run the Ethernet cable and outside power
cable (if necessary) through the compression
fittings.
4.
Attach Wall Mount Adapter to Corner Mount
Adapter as shown in
Image 19.
Image 18
Image 19
5. Using the screws provided (or other hardware)
attach the corner mount adapter to an exterior
90° corner wall.
6. Attach the HSG2 housing to Wall Mount
Adapter. Please reference “
Mounting the
Camera
”, if needed.
7. Tighten the Compression Fittings to seal the
wiring holes.
A
B
C
D


