background image

7

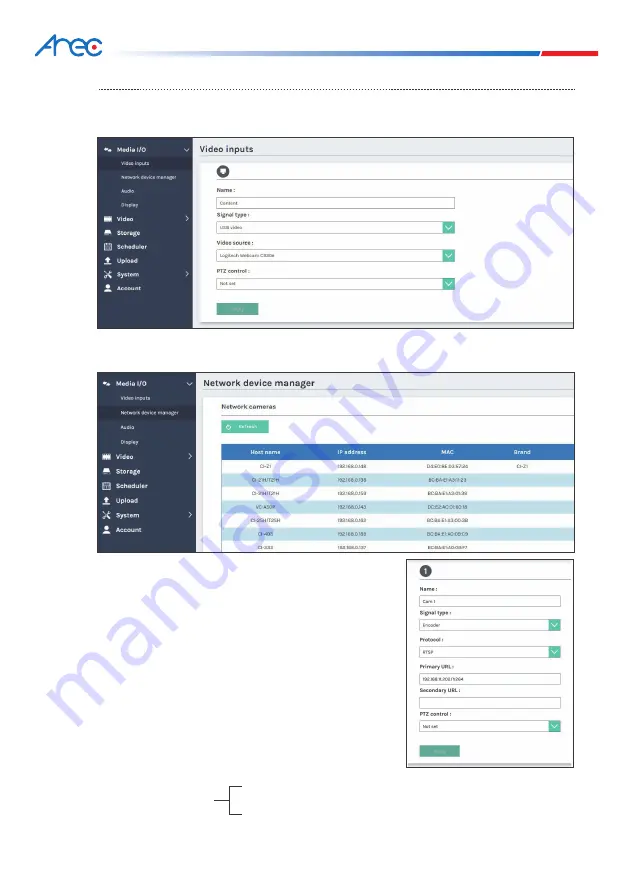
Make sure the network camera are connected under the 
same IP network (LAN)* and go to the [ 

Network device 

manager

 ] page. After the scanning is done, click the 

Login button and the authentication dialog will pop up. 
Enter the username and password of the camera to 
complete the authenticationand change the status to 

OK

 ]. Then the camera is ready for video input 

selection. Select the target camera by its IP address. 
For video source of encoder, enter RTSP or RTP 
connection URL.
* For instance, the camera and LS-US2 connected under 
   the same router with the same LAN address.

Setup

Step 1: Set up video input name,  video source, PTZ control in  [ 

Video inputs

 ] of [ 

Media I/O

 ]. 

             The capture source can be from USB input, network camera, or encoder input. 

If the assigned video source is network camera, a login authentication with the camera 

is required firstly in the [ 

Network device manager

 ] setup tab of [ 

Media I/O

 ].

Router(192.168.0.1)

LS-US2(192.168.0.10)

IP Camera(192.168.0.20)

LS-US2 Quick Installation Guide

Содержание LS-US2

Страница 1: ...LS US2 Media Station ENGLISH Quick Installation Guide AREC Inc All Rights Reserved 2021 l www arec com All information contained in this document is Proprietary ...

Страница 2: ...equipment and receiver Connect the equipment into an outlet on a circuit different from that to which the receiver is connected Consult the dealer or an experienced radio TV technician for help RF Exposure Warning The equipment complies with RF exposure limits set forth for an uncontrolled environment The antenna s used for this transmitter must not be co located or operating in conjunction with a...

Страница 3: ...2 LS US2 Quick Installation Guide CE Hereby AREC Inc declares that this Media Station is in compliance with the essential requirements and other relevant provisions of Directive 2014 53 EU ...

Страница 4: ...tor page providing complete presentation or lecture capture solution Media Station LS US2 98mm L x 95mm W x 55mm H 510g 5V 30W Max 0ºC 40ºC 90 Supports two video inputs and up to two USB Cam IP Cam stream signals And output the transcoded video to the HDMI port and the DisplayPort Product Name Model Name Dimension Weight Power Requirement Power Consumption Max Operating Temperature Humidity Maximu...

Страница 5: ...o turn OFF Long press 3 seconds to restart When the device is OFF push to turn ON 5V 1 For the backup USB storage device system format is needed in administrator webpage 2 Available for the USB mouse keyboard and touch devices 3 Available for the USB audio video inputs Supports the recording preview inputs monitoring and mixing display Supports the recording preview inputs monitoring and mixing di...

Страница 6: ...kerphone USB cam USB cam USB drive USB Keyboard USB mouse USB Keyboard USB mouse Power USB Video output HDMI Video output DP projector TV projector TV USB Micro B notebook IP cam Interactive Whiteboards Interactive Whiteboards Speakerphone USB cam USB Keyboard USB mouse Interactive Whiteboards ...

Страница 7: ... with a display monitor and use the RJ 45 Ethernet cable to connect an IP based network to the WAN port 2 Connect your PC NB to be the same network area with the device Enter the IP address displayed in the lower right side of the screen in your browser to access the System Administration webpage http 10 2 0 172 http 10 2 0 172 10 2 0 172 LS US2 Quick Installation Guide ...

Страница 8: ...a by its IP address For video source of encoder enter RTSP or RTP connection URL For instance the camera and LS US2 connected under the same router with the same LAN address Setup Step 1 Set up video input name video source PTZ control in Video inputs of Media I O The capture source can be from USB input network camera or encoder input If the assigned video source is network camera a login authent...

Страница 9: ...o source in Audio of Media I O Choose the correct USB audio source If there are more than 2 USB audio inputs connected to the system you only could assign one of them for the recording Step3 Set up network configurations in Network of System if necessary ...

Страница 10: ... buttons to start and stop recording Start a recording from the top panel Press button and recording begins Press button to end a recording Start a recording from the APK of iFPD Consult your iFPD supplier to install the AREClick APK Getting start a recording Run AREClick input the IP address and click the start service button to see the AREClick icon ...

Страница 11: ...at are dusty Locations where there are possible shocks Locations close to power amplifiers 4 If you notice smoke or odor coming from the product please quickly remove the power cable and send it to a maintenance center for processing 5 To avoid electrical shock the plug of the adapter should be stably and completely inserted into the power outlet and cannot be exposed it must also have sufficient ca...

Страница 12: ...AREC Inc All Rights Reserved 2021 l www arec com All information contained in this document is Proprietary Made in Taiwan Date 2021 12 01 Version 2 20 ...

Отзывы: