Arduino Yun Скачать руководство пользователя страница 5

A nice introduction to the concepts behind REST 

can be found here

.  

The there are two REST end points recognized by the Yún are:  


/arduino  


/data  

The "/arduino" directory doesn't have anything pre-configured. Anything added to the URL after 
the end point is passed from the webserver to the sketch on the 32U4. You can define your APIs 
inside the sketch. See the Bridge example to see how this is done to access the pins on the board.  

"/data" is used to access to the internal key/value storage. The available calls are:  


/put/KEY/VALUE

 : stores a value inside the storage  


/get/KEY

 : obtains the value of the requested key in JSON  


/get

 : obtains the entire storage list in JSON.  


/delete

 : deletes the internal storage  

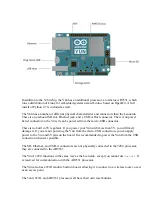
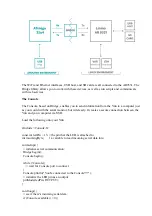
Resetting the processors (AR9331, WiFi, and 32U4) 

To restart the AR9331, which reboots Linino, press the "YÚN RST" reset button that is close to 
the analog inputs pins and the LEDs of the board.  

To restart the the 32U4 and restart the currently installed Arduino sketch, tap the button next to 
the Ethernet port 

two times

.  

The reset button for WiFi is located next to the USB-A connector. When you press the button, 
the WLAN LED will flash.  

If you move to a different network and can no longer wirelessly access the Yún through its web 
interface, you can reset the Yún's network configuration by pressing the Wifi reset button for 
longer longer than 5 seconds, but less than 30, the AR9331 processor will reboot. The WiFi 
configuration will be reset and the Yún will start its own wiFi network Arduino Yún-
XXXXXXXXXXXX. Any other modification/configuration will be retained.  

To reset the Linino distribution to its default state, press the WiFi reset button for at least 30 
seconds. The board reverts to the original settings as if it had been reflashed or taken out of the 
box. Among other things, this removes all installed files and network settings.  

Serial re-enumeration on reset. 

Since the Yún does not have a dedicated chip to handle serial communication, it means that the 
serial port is 

virtual

 -- it's a software routine, both on your operating system, and on the board 

itself. Just as your computer creates an instance of the serial port driver when you plug in any 
Arduino, the 32u4 creates a serial instance whenever it runs its bootloader. The board is an 
instance of USB's 

Connected Device Class (CDC)

 driver.  

This means that every time you reset the 32U4 processor, the USB serial connection will be 
broken and re-established. The board will disappear from the list of serial ports, and the list will 
re-enumerate. Any program that has an open serial connection to the Yún will lose its 
connection. This is in contrast to the Arduino Uno, with which you can reset the main processor 
(the ATmega328P) without closing the USB connection (which is maintained by the secondary 

Содержание Yun

Страница 1: ...ta to the board When programming the Y n you must choose Arduino Y n from the Tools Board menu in the Arduino IDE The Y n is only supported by Arduino IDE 1 5 4 and later Differences from the Arduino...

Страница 2: ...you power your Y n with more than 5V you will likely damage it If you are not powering the Y n from the micro USB connection you can apply power to the Vin and 5V pins on the board It is recommended t...

Страница 3: ...There are several status LEDs on the Y n indicating power WLAN connection WAN connection and USB Additionally pin 13 is connected to one of the status lights Linino...

Страница 4: ...ons or scripts For more on Python visit the Python 2 7 documentation pages If you re getting started with Python for the first time there are a number of excellent resources on line Learn Python the H...

Страница 5: ...by pressing the Wifi reset button for longer longer than 5 seconds but less than 30 the AR9331 processor will reboot The WiFi configuration will be reset and the Y n will start its own wiFi network Ar...

Страница 6: ...This means that if you re using any Serial or Console print println or write statements in setup they won t show up when you open the serial monitor or Console connection To work around this you can c...

Страница 7: ...nloa Once yo comes with ad Arduino u ve read th an installer IDE 1 5 4 i he license a r for the IDE installer or l and if you ag E and driver later and do gree with it rs ouble click click the the ins...

Страница 8: ...By default all available components are selected These include the IDE drivers and shortcuts Select the location you wish to install the IDE...

Страница 9: ...The installer will display its progress as it extracts the files to the proper locations if you chose to install the drivers a pop up window will confirm your selection...

Страница 10: ...ng blocked by a firewall Configuring the onboard WiFi The Y n has the ability to act as an Access Point but it can also connect to an existing network These instructions walk you through connecting yo...

Страница 11: ...will find a page with some diagnostic information about the current network connections The first is your WiFi interface the second is your ethernet connection Press the Configuration button to proce...

Страница 12: ...of 8 or more characters for your Arduino If you leave this field blank the system retains the default password of arduino If you wish you can set the timezone and country It is recommended to set thes...

Страница 13: ...When you press the Configure Restart button the Arduino will reset itself and join the specified network The Arduino network will shut down after a few moments...

Страница 14: ...ation screen Once the program is uploaded the 32U4 processor will restart You should see the LED connected to pin 13 blinking Using the onboard Ethernet When you connect the Yun to a wired network wit...

Страница 15: ...wirelessly It creates a secure connection between the Y n and your computer via SSH Load the following onto your Y n include Console h const int ledPin 13 the pin that the LED is attached to int incom...

Страница 16: ...see the Console by opening a terminal window and typing ssh root yourYunsName local telnet localhost 6571 then pressing enter NB If you are using Windows you must install a terminal emulator PuTTY is...

Страница 17: ...the board through REST calls It demonstrates how you can create your own API when using REST style calls through the browser When running this example make sure your computer is on the same network a...

Страница 18: ...or for parsing and controlling the pins This happens on port 5555 Start the server with server begin server listenOnLocalhost server begin Get Code In loop you ll create an instance of the YunClient f...

Страница 19: ...following This value will assign a value to the pin turning it HIGH or LOW If there is no trailing read the value from the specified pin pin client parseInt if client read value client parseInt digit...

Страница 20: ...D client print pin client print F set to analog client println value String key D key pin Bridge put key String value else value analogRead pin client print F Pin A client print pin client print F re...

Страница 21: ...ode client readStringUntil r if mode input pinMode pin INPUT Send feedback to client client print F Pin D client print pin client print F configured as INPUT return if mode output pinMode pin OUTPUT S...

Страница 22: ...r model and uses WebSockets to communicate between the two It runs a custom webserver on the Y n in python that allows for easy communication There are a number of examples for Spacebrew on the Y n in...

Отзывы: