background image

Installation Instructions
(for 15000 to 28500Btu/h)

 Page 19 

CAUTION

Do not, under any circumstances, cut or 

remove the third (ground) prong from the 

power cord.Do not change the plug on the 

power cord of the air conditioner.

Aluminum house wiring may present 

special problems- consult a qualified 

electircian.When handling unit, be careful 

to avoid cuts from sharp metal edges and 

aluminum fins on front and rear coils.

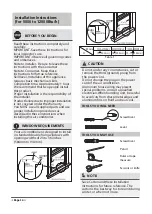
    BEFORE YOU BEGIN 

Read these instructions completely and 

carefully.

IMPORTANT-Save these instructions for 

local inspector’s use.

IMPORTANT-Observe all governing codes 

and ordianaces.

Note to Installer- Be sure to leave these 

instructions with the Consumer.

Note to Consumer- Keep these 

instructions for futrue reference.

Skill level- Installation of this appliance 

requires basic mechanical skills. 

Completion time- Approximately 1 hour. 

We recommend that two people install 

this product.

Proper installation is the responsibility of 

the installer.

Product failure due to improper installation 

is not covered under the Warranty.

You MUST use all supplied parts and use 

proper installation procedures as described 

in these instructions when installing this 

air conditioner.

NOTE:

Save Carton and these Installation 

Instructions for future reference. The 

carton is the best way to store unit during 

winter, or when not in use. 

Do the following before starting to install unit. 

See illustrations below.

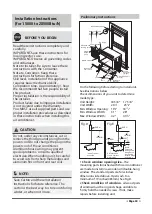
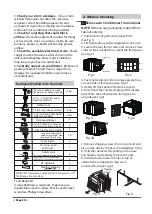
Check dimensions of your unit to determine 

model type:

Unit Height:                       18 5/8 "     17 5/8 ''

Unit Width:                        26   "          23    "

Min. Window Opening:     19   "         18    "

Min. Window Width:          31"            28"

Max. Window Width:          42"            40    "

1 .

Check window opening size

-- the 

mounting parts furnished with this air conditioner

are made to install in a wooden sill double-hung 

window. The standard parts are for window 

dimensions listed above. Open sash to a 

minimum of 19 inches(483mm). See Fig.D.

2.

Check condition of window

-- all wood parts 

of window must be in good shape and able to

 firmly hold the needed screws. If not, make 

repairs before installing unit.


1 2

/

1 2

/

1 2

/

1 2

/

5 8

/

SASH

.

  19  MIN.

indow Frame or

bstruction

Storm Window 

Frame or Other 

Obstruction

Board 

Thickness

As Required,

Along Entire 

Sill. Fasten

With Two Nails

Or Screws.

  /2  MIN.

1

  /2  MIN.

1

  19  MIN.

SASH

Window Sash Seal

Safety Lock and

3 /4 (or1/2   ) Long 

Hex Head Screw

Top Angle

Foam Gasket

Washer Head

Locking screw

Frame 

Assembly

(Left)

Side Retainer

Bottom rail

seal to Unit

1 /2  Long

Screw and

Locknuts

Locknut

3 /4  Long

Flat Head

Bolt

Sill Angle

Bracket

Window Support

Bracket

Frame 

Assembly

(Right)

Preliminary Instructions 

Fig.D

Fig.E

Содержание KAW05M1AWT

Страница 1: ...KAW05M1AWT KAW05R1AWT KAW06R1AWT KAW08R1AWT KAW10R1AWT KAW12R1AWT KAW15R1AWT ...

Страница 2: ...nts Important Safety Instructions 03 Installation Instructions 13 Normal Sounds 27 Air Conditioner Features 28 Care and Cleaning 33 Troubleshooting Tips 34 Remote Control Instructions 36 43 Warranty and Return Policy ...

Страница 3: ...r circuit Incorrect installation may cause fire and electric shock Do not operate with wet hands or in damp environment It may cause electric shock Do not direct airflow at room occupants only This could damage your health Always ensure effective grounding Incorrect grounding may cause electric shock Do not allow water to run into electric parts It may cause failure of machine of electric shock Do...

Страница 4: ...ner with water Water may enter the unit and degrade the insulation It may cause an electric shock Do not use for special purposes Do not use this air conditioner to preserve precision devices food pets plants and art objects lt may cause deterioration of quality etc Stop operation and close the window in storm or hurricane Operation with windows opened may cause wetting of indoor and soaking of ho...

Страница 5: ...t to clean both sides of the glass first If the window is a triple trackty pew it has creen panel included remove the screen completely before installation Be sure the airconditionerh as been securely and correctly in stalled accordingto the installation instructions in this manual Save this manual for possible future use in removing or installing this unit When handling the air conditioner be car...

Страница 6: ...rrent valid certificate from an industry accredited assessment authority which authorises their competence to handle refrigerants safely in accordance with an industry recognised assessment specification NOTE Do not use this device to turn the unit on or off Always make sure the RESET button is pushed in for correct operation The power supply must be replaced if it fails reset when either the TEST...

Страница 7: ......

Страница 8: ...ied out Work in confined spaces shall be avoided The area around the workspace shall be sectioned off Ensure that the conditions within the area have been made safe by control of flammable material 4 Checking for presence of refrigerant The area shall be checked with an appropriate refrigerant detector prior to and during work to ensure the technician is aware of potentially flammable atmospheres ...

Страница 9: ...o being corroded or are suitably protected against being so corroded 9 Checks to electrical devices Repair and maintenance to electrical components shall include initial safety checks and component inspection procedures If a fault exists that could compromise safety then no electrical supply shall be connected to the circuit until it is satisfactorily dealt with If the fault cannot be corrected im...

Страница 10: ... a naked flame shall not be used 11 Leak detection methods The following leak detection methods are deemed acceptable for systems containing flammable refrigerants Electronic leak detectors shall be used to detect flammable refrigerants but the sensitivity may not be adequate or may need re calibration Detection equipment shall be calibrated in a refrigerant free area Ensure that the detector is n...

Страница 11: ...me care shall be taken not to overfill the refrigeration system Prior to recharging the system it shall be pressure tested with OFN The system shall be leak tested on completion of charging but prior to commissioning A follow up leak test shall be carried out prior to leaving the site 14 Decommissioning Before carrying out this procedure it is essential that the technician is completely familiar w...

Страница 12: ...ssociated shut off valves in good working order Empty recovery cylinders are evacuated and if possible cooled before recovery occurs The recovery equipment shall be in good working order with a set of instructions concerning the equipment that is at hand and shall be suitable for the recovery of flammable refrigerants In addition a set of calibrated weighing scales shall be available and in good w...

Страница 13: ......

Страница 14: ...ote to Installer Be sure to leave these instructions with the Consumer Note to Consumer Keep these instructions for futrue reference Skill level Installatio of this appliance requires basic mechanical skills Completion time Approximately 1 hour We recommend that two people install this product Proper installation is the responsibility of the installer Product failure due to improper installation i...

Страница 15: ...10 3 4 1 12 Weather stripping 5 PREPARE AIR CONDITIONER 2 3 INSTALL THE ACCORDION PANELS NOTE The top rail hardware and the Fig A Fig B and Fig C are not applicable to the units more than 10000Btu h Before installing unit the top rail must be assembled on the unit For 10000Btu h models only C Align the hole in the top rail with those in the top of the unit as shown in Fig B D Secure the top rail t...

Страница 16: ...edge 3 H About 1 to 1 for 10 to12K 8 H Vinyl Clad Windows INSIDE OUTSIDE H About 3 4 to 1 for 5 to 8K Measure from the cabinet edge 3 H About 1 to 1 for 10 to12K 8 H INSTALL SUPPORT BRACKET 5 SECURE THE ACCORDION PANELS NOTE Check that air conditioner is tilted back about H Fig 5A and Fig 5B tilted about 3 to 4 downward to the outside After proper installation condensate should not drain from the ...

Страница 17: ......

Страница 18: ......

Страница 19: ...is air conditioner NOTE Save Carton and these Installation Instructions for future reference The carton is the best way to store unit during winter or when not in use Do the following before starting to install unit See illustrations below Check dimensions of your unit to determine model type Unit Height 18 5 8 17 5 8 Unit Width 26 23 Min Window Opening 19 18 Min Window Width 31 28 Max Window Widt...

Страница 20: ... that shown on the unit serial nameplate Power cord is 48 inches long Be sure you have an outlet near 6 Carefully unpack air conditioner Remove all packing material Protect floor or carpet from damage Two people should be used to move and install unit Tools Required A large flat blade screwdriver Tape measure Adjustable wrench or pliers Pencil Level Socket wrenches Phillips Screwdriver Hardware Pa...

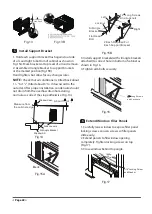
Страница 21: ...s in top leg of filler panel frame see step 6 Do not totally tighten Allow leg to slide freely Screws will be tightened after section 6 1 Open window and mark center of window inner sill as shown Fig 11 2 Place cabinet in window with bottom sill angle firmly seated over window sill as shown Bring window down temporarily behind top angle to hold cabinet in place Fig 12 3 Shift cabinet left or right...

Страница 22: ...ition Fig 15B Hand tighten but allow for any changes later 3 Install support brackets with sill angle brackets attached to correct hole in bottom of cabinet as shown in Fig 16 4 Tighten all 6 bolts securely 1 Carefully raise window to expose filler panel locking screws Loosen screws so filler panels slide easily 2 Extend panels to fill window opening completely Tighten locking screws on top Fig 17...

Страница 23: ...x head screw 1 Trim sash seal to fit window width Insert into space between upper and lower sashes Fig 18 2 Attach right angle safety lock Fig 19 4 Attach the top angle to window frame Use a 3 32 drill bit to drill one hole through the hole in the middle of top angle into the window frame and drive one 3 4 or 1 2 HEX HEAD locking screw through hole in the middle of top angle into the window frame ...

Страница 24: ...ner width of the side curtain as shown Fig 20 Step 2 Remark a line on the provided R1 insulation panel according to a length 1 8 3mm less than the measured width in step 1 then cut the R1 insulation panel along the line Fig 12 Step 3 Slide the R1 insulation panel into the side curtain the side with pattern should facing the indoor Fig 22 In order to minimize air leaks between the room air conditon...

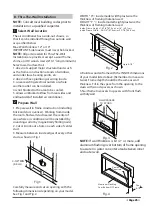
Страница 25: ...er truss bearing points etc 2 does not have plumbing or wiring inside 3 is near existing electrical outlets or where another outlet can be installed 4 is not blocked to the area to be cooled 5 allows unblocked airflow from rear sides and end outside of installed air conditioner 1 Prepare wall in frame construction including brick and stucco veneer Working from inside the room find wall stud neares...

Страница 26: ...onstruction refer to Step 2 of Thru the wall Installation for a wall thickness greater than 8 1 2 2 Secure cabinet in place using masonry nails or the right masonry anchor screws Another way to secure cabinet is to build a frame in the masonry wall such as the one shown in Fig 3 of Step 2 Prepare Wall Securely anchor frame to masonry wall This way gives very good louver clearance on either side of...

Страница 27: ......

Страница 28: ...ted by anything The louvers will allow you to direct the air flow Left or Right throughout the room as needed Move the Levers from side to side until the desired Left Right direction is obtained Air Directional Louvers Fresh Air Vent Control on 10 12 K MODELS Lever Air Direction for 05K 06K Levers Air Direction Levers Air Direction Air Direction 4 way Levers The louvers will allow you to direct th...

Страница 29: ...High Cool High Fan Off Low Fan Low Cool Cooling Temperature Wait three minutes before restarting Max Cool Min Cool ...

Страница 30: ......

Страница 31: ... be adjusted by pressing the fan button NOTE For some models the fan speed can not be adjusted under HEAT mode FOLLOW ME FEATURE on some models This feature can be activated from the remote control ONLY The remote control serves as a remote thermostat allowing for the precise temperature control at its location To activate the Follow Me feature point the remote control towards the unit and press t...

Страница 32: ... C or F and the Auto timer settings While on Fan only mode it shows the room temperature If the room temperature is too high or low it will display HI or LO Error codes AS Room temperature sensor error ES Evaporator temperature sensor error NOTE is displayed as shown in the obove picture HS Electric heating sensor error on some models CS Condenser temperature sensor error on some models OS Outside...

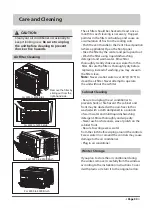
Страница 33: ...e hot water over 40 C 104 F to clean the air filter Never attempt to operate the unit without the air filter Winter Storage If you plan to store the air conditioner during the winter remove it carefully from the window according to the installation instructions Cover it with plastic or return it to the original carton Be sure to unplug the air conditioner to prevent shock or fire hazard The cabine...

Страница 34: ...aning section To defrost set to FAN ONLY mode Thermostat set too cold for night time cooling To defrost the coil set to FAN ONLY mode Then set temperature to a Higher setting Problem Solution Air conditioner cooling but room is too warm NO ice forming on cooling coil behind decorative front Air conditioner turns on and off rapidly Noise when unit is cooling Dirty air filter air restricted Clean ai...

Страница 35: ...Unit removing large quantity of moisture from humid room This is normal during excessively humid days Remote Sensing Deactivating Prematurely some models Remote control not located within range Place remote control within feet and pointed in the general direction of the air conditioner unit Remote control signal obstructed Remove obstruction Problem Solution Room too cold Set temperature too low I...

Страница 36: ......

Страница 37: ...RG15A B E ...

Страница 38: ......

Страница 39: ......

Страница 40: ......

Страница 41: ......

Страница 42: ......

Страница 43: ......

Страница 44: ......

Отзывы: