background image

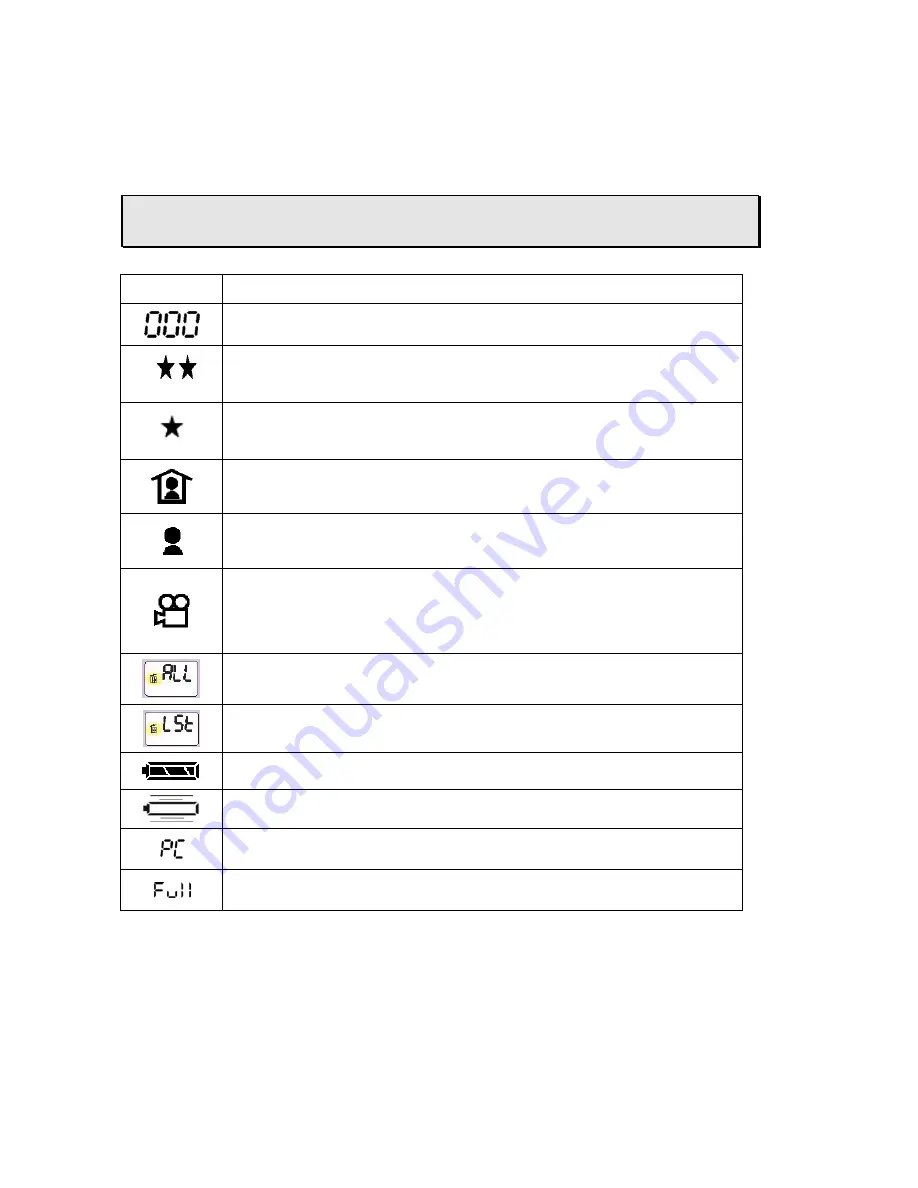
Camera Icons and Descriptions 

To select your desired setting, press the 

Power/Mode

 button to scroll through the different modes. The 

icons will display in the status LCD. Press the 

Shutter

 button to select a function while it is displayed. The 

camera is now ready to capture an image or streaming snapshots according to your selected preferences. 

Note:

 If you do not press any button within five seconds, the LCD screen automatically returns to 

the operational mode screen – ready to capture an image. 

Icon Description 


Number

 of images and videos captured 


High Resolution

 mode (HI and two-stars) 


1280 x 1008 pixels for still images 


LOW Resolution

 mode (LO and one-star) 


640 x 480 pixels for still images 


Indoor

 mode to capture images indoors, or in darker environments 


Outdoor

 mode to capture images outside 


Streaming Snapshot 


mode for capturing Video Clips 


The Movie Icon with one-star indicates 320 x 240 video resolutions. 


The Movie Icon and no-star indicates 160 x 120 video resolutions. 


ERASE ALL

 - to erase ALL images and videos saved in the camera 


ERASE LST

 - to erase the LAST image saved in the camera 


Full Battery Level indicator 


Low battery indicator  


Displays when the camera is connected to a computer 


Displays the camera’s memory size is full 


HI 

LO 

Содержание Go Vision 3-in-1 Mini Camera

Страница 1: ...1 3 in 1 Mini Camera User s Guide 16 3868 ...

Страница 2: ...to easily download your images and video to your PC With Arcsoft PhotoImpression 5 and VideoImpression 2 software you can edit your images and video with ease For more information on how to use Arcsoft PhotoImpression 5 and VideoImpression 2 you may visit their website at www Arcsoft com What s Included Open the 3 in 1 Mini Camera package and examine the contents Your package should contain the fo...

Страница 3: ...oImpression5 10 Arcsoft VideoImpression2 10 INSTALLING THE DIGITAL CAMERA DRIVER SOFTWARE 11 INSTALLING THE PHOTOIMPRESSION 5 AND VIDEOIMPRESSION 2 12 CONNECTING TO YOUR PC 13 CONNECTING YOUR MINI CAMERA TO YOUR PC 13 DOWNLOADING IMAGES AND VIDEOS TO YOUR PC 15 USING THE TWAINAPP TO TRANSFER IMAGES AND VIDEOS 15 USING PHOTOIMPRESSION 5 TO TRANSFER IMAGES 16 USING YOUR MINI CAMERA AS A PC WEB CAMER...

Страница 4: ...4 Camera Features Front View Rear View ...

Страница 5: ...mptly and properly Do not burn or bury the battery Use only a fresh battery of the required size and recommended type Battery can leak chemicals that may destroy electronic parts If you do not plan to use the camera for more than two weeks remove the battery When flashes the camera beeps and automatically turns off Replace the battery within 30 seconds to avoid losing your images IMPORTANT WARNING...

Страница 6: ...eps once and then 000 appears To turn off the camera hold down the Power Mode button again Note Your Mini Camera automatically turns off after 60 seconds of inactivity LCD Information Status Display The following icons are used in the Information Status LCD display to present mode and setting options Note When scrolling through the modes an icon blinks when it is selected ...

Страница 7: ... images and videos captured High Resolution mode HI and two stars 1280 x 1008 pixels for still images LOW Resolution mode LO and one star 640 x 480 pixels for still images Indoor mode to capture images indoors or in darker environments Outdoor mode to capture images outside Streaming Snapshot mode for capturing Video Clips The Movie Icon with one star indicates 320 x 240 video resolutions The Movi...

Страница 8: ...t is low Outdoor Use when capturing images outdoors 4 Look through the viewfinder and focus on the image you want to capture Hold the camera still and press the Shutter button to take a picture A short beep sounds when a picture is taken The photo number in the photo counter increases Capturing Streaming Snapshots Video Clips 1 Hold down the Power Mode button to turn on the camera 2 Repeatedly pre...

Страница 9: ...camera Repeatedly press the Power Mode button until the desired Delete mode displays Delete ALL images and Videos To delete all images and video clips hold down the Shutter button until you hear 2 beeps Delete the LAST image or video capture To delete the last image or video clip hold down the Shutter button until you hear 2 beeps ...

Страница 10: ...and Arcsoft VideoImpression 2 are photo and video editing applications Picture Manager TWAIN The Picture Manager works with TWAIN compliant third party software The Picture Manager allows you to quickly view edit the images e g crop rotate flip and save them to your computer Arcsoft PhotoImpression5 Acquire organize view browse and share photos fast Provides powerful tools for photo editing and en...

Страница 11: ...omputer 1 Insert the DIGITAL CAMERA software CD into your CD ROM drive The CD runs automatically and the DIGITAL CAMERA installation menu displays Click Digital Camera Driver Note If the CD does not run automatically click Start Run then type D autorun exe in the Run Dialog text box where D is your CD ROM drive 2 Start InstallShield Wizard displays briefly Then the following screen displays Click ...

Страница 12: ...VideoImpression 2 Note For more information about PhotoImpression 5 and VideoImpression 5 please visit the Arcsoft Web site at www Arcsoft com 1 Go to the Digital Camera screen and click on ArcSoft Software Suite 2 Follow the on screen instructions to complete installing the ArcSoft sofware ...

Страница 13: ...rt Note Windows will prompt you to install hardware drivers the first time you connect your mini camera to your PC after installing the software Insert the supplied CD ROM into your CD ROM drive and follow the on screen instructions If you subsequently connect the camera to a different USB port on your PC it may go through the hardware installation routine once again 5 Your PC now detects the came...

Страница 14: ...stalled the software disconnect the camera from your computer and follow the directions under Installing the Digital Camera Driver Software The Found New Hardware Wizard will begin automatically Make sure Install the software automatically is selected and click Next Windows will begin to search for the necessary drivers on your system These were installed with the software When your computer locat...

Страница 15: ...driver 1 Click Start Program and Mega Pixel Camera 8105 SXGA and then TwainApp 2 Click on Get DSC to browse the pictures in the camera 3 Click on Download to download the pictures 4 When you complete downloading click on Transfer All and then select a path to store the pictures You can save pictures in either bitmap or jpg format Saving pictures in an jpg format occupies less memory capacities tha...

Страница 16: ...lick Mega Pixel Camera 8105 SXGA Then the TwainApp will be called out for you to transfer images and videos 3 The Picture Manager allows you to view each individual image saved on your camera You can use the arrow keys to scroll to the previous or the next picture Click on the Transfer button to download the images to your computer Notes 1 Turn off the camera before you remove the battery 2 Downlo...

Страница 17: ...n to let the camera lens face the computer user Viewing Video Clips with Windows Media Player If your computer is equipped with Windows Media Player Windows 2000 ME and XP you can use the Windows Media Player to view your video by double clicking on the video clip Note If you need to install the latest version of Windows Media Player you can download Media Player free of charge from Microsoft Web ...

Страница 18: ...he NetMeeting screen displays click the Tools menu select Video and click Send A video window opens My Video You can start and stop sending video using the controls on this window Note For more information on using NetMeeting and to download the latest version browse the Microsoft Web site at http www microsoft com windows netmeeting You can also use your mini camera as a video conferencing camera...

Страница 19: ... hallway and bright entryway can cause improper exposure Don t shoot directly towards light or the sun Try to avoid any mixture of different lighting such half sunlight and half fluorescent light Images of a computer screen may include lines and artifacts Avoid an object in the image that could reflect light or one that is close to the person taking the image e g glass bottle white shirt glasses e...

Страница 20: ... in 8MB SDRAM Storage Capacity 8MB 2 stars 1280 x 1008 Pixels 16 Pictures 1 star 640 x 480 Pixels 64 Pictures Video Clip 320 x 240 Pixels 30 Seconds PC Camera Mode 10 12fps 640 x 480 25 30fps 320 x 240 via USB Stream to PC Output File Format JPEG File Still AVI File Video Display Black and White Status LCD PC Interface USB 1 1 Mini USB Connection Direct to PC Power AAA 1 5V Alkaline Battery x 1 No...

Страница 21: ... Use the TWAIN driver utility to capture an image while connected to a PC The images are blurry The camera or subject was moving when the image was captured Hold the camera steadily to capture images The minimum focus distance is about two feet Objects closer than 2 feet will not be in focus The image is too light You are facing a bright light when taking the image Change the angle of the image so...

Страница 22: ...e of the following measures Reorient or relocate the receiving antenna Increase separation between the equipment and receiver Connect the equipment into an outlet on a circuit different from that to which the receiver is connected Consult your local RadioShack store or an experienced radio TV technician for help If you cannot eliminate the interference the FCC requires that you stop using your cam...

Отзывы: