background image

28

E

s

Pa

ÑO

l

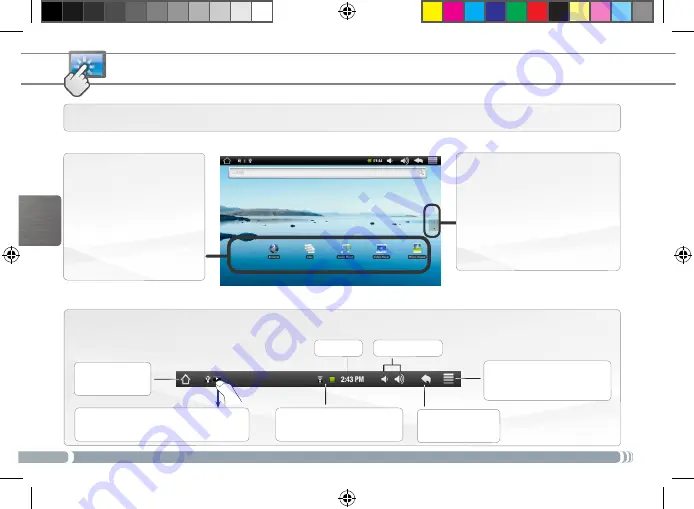
La iNtERfaz DEL aRNova

Barra superior de la interfaz 

(varía según la pantalla en la que se encuentre)

Volver a la 

pan-

talla


principal

Volver

 a la panta-

lla anterior

Menú

: ofrece distintas opciones 

de menú en función de la pantalla 
en la que se encuentre.

El dispositivo ARNOVA está equipado con una pantalla táctil. La mayoría de zonas de pantalla reaccionan al tocarlas con un 
dedo.

Pantalla principal

Aplicaciones botón

Dé un toque en este icono para mos-

trar todas las aplicaciones Android™ 
instaladas en el ARNOVA (juegos, 

distintas herramientas, etc.). Puede 

copiarlas a la pantalla de inicio. Us-

ted puede obtener otras aplicaciones 

Android™ desde la AppsLib (en la 

página principal).   

Estos son los accesos directos 

Android™ predeterminados (

Na-

vegador


web

EMail

, etc.). Dé un 

toque en un icono para abrir la 

aplicación correspondiente. Pue-

de personalizar la pantalla de 

inicio añadiendo o eliminando 

accesos directos y widgets, cam-

biando el fondo, etc. 

Consulte la 

página siguiente.

Iconos de 

Estado

: (estado de 

la conexión WiFi, nivel de la 

batería, etc.)

Iconos de 

Notificación

: arrastre la barra su-

perior hacia abajo para mostrar los mensajes 

de notificación (si hay alguno).

Hora

Volumen 

-/+

Содержание Arnova 8 4GB

Страница 1: ...m support for e mail support Please register your product before contacting Technical Support see Register your Product Register your product Thank you for choosing this ARNOVA product We hope that you will enjoy using it and that it will give you satisfaction for many years to come Once you unpack your ARNOVA product we recommend that you take a few minutes to register it http arnovatech com regi...

Страница 2: ...vice Go on the Home screen tap on the Menu icon then select Settings USB Mode select If the Host port is off tap on the Host port line to turn it on Important turn off the Host port after use Mini USB port to connect your ARNOVA to your computer using the included USB cable to transfer files Home button Headphone jack Power connector Microphone Micro SD card slot Hardware Reset In the event that y...

Страница 3: ...bring you through a few screens to help you set up the principal settings Language country time etc Before using your ARNOVA for the first time completely charge the battery Charging the Battery Connect the supplied power cable to the ARNOVA Power connector and to a wall outlet The ARNOVA device will turn on and start charging ...

Страница 4: ...y level etc Notification icons drag the top bar downwards to reveal the notification messages if any These are the default Android shortcuts Web Browser EMail etc Tap on an icon to open the correspond ing application You can customize the Home screen by adding removing shortcuts and widgets changing the wallpaper etc See next page Home Screen Application button Tap on this icon to reveal all the A...

Страница 5: ...in while you re holding an item the Applications tab on the right side of the screen turns into a recycle bin and release your finger Customizing your product Changing the Settings From the Home screen tap on the Menu icon tap on Settings and choose a category Wireless controls Sound display Date time etc The extended Home screen Slide your finger horizontally on the screen to go to the left or ri...

Страница 6: ... or letters of the typeWEP WPA orWPA2 To obtain the exact connection parameters required contact the Internet service provider To configure a new WiFi network go on the Home screen tap on the Menu icon then select Settings In the Settings screen select Wireless networks If theWiFi is off tap on the Wi Fi line to turn it on Then select Wi Fi settings The ARNOVA will scan for availableWiFi networks ...

Страница 7: ... to display hide the on screen controls tap anywhere on the screen To pause or resume a video tap on the icon bottom of screen To go to any particular point in the video slide the progression bar to the desired point To play the next or previous song tap on the icons Use the icons and the progression bar as in the video player screen see above To start or pause a slide show tap on the icon To view...

Страница 8: ... them into the respective folders using Win dows Explorer or the Finder on a Mac or by using Windows Media Player Open Windows Media Player and then use the Sync tab to synchronize your music videos and photos onto your ARNOVA See Windows Media Player s Help to learn more about this Once all your file transfers are finished closeWindows Explorer and any other program that may have read or written ...

Страница 9: ...oir accès au support technique ARNOVA http arnovatech com support Besoin d aide Comme nous mettons à jour et améliorons régulièrement nos produits le logiciel de votre appareil peut présenter une interface ou des fonctionnalités légèrement différentes de celles décrites dans ce guide Sur notre site Web Consultez la Foire Aux Questions FAQ sur http arnovatech com faq Contactez notre équipe d assist...

Страница 10: ...ode select Si le Host port est désactivé appuyez sur la ligne Host port pour l activer Important désactiver le Host port après utilisation Port mini USB permet de connecter votre ARNOVA à un ordinateur à l aide du câble USB fourni pour transférer des fichiers Accueil Retour à l écran d accueil Prise casque Connecteur d alimentation pour connecter le câble d alimentation fourni Microphone intégré L...

Страница 11: ...s aide à configurer les principaux réglages de l appareil la langue le pays l heure etc Avant d utiliser votre ARNOVA pour la première fois chargez complètement sa batterie Charger la batterie Branchez le câble d alimentation fourni sur le connecteur d alimentation de l ARNOVA et sur une prise secteur Votre ARNOVA s allume et commence à se charger ...

Страница 12: ... de l écran vers le bas pour afficher les messages de notification le cas échéant Ecran d accueil Voici les raccourcis Android par défaut Navigateur Web E mail etc Appuyez sur une icône pour ouvrir l application correspondante Vous pouvez personnaliser l écran d accueil en ajoutant supprimant des raccourcis et des widgets en changeant le fond d écran etc Voir page suivante Bouton Applications Appu...

Страница 13: ...ons sur la droite se transforme en corbeille lorsque vous maintenez un élément appuyé et relâchez votre doigt Personnalisation de l appareil Modification des paramètres Sur l écran d accueil appuyez sur l icône de Menu appuyez sur Paramètres et choisissez une catégorie Connexions sans fil Sons et affichage Date et heure etc L écran d accueil étendu Faites glisser votre doigt horizon talement sur l...

Страница 14: ... ouWPA2 Pour obtenir les paramètres de connexion exacts contacter le fournisseur d accès à Internet Pour configurer un nouveau réseau WiFi allez sur l écran d accueil appuyez sur l icône de Menu puis sélectionnez Paramètres Dans l écran des Paramètres sélectionnez Connexions sans fil Si le WiFi est désactivé appuyez sur la ligne Wi Fi pour l activer Puis sélectionnez Paramètres Wi Fi L ARNOVA rech...

Страница 15: ...mporte où sur l écran Pour mettre en pause relancer une vidéo appuyez sur l icône en bas de l écran Pour naviguer dans la vidéo utilisez la barre de progression en bas de l écran et faites la glisser jusqu à la zone désirée Pour lire la chanson précédente suivante appuyez sur les icônes Utilisez les icônes et la barre de progression de la même façon que dans le lecteur vidéo voir ci dessus Pour dé...

Страница 16: ...s Explorer ou le Finder sur Mac ou vous pouvez également utiliser Windows Media Player Lancez Windows Media Player puis utilisez l onglet Synchroniser pour synchroniser vos chansons vidéos et photos avec votre ARNOVA Consultez l aide de Windows Media Player pour en savoir plus à ce sujet Une fois que tous les transferts de fichiers sont terminés fermez Windows Media Player ou tout autre programme ...

Страница 17: ...OVA http arnovatech com support Im Internet unter http arnovatech com register Ä Ä SIE BENÖTIGEN HILFE Da unsere Produkte kontinuierlich aktualisiert und weiterentwickelt werden kann die Software Ihres Geräts in Erscheinung und Funktionalität geringfügige Abweichungen zu den Darstellungen in dieser Kurzbedienungsanleitung aufweisen Auf unserer Website Für häufig gestellte Fragen FAQ siehe http arn...

Страница 18: ...ungen USB Mode select Wenn das Host port ausgeschaltet ist tippen Sie auf die Host port Zeile um es einzuschalten Wichtig Schalten Sie den Host Port nach Gebrauch aus Mini USB Port Um Ihren ARNOVA mit Ihrem Computer zu verbinden verwenden Sie das mitgelieferte USB Kabel um Dateien zu übertragen Home Taste bringt sie jederzeit zum Haupt Desktop zurück Kopfhöreranschluss Strom anschluss zum Anschlus...

Страница 19: ...me um Ihnen dabei zu helfen die grundlegenden Einstellungen vorzunehmen Sprache Land Uhrzeit usw Vor der erstmaligenVerwendung des ARNOVA sollte der Akku vollständig aufgeladen werden Aufladen des Akkus Verbinden Sie das mitgelieferte Stromkabel mit dem ARNOVA Stromanschluss und mit einer Steckdose Daraufhin schaltet sich der ARNOVA Player ein und startet den Ladevorgang ...

Страница 20: ... Anwendungen zu sehen Spiele verschiedeneTools usw Bei Bedarf können Sie diese Anwendungen auf Ihren Desktop ko pieren Sie finden weitere Android Anwendungen in der AppsLib die Sie auf der Startseite finden Dies sind Desktop Verküpfungen von Android Web Browser E Mail usw Tippen Sie auf ein Icon um die entsprechende Anwendung zu öffnen Sie können den Home Screen nach Ihren Wünschen anpassen indem ...

Страница 21: ...t und ziehen es einfach auf den Mülleimer dieser erscheint auf der rechten Seite des Displays anstatt des Applikations Tab Anpassen Ihres Produktes Einstellungen ändern Tippen Sie auf das Menü Icon anschließend auf Einstellungen und wählen Sie aus einer der Kategorien Wireless Sound und Display Datum und Uhrzeit usw Der erweiterte Desktop Bewegen Sie Ihren Finger hori zontal auf dem Touchscreen um...

Страница 22: ...g mit einem der bereits konfigurierten Netzwerke herstellen Um ein neues WiFi Netzwerk einzurichten tippen Sie auf dem Desktop auf das Menü Icon und wählen anschließend Einstellungen Unter Einstellungen wählen Sie Wireless Wenn das WiFi ausgeschaltet ist tippen Sie auf die WLAN Zeile um es einzuschalten Dann wählen Sie WLAN Einstellungen aus Der ARNOVA wird die verfügbaren WiFi Netze suchen und si...

Страница 23: ...uf eine beliebige Stelle im Bildschirm Um einVideo anzuhalten oder fortzusetzen tippen Sie auf das Symbol unten auf dem Bildschirm Um zu einem bestimmten Punkt imVideo zu springen schieben Sie die Fortschrittsleiste zum gewünschten Punkt Um zum nächsten oder letzten Titel zu gelangen tippen Sie auf die Symbole Verwenden Sie die Symbole und die Fortschrittsleiste wie in demVideo Player Bildschirm s...

Страница 24: ...ren ARNOVA entweder mit dem Windows Explorer oder mit dem Finder auf einem Mac übertragen oder indem Sie denWindows Media Player verwenden Verwenden Sie denWindows Media Player Tab Sync Synchronisieren um Musik Videos und Fotos IhrerWahl auf Ihrem ARNOVA zu synchronisieren Weitere Informationen entnehmen Sie bitte derWindows Media Player Hilfe Sobald die Dateiübertragung beendet ist schließen Sie ...

Страница 25: ... Internet en http arnovatech com register Ä Ä NECESITA AYUDA Tenga en cuenta que como estamos actualizando y mejorando constantemente nuestros productos el software de su dispositivo puede variar ligeramente con respecto a lo descrito en esta Guía Rápida En nuestro sitio web Consulte la sección de preguntas más frecuentes en http arnovatech com faq Póngase en contacto con nuestro equipo de Asisten...

Страница 26: ...seleccione Ajustes USB Mode select Si el Host port está desactivado dé un toque en la línea Host port para activarlo Importante apagar el Host port después de su uso Puerto mini USB para conectar el ARNOVA a un ordenador mediante el cable USB incluido para transferir archivos Inicio vuelve a la pantalla de inicio Toma de auriculares Conector de alimentación para conectar el cable de alimentación s...

Страница 27: ...s de una serie de pantallas que le ayudarán a configurar los parámetros principales idioma país hora etc Antes de utilizar su ARNOVA por primera vez cargue completamente la batería Cargado de la batería Conecte el cable de alimentación suministrado al conector de alimentación del ARNOVA y a una toma eléctrica de pared El ARNOVA se encenderá y empezará a cargarse ...

Страница 28: ...nes Android instaladas en el ARNOVA juegos distintas herramientas etc Puede copiarlas a la pantalla de inicio Us ted puede obtener otras aplicaciones Android desde la AppsLib en la página principal Estos son los accesos directos Android predeterminados Na vegador web EMail etc Dé un toque en un icono para abrir la aplicación correspondiente Pue de personalizar la pantalla de inicio añadiendo o eli...

Страница 29: ...l arrástrelo hasta la papelera de reciclaje mientras mantiene el dedo sobre un elemento la pestaña de Aplicaciones del lado derecho de la pantalla se convierte en una papelera de reciclaje y suelte el dedo Personalización del producto Cambio de los ajustes En la pantalla de inicio dé un toque en el icono de menú dé un toque en Ajustes y elija una categoría Conexiones inalámbricas Sonido y pantalla...

Страница 30: ...de una red que ya haya configurado una vez intentará realizar una conexión Para configurar una red WiFi nueva sitúese en la pantalla de inicio dé un toque en el icono de menú y a continuación seleccione Ajustes En la pantalla Ajustes seleccione Conexiones inalámbricas Si el WiFi está desactivado dé un toque en la línea Wi Fi para activarlo Después seleccione Configuración de Wi Fi El ARNOVA realiz...

Страница 31: ...talla pinche en cualquier lugar de la pantalla Para pausar o reanudar un vídeo pinche en el icono esquina inferior de la pantalla Para ir a un determinado punto en el vídeo deslice la barra de progresión hasta el punto deseado Para reproducir la canción siguiente o anterior pinche en los iconos Utilice los iconos y la barra de progresión de igual forma que para la reproducción de vídeo Para empeza...

Страница 32: ...lorador de Windows o la función Finder en un Mac o bien utilizando Windows Media Player Utilice Windows Media Player pestaña Sincronizar para sincronizar la música los vídeos y las fotos que elija en su ARNOVA Para saber más sobre esta función consulte la ayuda de Windows Media Player Una vez finalizadas todas las transferencias de archivos cierre el Explorador de Windows y cualquier otro programa...

Страница 33: ...tp arnovatech com Ä Ä register SERVE AIUTO Poiché i nostri prodotti vengono continuamente aggiornati e migliorati è possibile che il software del dispositivo si presenti in modo leggermente diverso o con funzioni modificate rispetto a quanto presentato nella presente Guida rapida Sul nostro sito Web Consultare la sezione FAQ Frequently Asked Questions all indirizzo http arnovatech com faq Contatta...

Страница 34: ... l icona quindi selezionare Impostazioni USB Mode select Se Host port è spento toccare la linea Host port per portarla sullo stato attivo Importante spegnere la Host port dopo l uso Porta mini USB per collegare ARNOVA al vostro PC utilizzare il cavo USB anche per trasferire files Schermata principale per tornare alla schermata principale Spinotto cuffie Connettore di alimentazione per collegare il...

Страница 35: ...e le impostazioni principa li lingua paese ora ecc Prima di utilizzare il dispositivo ARNOVA per la prima volta caricare completamente la batteria Caricamento della batteria Collegare il cavo di alimentazione fornito al connettore di alimentazione del dispositivo ARNOVA e a una presa a muro Il dispositivo ARNOVA si accende e viene avviata la ricarica ...

Страница 36: ...cona per mostrare le applicazioni Android installate sul vostro ARNOVA giochi tools vari ecc E possibile copiarli diret tamente sul vostro schermo Potete ottenere altre applicazioni Android dall Appslib che si trova sulla pagina iniziale dello schermo Icone delle Stato collegamen to wifi livello batteria ecc Icone di Notifica trascinare la barra degli stru menti verso il basso per mostrare i messa...

Страница 37: ...o sempre tenendo il dito premuto la barra delle applicazioni sulla parte destra dello schermo si trasforma in un cestino quindi rilasciare il dito personalizza il prodotto Cambio Impostazioni Dallo schermo sfiorare l icona menu toccare Impostazioni e scegliere una categoria Controlli wireless Audio e display Data e ora ecc Schermo intero Fare scivolare il dito in senso orizzontale sullo schermo pe...

Страница 38: ...l Internet Service Provider per ottenere i parametri di connessione appropriati Per configurare una nuova rete WIFI andare allo schermo principale sfiorare sul Menu l icona quindi selezionare Impostazioni Nello schermo Impostazioni selezionare Controlli wireless Se WIFI è spento toccare la linea Wi Fi per portarla sullo stato attivo Quindi selezionare Impostazioni Wi Fi Il ARNOVA inzierà la ricerc...

Страница 39: ...rea qualsiasi dello schermo Per sospendere o riprendere la riproduzione di un video toccare l icona parte inferiore dello schermo Per selezionare un punto specifico nel video fare scorrere la barra di avanzamento al punto desiderato Per riprodurre il brano successivo o precedente toccare le icone Utilizzare le icone e la barra di avanzamento come nella schermata del lettore video vedere sopra Per ...

Страница 40: ...lle usando Windows Explorer o Finder su Mac oppure usando Windows Media Player Utilizzare Windows Media Player sche da Sync Sincronizzazione per sincronizzare la musica le foto e i video desiderati nel dispositivo ARNOVA Per ulteriori informazioni consultare la Guida di Windows Media Player Una volta terminati tutti i trasferimenti dei file chiudere Windows Explorer e tutti gli altri programmi che...

Страница 41: ...et internet op http arnovatech com register Ä Ä HULP NODIG Omdat we onze producten voortdurend aanpassen en verbeteren kan de software van uw apparaat er een beetje anders uitzien of een licht gewijzigde functionaliteit hebben dan voorgesteld in deze Snelstartgids Op onze website Raadpleeg het onderdeel Frequently Asked Questions op http arnovatech com faq Neem contact op met onze Technisch onders...

Страница 42: ...togram en selecteert u Instellingen USB Mode select Als Host port uit staat druk dan op de Host port regel om het aan te zetten Belangrijk het uitschakelen van de Host port na gebruik Mini USB poort met de bijgesloten USB kabel kunt u uw ARNOVA met uw computer verbinden om bestanden over te brengen Home terug naar het Home scherm Hoofdtelefoonaansluiting Stroomaansluiting voor aansluiting van het ...

Страница 43: ...aar schermen leiden om u te helpen met de voornaamste instellingen taal land tijd enz Laad de batterij volledig op alvorens de ARNOVA voor de eerste maal te gebruiken De batterijen laden Sluit het meegeleverde netsnoer aan op de stroomaansluiting van de ARNOVA en op een stopcontact Uw ARNOVA zal worden ingeschakeld en starten met laden ...

Страница 44: ...plicaties te zien games verschillende instrumenten enz U kunt deze op uw beginpagina plakken U kunt meer Android toepassingen ophalen uit de AppsLib die u vindt op het Beginscherm Statuspictogrammen status WiFi verbinding batterij niveau enz Berichtgevingspictogrammen sleep de bo venste werkbalk naar beneden om eventuele berichten te zien Dit zijn de standaard Android snelkoppelingen Web Browser E...

Страница 45: ...t naar de prullenbak terwijl u uw vinger op een item houdt verandert het tabblad Applicaties aan de rechterkant van het scherm in een prullenbak en laat u het item tot slot los Personaliseer uw product De instellingen wijzigen Druk op het beginscherm op het menu pictogram druk vervolgens op Instellingen en kies een categorie Draadloze bedieningselementen Geluid en weergave Datum en tijd enz Het ui...

Страница 46: ...eerd hebt zal het proberen om hier verbinding mee te maken Om een nieuw WiFi netwerk te configureren gaat u naar het beginscherm drukt u op het Menu pictogram en selecteert u Instellingen In het Instellingen scherm selecteert u Draadloze bedieningselementen AlsWiFi uit staat druk dan op de Wi Fi regel om het aan te zetten Selecteer vervolgens Wi Fi Instellingen Uw ARNOVA zal nu gaan zoeken naar be...

Страница 47: ...scherm weer te geven of te verbergen Om een video te pauzeren of het afspelen te hervatten tikt u het pictogram aan onderaan op het scherm Om naar een specifiek punt in de video te gaan verschuift u de voortgangsbalk naar het gewenste punt Om het volgende of vorige nummer te spelen tikt u het pictogram aan Gebruik de pictogrammen en de voortgangsbalk zoals in het scherm van de videospeler zie hier...

Страница 48: ...van Windows Verkenner of met Zoeken op een Mac ofwel met behulp van Windows Media Player Gebruik Windows Me dia Player tabblad Sync om de muziek de video s en de foto s van uw keuze te synchroniseren Zie Help van Windows Media Player voor meer informatie Sluit zodra alle bestanden overgeplaatst zijn Windows Verkenner en eventuele andere toepassingen die bestanden op de ARNOVA hebben gelezen of bes...

Отзывы: