ARCHEAN Audio Accessibilite DCSTS-K072 Скачать руководство пользователя страница 14

14

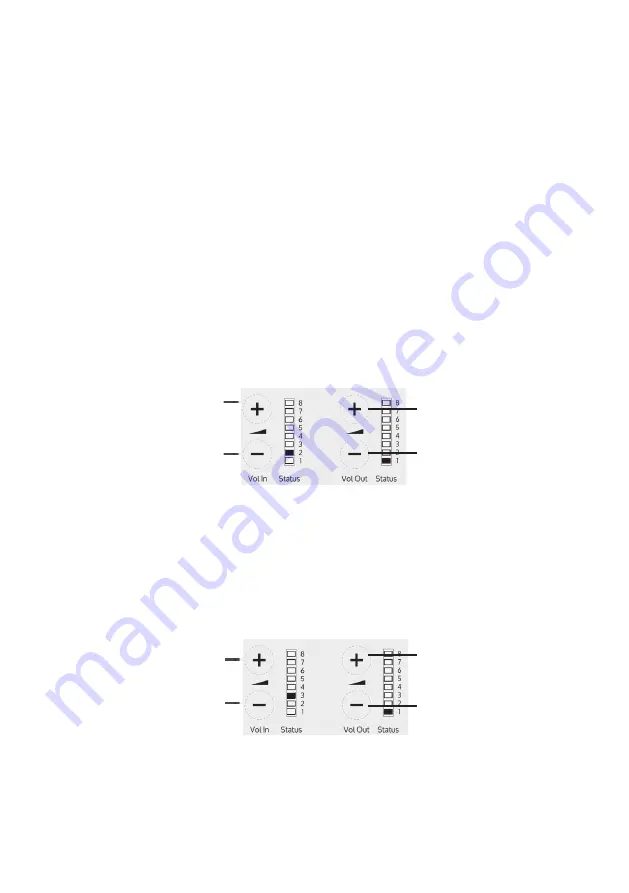
1.  Ensure the customer and staff volumes are turned completely down.

2.  Adjust staff (Volume In) volume to a comfortable level. Press and hold 

the Volume In (+) or (-) buttons to increase or decrease the level. The 

corresponding LED bar will show the volume setting.

3.  Increase customer (Volume Out) volume until feedback is heard. Press 

and hold the Volume Out (+) or (-) buttons to increase or decrease the 

level. The corresponding LED bar will show the volume setting.

4.  Decrease customer (Volume Out) volume until feedback is eliminated.

Setup Area 2:

Ducking Adjustment (LED 2 flashes)

Setup Area 2 allows you to adjust the Ducking level or to turn it on/off. 

The ducking function is provided to reduce feedback on a window intercom 

system. Feedback occurs when the overall setting of both volume controls 

is too high. The ducking system works by detecting which microphone in the 

conversation is being used, and temporarily reducing the volume setting.  

Increase  

ducking level
Decrease  

ducking level

Ducking on

Ducking off

Increase drive

Decrease drive

The drive levels should be adjusted so the red LED 8 is illuminated only when 

there are peaks in the speech volume. 

If the amplifier does not have a loop attached, turn the Hearing Loop Drive off 

as indicated in the diagram above.

Setup Area 3:

Hearing Loop Drive Adjustment (LED 3 flashes)

Setup Area 3 allows you to adjust the Hearing Loop Drive or to turn it on/off. 

Hearing loops improve communication by enabling hearing device users to 

hear sound sources directly, cutting out background noise. 

Hearing Loop Drive on

Hearing Loop Drive off

Содержание Audio Accessibilite DCSTS-K072

Страница 1: ...Window Intercom System Speaker Pod and Screen Mounted Microphone DCSTS K072 Installation User Guide December 2020...

Страница 2: ...Visitor Installation Hearing Loop Installation Amplifier Setup Troubleshooting Engineer s Mode 3 3 4 5 6 6 7 9 10 12 13 Contacta has a policy of continuous product development and therefore small spec...

Страница 3: ...ar barriers There is an optional hearing loop facility providing additional assistance for hearing device wearers 1 Installation and User Manual 2 Amplifier 3 IEC Lead 4 Power Supply 5 Hearing Loop Ae...

Страница 4: ...tone for the attention of staff Staff microphone Customer visitor microphone Confidence LED if required for status alerts and fault detection Hearing loop aerial Line in connection for external audio...

Страница 5: ...power supply to the required length to connect to the back of the amplifier Bare approximately 6mm of the cable ends to connect to the 2 pin plugs Wire Cutters Strippers Tape Measure Pencil or Marker...

Страница 6: ...e sitting 2 Mark the four fixing points for the amplifier under the counter 4 Drill and fix the amplifier in place using the supplied screws 6 Install the amplifier s power supply close to a power soc...

Страница 7: ...he cable hole back to the amplifier and fix the microphone in place using the supplied screws 5 Fix the microphone head to the screen using the double sided pad supplied 6 Place the staff pod on the s...

Страница 8: ...anagement holes drill suitable locations near the rear of both the staff and customer sides of the counter 10 Remove the top of the pods to gain access to the fixing points 11 Mark the two fixing poin...

Страница 9: ...on the aerial under the counter using either the provided P clips or another fixing method of your choice See the diagram below for recommended positioning A is the optimum layout for a counter hearin...

Страница 10: ...me In or buttons to increase or decrease the level The corresponding LED bar will show the volume setting 6 Ensure the mouse microphones are placed as close to their intended users as possible 7 Check...

Страница 11: ...Ds illuminated while the Volume Out LED bar will display the firmware revision number in a fixed pattern of LEDs This indicates that default settings have been restored Fault Diagnosis LEDs Volume In...

Страница 12: ...ections and if possible check the hearing device with a known working hearing loop 2 Ensure loop tester has a new set of batteries I can hear interference through speakers buzzing whistling hissing 1...

Страница 13: ...no buttons are pressed for 2 minutes There are 3 editable setup areas in Engineer s Mode You will always enter setup area 1 first The green Volume In LED bar will flash to indicate which setup area yo...

Страница 14: ...back on a window intercom system Feedback occurs when the overall setting of both volume controls is too high The ducking system works by detecting which microphone in the conversation is being used a...

Страница 15: ......

Страница 16: ...Local dealer Audio Accessibilit By ARCHEAN Technologies 1899 Avenue d Italie ZI Alba sud II 82000 Montauban France 33 0 5 63 93 50 00 contact audioaccessibilite tech www audioaccessibilite tech...

Отзывы: