background image

25 

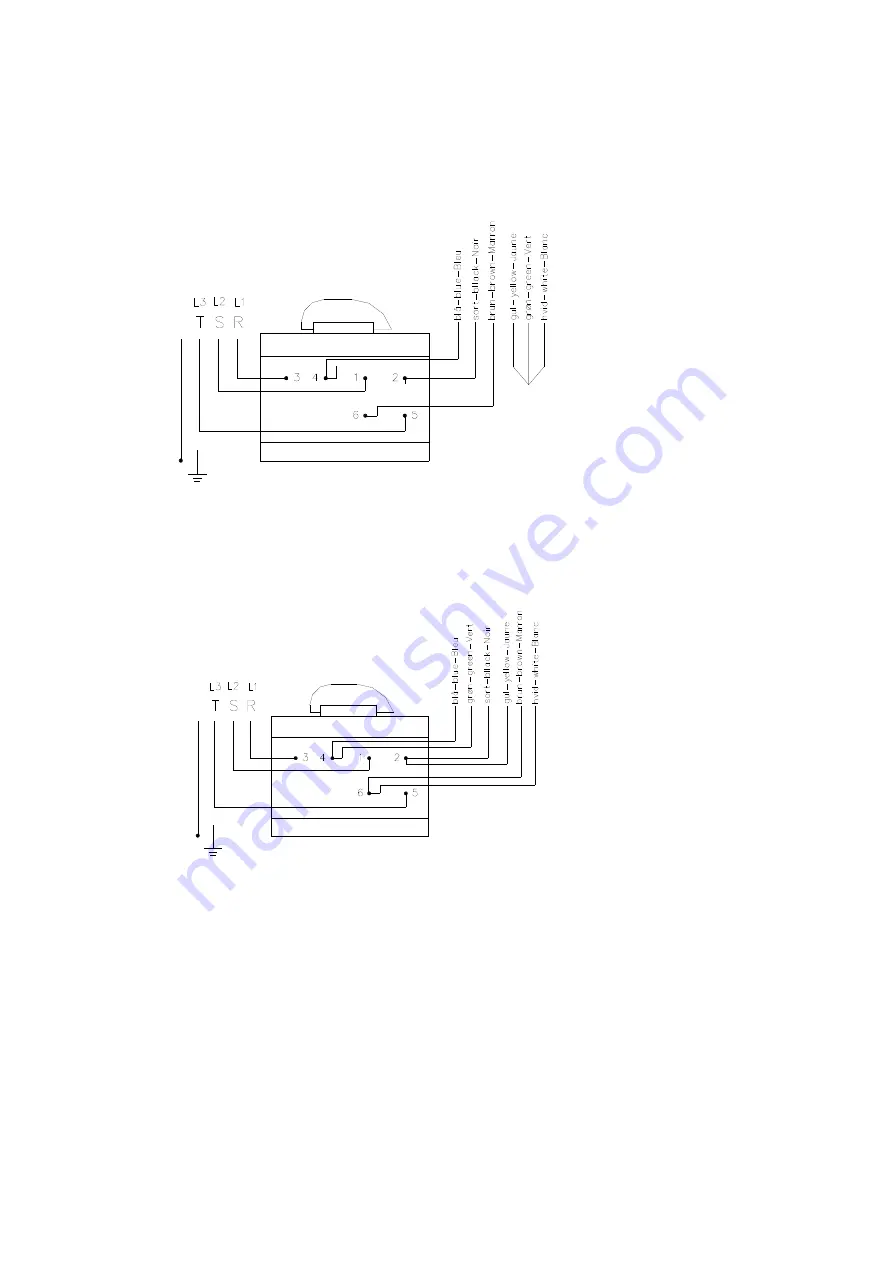
7.2 Wiring diagram 

 
E 308 industrial grinding machines can be wired 3 x 400 V, 50/60 Hz or 3 x 230 V 
50/60 Hz. See wiring diagrams below. 


Fig.: 6.2 


Max. Voltage 

Min. Voltage 

Содержание E 308

Страница 1: ...ARBOGA Industrivej 3 9 DK 9460 BROVST DENMARK TEL 45 98 23 60 88 FAX 45 98 23 61 44 Manual E 308 EP 308 EPB 308 POP 308 Industrial grinding machine ...

Страница 2: ...ament and Council Directive 2006 42 EC of 17 May 2006 And also in accordance with Low Voltage EUROPEAN PARLIAMENT AND COUNCIL DIRECTIVE 2014 35 EU of 26 February 2014 EMC EUROPEAN PARLIAMENT AND COUNCIL DIRECTIVE 2014 30 EU of 26 February 2014 ARBOGA A S Industrivej 3 9 DK 9460 Brovst Denmark www scantool group com Tel 45 98 23 60 88 Fax 45 98 23 61 44 ...

Страница 3: ...MACHINE 11 4 1 ADJUSTMENT THE POLISHING MACHINE 11 5 KU 8 EXHAUST SYSTEM 12 5 1 ASSEMBLING AND MOUNTING OF KU 8 EXHAUST SYSTEM 12 5 2 MAINTENANCE OF THE KU 8 EXHAUST SYSTEM 12 6 SPARE PARTS 13 6 1 MACHINE VIEW OF E 308 13 6 2 E 308 BASIC MODEL 14 6 3 E 308 COVER 15 6 4 E 308 BELT ARM 17 6 5 KU 8 EXHAUST SYSTEM FOR E 308 19 6 6 EX 16 EXHAUST UNIT FOR EPX 308 21 6 7 POP 308 W SPINDLE 22 6 8 POP 308 ...

Страница 4: ...formed by an authorised installer Please make sure that the motor has the correct direction of rotation please see the arrow on the cover Fig 1 1 Before operating the machine please control that the outer cover A see fig 1 1 is secured to the inner cover The outer cover must be mounted during use of the machine and can only be dismounted during maintenance The grinding wheel B must be able to rota...

Страница 5: ...sign He also knows that they are dangerous if misused This is the theme of a new safe use program for stationary power tools The safety rules are based on approved practices in industrial and home shops 1 Know your power tool Read the owner s manual carefully Learn its applications and limitations as well as the specific potential hazards peculiar to this tool 2 Keep guard in place and in working ...

Страница 6: ...safety glasses 13 Secure works Use clamps or vise to hold works when pratical It s safer than using your hands and it frees both hands to operate tool 14 Don t overreach Keep proper footing and balance at all times 16 Disconnect tools before servicing and when changing accessories such as grinding wheels polishing mops grinding belts blades bits cutters etc 18 Use recommended accessories Consult o...

Страница 7: ...er A see fig 2 1 then dismount the outer cover B The nut C is unscrewed and now the outer flange and the grinding wheel can be taken off The new grinding wheel is not allowed to exceed the measures given on the motor sign on the machine It is very important that the hole dimension is correct The grinding wheels are supplied with labels discs made of pressed material which are placed around the hol...

Страница 8: ...e arm C may not be tightened more than it is still possible to adjust the direction of rotation of the grinding belt The belt arm can be adjusted to the wanted inclination and then the holder for the telescope arm D must be tightened by tightening the two screws placed in the ring on the holder The flanges contact wheel and the lock nut is mounted see split drawing of the belt arm for order Please...

Страница 9: ...the grinding belt runs straight This is done by using the handle D which is loosened so the telescope arm E and the top roll F can be turned along until the grinding belt runs straight Now tighten the handle D This adjustment of the grinding belt may only be performed by pulling the grinding belt with your hands and with the POWER OFF Fig 3 2 There are many kinds of grinding belts and therefore it...

Страница 10: ...ge the graphite pad C on the grinding surface when needed Fig 3 3 When changing the contact wheel first dismount the grinding belt D as described above The nut E is unscrewed and the flange F is taken off together with the contact wheel B Mount the new contact wheel B in reverse order 3 4 Operating the belt arm Grinding on the belt arm can be done at the contact wheel or on the grinding surface It...

Страница 11: ...nual and on the motor sign Check for correct direction of rotation on the motor All wiring must be performec by an authorized electrician Fig 4 1 Before start operating please check if the polishing discs A see fig 5 1 are firmly secured to the rotor The polishing disc is mounted when the machine is disconnected The polishing disc A must rotate freely without being loose Checks and adjustments are...

Страница 12: ...ting pipe To the last fit the suction hoses G and mount them with the straps H Before use the KU 8 exhaust system must be mounted with suction hoses on the exhaust connecting pipe I which then is connected to the central exhaust system If the central exhaust system is not connected to a cyclone the exhaust from the KU 8 exhaust system must be connected to a cyclone and then connected to the centra...

Страница 13: ...13 6 Spare parts 6 1 Machine view of E 308 In the following we have illustrated split drawings and spare parts lists Fig 6 1 A Motor part B Grinding cover C Belt arm D KU 8 exhaust system ...

Страница 14: ...hield V 0187860 5 O ring 50x45x3 mm 1385259 6 Wave spring 50x44x0 6 0100331 7 Bearing 6205 2Z C3 0104221 8 Cable 4x0 75mm sort 0129420 9 Cable lead in PG11 0105154 10 Blind stop PG11 2112512 11 Stator housing 1313700 12 Split pin ø4x8 0711179 13 Rotor cpl 0766917 14 Bearing end shield H 1461142 15 DISA switch 230 V 0188807 16 DISA switch 440 V 0188814 17 Skrew M4x10 0100427 18 Switch for DISA swit...

Страница 15: ...15 6 3 E 308 cover Fig 6 3 Split drawing of E 308 cover ...

Страница 16: ... shield ARBOGA 0114351 0114351 14 Clamp for eye shield new model 0110010 0110010 15 Spring 5x10mm 0112911 0112911 16 Machine screw M5x25 PHJX Z 0112732 0112732 17 Screw M5x10 CH Z 0120628 0120628 18 Spring disc DIM 5 Z 0102555 0102555 19 Lock nut M8 0928640 0928640 20 Mounting plate f cover ARBOGA 308 0318522 0318522 21 Cover ARBOGA 308 ext 1003109 1003110 22 NutM20x1 5 0744824 0744816 23 Flange e...

Страница 17: ...17 6 4 E 308 belt arm Fig 6 4 Split drawing of E 308 belt arm ...

Страница 18: ...10 2188010 21 Fittings for telescope arm 1533813 1533813 22 Spring disc DIM 8 Z 0132594 0132594 23 Screw M8x25 CH Z 0120620 0120620 24 Middle ring 4318001 4318001 25 Pointed screw M8x16 2078210 2078210 26 Holder for telescope arm 2078211 2078211 27 Tool rest 0744425 0744409 28 Disc 3 8 Z 0101491 0101491 29 Screw M10x30 Z 0120707 0120707 30 Cover box for belt arm 1533780 1533781 31 Spring disc DIM ...

Страница 19: ...19 6 5 KU 8 exhaust system for E 308 Fig 6 5 Split drawing of KU 8 exhaust system for E 308 ...

Страница 20: ...n housing RIGHT ext 0785636 0785636 16 Electric motor 1043072 1043064 17 Threaded rod PG11 0920011 0920011 18 Protection hose 18x13 400mm 0920400 0920400 19 Dust bag 0811793 0811793 20 Screw M4x16 m pan headed 2006480 2006480 21 Cork washer 120x9 2006728 2006728 22 Exhaust connecting pipe 1444190 1444190 23 Screw M5x10 CH Z 0120628 0120628 24 Spring disc DIM 5 Z 0102555 0102555 25 Strap 68 85 1944...

Страница 21: ...308 6 6 1 Spare parts list for EX 16 exhaust unit for EPX 308 Pos No Description Item no 1 Screw M12x40 Z 7654320 2 Disc ø13x24x2 5 0105167 3 Water cup 0771333 4 Table 1065106 5 Tap tite M4x8 1242946 6 Pedestal 3x400 1022342 10 Dust bag 0811793 11 Strips 68 85 1944266 12 Suction hose 2006731 ...

Страница 22: ... Spare parts list for POP 308 w spindle Pos nr Benævnelse V H 1 Polishing guard w exhaust 1065267 1065268 1 Polishing guard no exhaust 1065269 1065270 2 Disc 6mm 0737631 0737631 3 Skrew M6x10 0110089 0110089 5 Spindle 1100742 1100750 6 Polishing Mop 200x20xø6 1531557 1531557 ...

Страница 23: ...w flange Pos nr Type Left Right 1 Polishing guard Left 1065267 1065268 1 Polishing guard Right 1065269 1065270 2 Disk 6mm 0737631 0737631 3 Skrew M6x10 0110089 0110089 4 Flange inner 0921572 0921572 5 Polishing Mop ø200x20xø6 1531506 1531506 6 Flange outer 1105183 1105183 7 Nut M20x1 5 0744824 0744816 ...

Страница 24: ...54 Class F F F F Amp w 230V 3 3 3 3 3 3 3 3 Amp w 400V 1 7 1 7 1 7 1 7 Cos 0 81 0 81 0 81 0 81 Weight 30 75 75 75 The noise level for these machines have been measured to 76 dB A in accordance to the measuring device in the AT notification no 561 on fixture of technical aids 7 2 Dimensions Fig 7 1 Model A B C D E F G H I J E 308 355 415 340 400 930 1190 1680 125 400 670 EP 308 355 415 340 400 930 ...

Страница 25: ...25 7 2 Wiring diagram E 308 industrial grinding machines can be wired 3 x 400 V 50 60 Hz or 3 x 230 V 50 60 Hz See wiring diagrams below Fig 6 2 Max Voltage Min Voltage ...

Страница 26: ... The product has not been misused or carelessly handled and in particular has not been used in a manner contrary to the operating instructions 3 Repairs have not been made or attempted by other than our own Service Staff or the staff of our Official Service Agents 4 Documentary proof of purchase date is produced when the goods are handed in or sent for repair 5 Wear parts are not covered by the wa...

Отзывы: