34
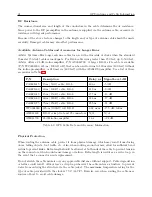
The Setup Menus
No.
Setup Menus
Setup Items
1
Main RS-232C
Main RS-232C Port Parameters and Broadcast
2
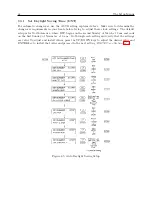
Local Hour & DST
Set Local Offset, Daylight Saving mode
3
Out Of Lock
Set Time Interval Before Alarm
4
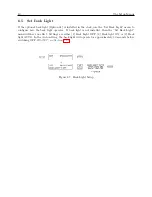
Backlight
Set to ON, OFF or AUTO
5
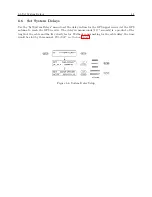
System Delays
Set Timing Delay in Nanoseconds
6
Programmable Pulse
Set Mode, Pulse Width and Time Zone
7
IRIG-B Time Data
Set IRIG-B Time Zone and IEEE-1344
8
Event/Deviation
Set for Event, or 1–PPS Deviation
9
Freq. Reference
Set to Internal or External
10
Set Auto Survey
Set Survey mode
11
Position Hold
Set ON or OFF
12
Option Control
Set Slot A and Slot B options
Table 6.1: Front-Panel Setup Menus
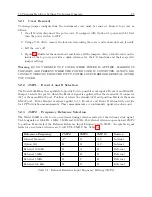
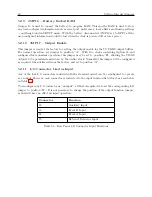
ENTER
: Press the Enter key to confirm changes made within SETUP menus. Generally, pressing
ENTER also advances the next parameter, or returns to the previous menu level. In numeric data
entry mode, press ENTER to move the cursor to the right.
UP
: Press the UP key, within the SETUP menus, to adjust numerical values upward, or to scroll
upward through the available menu choices. The UP key also assists in navigating through main
Setup Menus in normal order.
DOWN
: Press the DOWN key, within the SETUP menu, to adjust numerical values downward, or
to scroll downward through available menu choices. Also assists in navigating through main Setup
menus in reverse order.
6.1.2
Numeric Data Entry Mode
Numeric data entry mode is activated anytime you enter a menu that requires a change in numerical
value and press either the UP or DOWN key to change the digit value. When in this mode, the
function of the SETUP and ENTER keys change to give left and right cursor control.
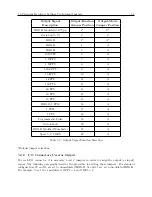
6.1.3
Default Firmware Settings
When shipped from the factory, and unless specified otherwise, all models will be configured with
default settings.
Many users elect to modify the clock settings to fit their locale and desired
operation. Default settings are listed in Table 6.2.
Содержание 1088A
Страница 4: ...iv ...
Страница 6: ...vi ...
Страница 18: ...xviii LIST OF FIGURES ...
Страница 23: ...1 4 Attaching Rack Mount Ears to 1088A B Series Clocks 3 Figure 1 2 Attaching Rack Mount Ears ...
Страница 24: ...4 Unpacking the Clock ...
Страница 32: ...12 Front and Rear Panels ...
Страница 38: ...18 Connecting Inlet Power Input and Output Signals ...
Страница 41: ...4 1 GPS Antenna Installation 21 Figure 4 2 Antenna Mounting Bracket Figure 4 3 Antenna Mounting with AS0044600 ...
Страница 46: ...26 GPS Antenna and Cable Information ...
Страница 48: ...28 Setting Internal Jumpers Figure 5 1 Model 1088B Main Board ...
Страница 76: ...56 The Setup Menus ...
Страница 112: ...92 Serial Communication and Command Set ...
Страница 127: ...B 4 Physical Dimensions 107 Figure B 1 Suggested Mounting of the AS0094500 Surge Arrester ...
Страница 128: ...108 Using Surge Arresters ...
Страница 137: ...C 5 Option 04 Parallel BCD Output 117 C 5 2 Option 04 Firmware Setup Figure C 2 Option 04 Firmware Setup ...
Страница 145: ...C 5 Option 04 Parallel BCD Output 125 Figure C 4 Option 04 Output Jumper Settings ...
Страница 146: ...126 Options List Figure C 5 Option 04 Board Layout and Jumper Locations ...
Страница 165: ...C 12 Option 17 Parallel BCD Output and Second RS 232 Port 145 Figure C 11 Option 17 Output Jumper Settings ...
Страница 166: ...146 Options List Figure C 12 Option 17 Board Layout and Jumper Locations ...
Страница 176: ...156 Options List C 14 5 Typical Network Configuration Figure C 15 Option 18 Network Configuration ...
Страница 187: ...C 16 Option 20A Four Fiber Optic Outputs 167 Figure C 22 Option 20A Jumper Locations ...
Страница 194: ...174 Options List Figure C 24 Option 23 Internal Jumper Setup ...
Страница 196: ...176 Options List Figure C 25 Option 27 Jumper Locations ...
Страница 214: ...194 Options List Figure C 28 Option 29 Connector Signal Locations ...
Страница 270: ...250 Options List ...


