background image

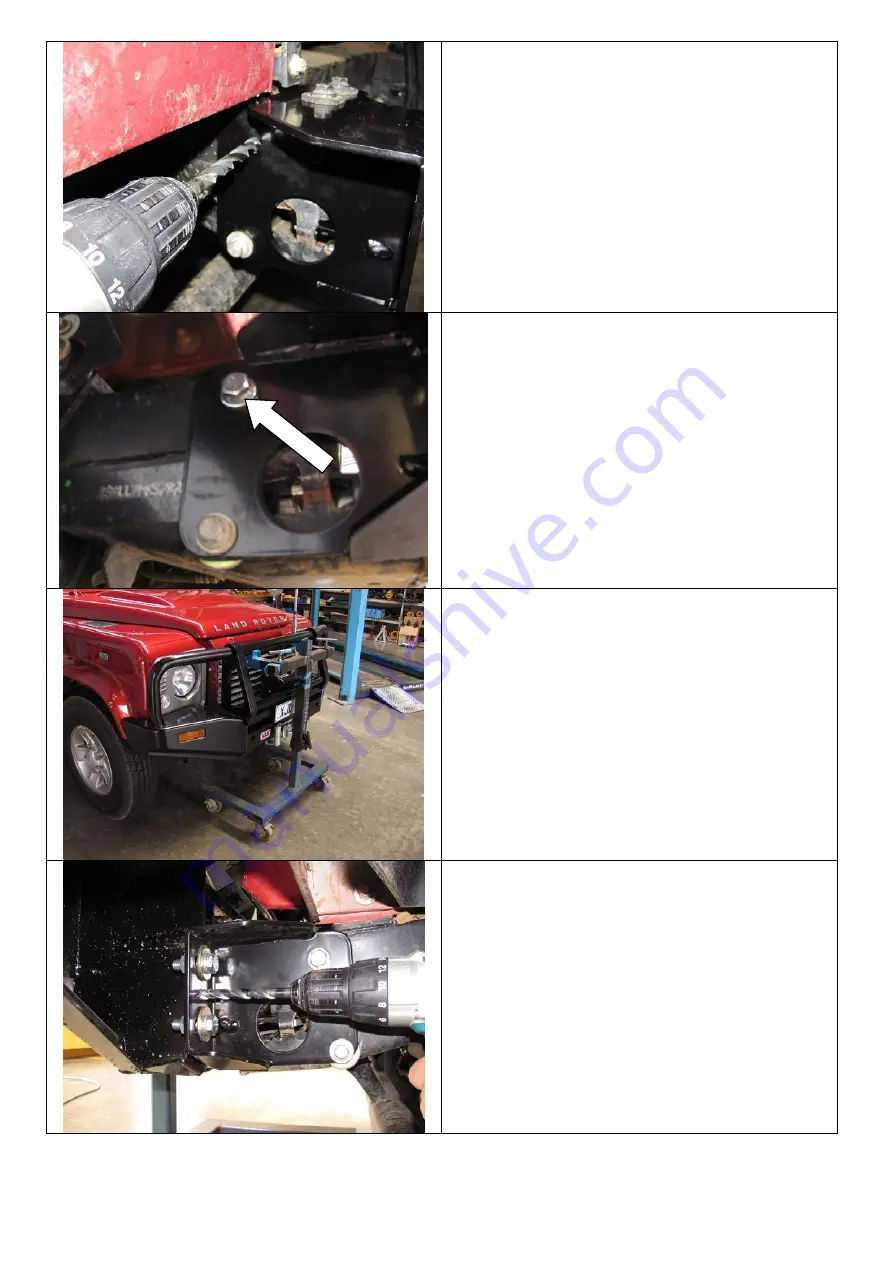
29. Drill through the chassis rails with the

10mm drill bit using the upper holes in the

mount bracket as a guide.

30. Repeat both sides.

31. Use paint or anti rust on the bare metal of

newly drilled hole.

Note: Only drill through one side of each rail.


32. Place an M10 SEMS bolt assembly through

each of the hols and secure using M10

flange nuts.

33. Tighten to above specified torque setting.

Note: If fitting a winch, it should be done now 

using fitting kit 3532070 and fitting 

instructions 3787082 

34. Replace the grille using the screws

removed in step 1.

35. Place the bar back into position and re-

secure using the M12 fasteners and shims

if required.

36. Locate bar as per step 16.

37. Tighten all fasteners to above specified

torque setting.

38. Using the holes in the mount brackets as a

guide, drill pinning holes through the bar

mounts.

39. Place an M10 SEMS bolt assembly through

each of the holes and secure using M10

flange nuts.

40. Tighten to above specified torque setting.

Содержание 3432300

Страница 1: ...ke or model other than those specified by ARB Do not remove labels from this bull bar This product or its fixing must not be modified in any way The installation of this product may require the use of specialized tools and or techniques It is recommended that this product is only installed by trained personnel These instructions are correct as at the publication date ARB Corporation Ltd cannot be ...

Страница 2: ...o have this service carried out on your behalf HAVE AVAILABLE THESE TOOLS WHEN FITTING PRODUCT BASIC TOOL KIT ELECTRICAL TAPE HACKSAW OR JIG SAW SUITABLE TO CUT PLASTIC DRILL WITH 10MM HSS DRILL BIT NOTE WARNING notes in the fitting procedure relate to OHS situations where to avoid a potentially hazardous situation it is suggested that protective safety gear be worn or a safe work procedure be emp...

Страница 3: ...he number plate from the bumper bar 4 Remove and retain the 4 bolts from the top of the factory bumper bar 5 Remove the factory bumper 6 Remove and retain the nut plates from the bumper bar 7 If fitted remove and discard the nut plate retaining clip 8 Discard the bumper bar 9 Remove and retain the 2 lower front bolts and washers holding the factory protection bar to the chassis ends 10 Discard the...

Страница 4: ... mounts using 4 M12 x 1 25 x 40 Hex Bolts OR 4 M12 x 1 25 x 50 Hex Bolts 4 M12 Spring Washers 8 M12 flat washers and 4 M12 x 1 25 nuts Note To determine if the 40mm or 50mm bolts should be used there should be a minimum of 3 FULL threads protruding past the nut when the bar mount and final shim qty is assembled and tightened 17 Align the bar so that it is level central to the vehicle And at a desi...

Страница 5: ...the chassis rails as a guide drilling from the inside outward 23 Use paint or anti rust on the bare metal of newly drilled hole 24 Repeat both sides 25 Pull the factory protection bar back into position 26 Place an M12 washer in between the mount bracket and the chassis rail as a packer and hold in place using the bolts and washers removed in step 9 27 Secure using the 2 new M10 nylock nuts from t...

Страница 6: ...ng Note If fitting a winch it should be done now using fitting kit 3532070 and fitting instructions 3787082 34 Replace the grille using the screws removed in step 1 35 Place the bar back into position and re secure using the M12 fasteners and shims if required 36 Locate bar as per step 16 37 Tighten all fasteners to above specified torque setting 38 Using the holes in the mount brackets as a guide...

Страница 7: ...des 43 Attach the indicator lamps to each side of the bar using the self tapping screws provided with the lamps 44 Attach one of the looms to each of the indicators 45 Cover the looms with the convoluted tube supplied 46 Undo the 2 screws hold the indicators onto each side of the vehicle and pull the indicator housings away from the vehicle ...

Страница 8: ... Connect black with black and red with green 49 Cover the joins with electrical tape 50 Test the wiring by switching the vehicles indicators on and checking to see if the new bar lamps work correctly 51 Replace the indicators onto the vehicle 52 Tidy the wiring using cable ties 53 If a winch is not fitted fit the number plate to the lower 2 holes above the winch cavity using M6 hex bolts M6 washer...

Страница 9: ...Winch Bull Bar fitted to vehicle Winch Bumper fitted to vehicle ...

Отзывы: