PAGE 18
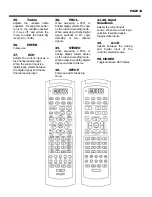
(REW) button on the remote control will manually adjust the analog input level up or
down respectively in 1/2 dB steps. For each 1/2 dB step, you must press the SHIFT
button. If the analog input level is raised too high, once clipping is detected it will
automatically lower to the optimum level.
Separate Audio and Video Input Switching
The first time an input is selected, using the input selection buttons at the bottom of the
remote control, both the Audio and Video will switch simultaneously. Pressing the
selected source button a second time will switch the Video to the previously selected
Video source. If the previously selected Video source is the same as the current Video
source, the picture will not change. To utilize this feature, first select your Video source,
then select your audio source, and again press the source button to switch the Video
back to the previously selected input.
System Lock
In certain situations it may be advantageous to "lock" the system. Once all settings have
been adjusted for the Soundstage, by locking the system, no permanent changes can be
made to channel balances, or the Custom Menus. In the LOCKED mode, you will not be
able to access the Custom Menus, the Setup Menu, or the Setup Guide. (on the fly level,
and balance adjustments are still allowed but these settings are not saved) To lock the
Soundstage, turn off the power to the processor. With the preamp power off, press the
and VOLUME - buttons on the front panel simultaneously, and with these
buttons depressed, press the power button. This will toggle the Soundstage between
Locked (indicated by a capital L on the front panel display) and Unlocked mode.
(indicated by a capital U on the front panel display) Once you have the processor in the
correct mode, you can release all buttons. The mode indication will remain on the front
panel display until the Soundstage is powered on again.
Front/Rear Balance
Front to rear balance can be adjusted temporarily by one of the rear channel buttons on
the remote. This will only be available in modes that utilize rear channels. Moving the
Balance toward the rear channels will lower the volume of the front channels. Moving
the Balance toward the front channels will lower the volume of the rear channels. As this
is a temporary adjustment, the next time a mode is loaded, the balance will be reset to
the center position. If you find that you must constantly adjust the front to rear balance,
it may indicate that your channel balance are not set properly.
CUSTOM MENUS
CUSTOM MENUS
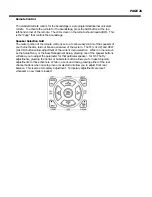
Enter the Custom Menus by pressing the MENU button on the remote. The PAUSE button, and the STOP button
are used to scroll the list of menus up and down. Select the item you would like to adjust by pressing the
corresponding number on the remote. Use the LVL UP, and LVL DN buttons to adjust the setting. Once you have
accessed a particular menu setting, pressing MENU again will bring you back to the custom menu selection screen,
and pressing MENU once again will exit the Custom Menus.
1. Scroll Test Tones
The default setting is YES. By setting this to NO, when you are in the Setup Mode the
Test Tones will not scroll from speaker to speaker. The Test Tone can be selected at a

