20
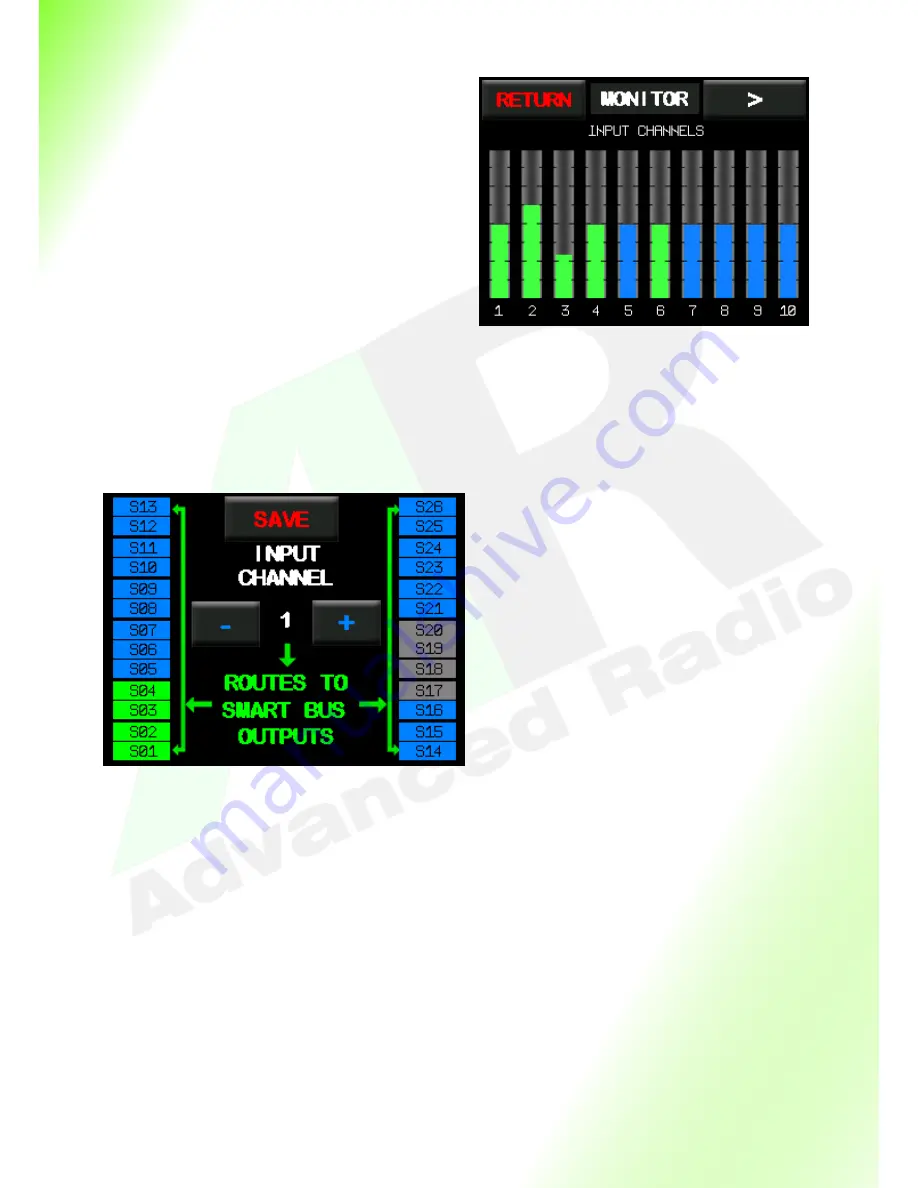
Note: The monitor gives you a visual indication of
the assigned input channels from your receiver.
Your new SmoothFlite RRS comes with primary
control surfaces pre
-
assigned to simplify your set-
up.
Hint: Create a new model on your transmitter with
dual aileron channels, single elevator and single
rudder channels.
If all is connected correctly, moving the transmitter
sticks will cause the green bars on the monitor
screen to move.
As you can see, the monitor screen is a good tool
for viewing input channel assignments.
For advance setups, we have included a blank
assignment sheet at the end of this user guide.
The following steps will show you how you can re-
assign channels from the factory setup.
Press return from the monitor screen to return to
the main menu.
Step 4
From the main menu, tap the I/O Routing
button. The screen (on the left) should ap-
pear. In this example, transmitter input chan-
nel 1 (coloured white) routs to servo outputs
S01, S02, S03 and S04, which are coloured
green.
Lets show how easy it is to assign and de
-
assign additional servo outputs to transmitter
channel 1.
With the Stylus supplied, tap the Blue S13
button on the Smart Screen. The S13 should
turn green. We have now added servo output
13 (S13) to transmitter input channel 1.
SmoothFlite makes it that simple!
Tapping S13 a second time, will de
-
assign it
turning it back to blue.
Note: The servo channels are colour coded.
Green
= they are assigned to the current transmitter input channel.
Blue
= they are not assigned to any transmitter input channel and are available .
Grey
= they have been assigned to a different transmitter input channel other than the one currently
selected and cannot be selected for this channel.
Step 5
Lets now show you how to move through transmitter input channels. With the Stylus, tap the Plus (+)
button once. You should see the input channel change to 2 (coloured white), and the previously green
servo output channels will become grey (remember these servo outputs were assigned to input channel 1
so they are not available to input channel 2). Depending on the chosen protocol other servo outputs
should show as green i.e. they are assigned to input channel 2. Tapping the Plus (+) sign will move you to
higher input channels. Tapping the Minus (
-
) sign minus sign will move you to lower input channels and
eventually back to input channel 1.
Note: you must press the
SAVE
button in order to confirm any changes to the channel routing. Pressing
save also returns you to the Main Menu.
Содержание SmoothFlite RRS
Страница 1: ...SmoothFlite RRS User Guide ...
Страница 26: ...26 Page Intentionally Left Blank ...
Страница 65: ...65 Notes ...


