background image

aquatic Industries, Inc.

15

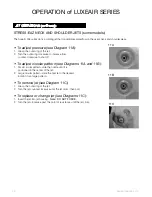
OPErATiON of LuxEAir SEriES 

NOTE: dO NOT STArT PumP uNTiL ALL jETS ArE SuBmErgEd.  wATEr LEVEL ShOuLd  
BE 2” ABOVE highEST jET.

 jET OPErATiONS:

FuLL SizE PrESSurE-FLO hydrOThErAPy jET:

All  Full-size  Pressure-Flo  hydrotherapy  Jets  can  be  interchanged  with  the  hand  held  Jet.   

NOTE: 

For  operation 

information, please see Diagrams 12A, 12B and 12c on page 17.

AquATiC rOTAry mASSAgE jET:

The Aquatic rotary Massage Jet is a highly versatile, full-size jet.  As with all jets in this series, the pressure and 

circular pattern are fully adjustable.

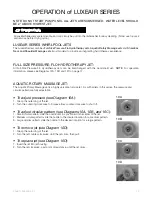
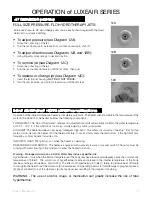
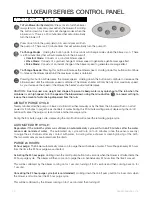
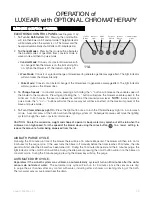
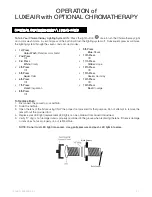
•  To adjust pressure (see Diagram 10A):

1.  grasp the outer ring of the jet.

2.  Turn the outer ring clockwise to increase flow, counter-clockwise to shut off.

•  To adjust circular pattern (see Diagrams 10A, 10B, and 10C):

1.  small circular pattern: slide the nozzle until it is positioned in the center of the jet.
2.  Medium circular pattern: slide the nozzle to the desired location for a medium pattern.
3.  Large circular pattern: slide the nozzle to the desired location for a large pattern.

•  To remove jet (see Diagram 10D):

1.  grasp the outer ring of the jet.

2.  Turn the jet counter-clockwise, until the jet clicks, then pull.

•  To replace jet (see Diagram 10D):

1.  Insert the jet into jet housing.

2.  Turn the jet clockwise, past point of resistance, until the jet clicks. 

LuxEAir SEriES whirLPOOL jETS

The LuxeAir Series combines 

Full-Size Pressure-Flo hydrotherapy jets, Aquatic rotary massage jets 

and 

StressEaz 

Neck and Shoulder massage jets

 (most models) to provide an invigorating hydrotherapy experience. 

10B

10C

10d

All LuxeAir series jets are removable, and can simply be put into the dishwasher for easy cleaning.  (Note: use top rack 

and remove before drying cycle.)

10A

Содержание LuxeAir Series

Страница 1: ...Owner s Manual Installation Guide Note Read all instructions before proceeding with installation All specifications are 1 4 and are subject to change without notice LUXEAIR SERIES ...

Страница 2: ...eration Jet Operations 15 Inline Maintenance Heater Operating Instructions 17 Bathside Control Systems 18 Maintenance and Care Initial Cleaning 22 Whirlpool System Cleaning 22 Air Bath System Cleaning 22 Surface Cleaning 22 Jet Cleaning 22 Surface Scratch Removal 22 Repair Information 22 Water Quality Issues 22 User Information 25 FCC Information 25 Serial Number How to Locate 25 Troubleshooting g...

Страница 3: ...o confirm registration Please fill out the information below and reference when contacting the distributor to expedite warranty claims Owner Information Model Name Serial Number See Table of Contents for Location Purchase Date Distributor P O Box 889 Leander TX 78646 0889 Phone 800 928 3707 Fax 888 296 7450 Aquatic Industries Inc Product Registration Information ...

Страница 4: ...o these instructions during the life of your whirlpool Failure to comply with these instructions may invalidate your warranty If you have any questions concerning installation operation maintenance or any other aspect of your whirlpool please contact AQUATIC INDUSTRIES CUSTOMER SERVICE CENTER 800 928 3707 The Troubleshooting Guide on page 27 may be helpful in answering some of your questions Impor...

Страница 5: ...unconsciousness with the possibility of drowning Never use the whirlpool while under the influence of alcohol anticoagulants stimulants antihistamines vasoconstrictors vasodilators hypnotics narcotics or tranquilizers G Persons with a medical history of heart disease low or high blood pressure circulatory system problems or diabetes should consult a physician before using a whirlpool H Persons usi...

Страница 6: ...run pump for 10 minutes 6 With the pump running turn on the blower Check all functions 7 Inspect the tub completely Any defect must be reported to Aquatic Industries Inc prior to installation in order to have it covered by warranty Should inspection indicate any damage do not install the bath 8 Check to ensure that your installation will conform to all applicable codes and secure necessary permits...

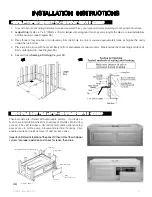
Страница 7: ...tions and noise 3 Tub must rest entirely on all leveling feet or ABS Support Base DO NOT SUPPORT THE WEIGHT OF THE TUB BY THE RIM Lift unit and place into framework If necessary adjust feet until unit is completely touching on the leveled sub floor Secure the unit by fastening the bottom feet to the sub floor with any construction adhesive caulk For quieter operation and heat conservation the wall...

Страница 8: ...ning should be 1 smaller than the specified rim dimensions Extreme care must be taken in this type of installation to ensure the tub will come to rest entirely on the leveling feet or ABS Support Base 6 IF YOU HAVE PURCHASED A WHIRLPOOL WITH AN INSTALLED TILE FLANGE PROCEED TO INSTRUCTION A STRUCTURAL PREPARATION continued Factory installed tile flange 2A LuxeAir 31 32 INTEGRALLY SKIRTED baths Alc...

Страница 9: ...mly on ledger strip see Diagram 3A 5 See and follow Sealing Finishing Diagram 3B These models are offered with removable panels It provides a flush to wall installation sheet rock overlaps skirt while still providing access The skirt features a decorative removable panel enabling easy access to motor pump blower and electrical hookups Clips enable simple and quick removal of skirt access panel Imp...

Страница 10: ...ecifications are subject to change as we improve upon our product as required The dimensions needed for site preparation and structure building will differ Aquatic Industries Inc assumes no responsibility for preparatory work B A 5A 1 After securing tub in place normal waste and overflow and valves are installed per normal plumbing procedures in accordance with all state and local standards 2 Inst...

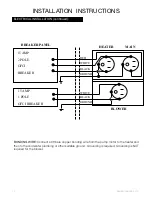
Страница 11: ...black wire to the hot side of the receptacle the white wire to the neutral side of the receptacle and the green wire to ground Replace the cover and plug in the blower See diagram on page 12 The second junction box will have two outlets one labeled Main and the other labeled Heater Remove the cover Run Romex 14 3 with ground from a 15 amp 2 pole GFCI breaker not supplied located in the breaker pan...

Страница 12: ...and then to the cold water plumbing or other suitable ground Grounding is required Grounding is NOT required for the blower breaker panel 15 AMP 2 POLE GFCI BREAKER 15 AMP 1 POLE GFCI BREAKER BLOWER MAIN HEATER WHITE RED BLACK GROUND WHITE BLACK GROUND INSTALLATION INSTRUCTIONS electrical installation continued ...

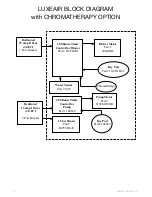
Страница 13: ...ker 20 Minute Timer Control for Blower Part 1102 Key Pad Part 1104PAD Dedicated 15 amp 110vac w GFCI 2 Pole Breaker 20 Minute Timer Control for Pump Part 1103 Pump Motor Part 8108MOTOR Blower Motor Part 1104BLOWER 1 5 kw Heater Part 8095THEAT Communication Cable Water Sensor Part 1102SENSOR ...

Страница 14: ...le Breaker 20 Minute Timer Control for Blower Part 8075BOX Key Pad Part 1110PADCL Dedicated 15 amp 110vac w GFCI 2 Pole Breaker 20 Minute Timer Control for Pump Part 100820 Pump Motor Part 8108MOTOR Blower Motor Part 8000BLW 1 5 kw Heater Part 8095THEAT Water Sensor Part 1025 Chromatherapy Key Pad Part 100667 ...

Страница 15: ...0A 10B and 10C 1 Small circular pattern slide the nozzle until it is positioned in the center of the jet 2 Medium circular pattern slide the nozzle to the desired location for a medium pattern 3 Large circular pattern slide the nozzle to the desired location for a large pattern To remove jet see Diagram 10D 1 Grasp the outer ring of the jet 2 Turn the jet counter clockwise until the jet clicks the...

Страница 16: ...er clockwise to shut off To adjust circular pattern see Diagrams 11A and 11B 1 Small circular pattern slide the nozzle until it is positioned in the center of the jet 2 Large circular pattern slide the nozzle to the desired location for a large pattern To remove jet see Diagram 11C 1 Grasp the outer ring of the jet 2 Turn the jet counter clockwise until the jet clicks then pull To replace or chang...

Страница 17: ...ure of 98 6o F The symptoms of hyperthermia include an increase in the internal temperature of the body dizziness lethargy drowsiness and fainting The effects of hyperthermia include 1 failure to perceive heat 2 failure to recognize the need to exit the whirlpool 3 unawareness of impending hazard 4 fetal damage in pregnant women 5 physical inability to exit the whirlpool 6 unconsciousness resultin...

Страница 18: ...s button to a lower setting to reduce the amount of water being dispersed from the tub Air Bath Purge Cycle Twenty minutes after the pump or blower is turned off either manually or by the timer the blower will turn on at full power for 3 minutes to purge the air channels of water During this 20 minute waiting period depressing the on off button will cancel the purge cycle and starts another massag...

Страница 19: ...erapy Light on in color wash mode A second press of the button will turn the lighting system off Subsequent presses will move the lighting system through the seven constant color modes CAUTION Due to the varied size weight and shape of a person s body water may splash out of the tub when the air blower is on high speed Turn the speed of the blower down using the minus button to a lower setting to ...

Страница 20: ...for the user to differentiate it from the standby of the regular purge cycle The purge will be done every day at the same time the user activated it pressed the button By pressing the button again the 24 hour purge will be deactivated and the light indicator on the on off button will stop blinking and turn off operation of LuxeAir with Optional Chromatherapy The On Off Electronic Button with Timer...

Страница 21: ...piration 8th Press Off To Replace Bulb 1 Disconnect the power to your bathtub 2 Drain the bathtub 3 Open the lens of the fixture using ONLY the proper tool provided for that purpose Do not attempt to remove the lens without the provided tool 4 Replace your LED light replacement LED lights can be obtained from Aquatic Industries 5 Verify O ring is not damaged and is properly positioned in the groov...

Страница 22: ...bath cleaning Before tub is used your air bath and plumbing system should be flushed Close the drain Fill bath with hot water to at least six inches above air injector holes Add 2 teaspoons of low sudsing automatic dishwashing detergent and no more than 4 ounces of bleach to the water DO NOT use bleach or other chlorinated cleansers on metal trim surrounding control panels Turn blower on for appro...

Страница 23: ...ntact the water supplier to determine the iron content and or corrosion potential of the water and follow their suggestions for treatment If you are on an individual well you need to contact a water treatment company to test your water and suggest solutions if a problem is present Manganese Manganese is found in many natural waters especially from wells High manganese levels may result in the form...

Страница 24: ...the whirlpool tub If excess accumulations persist you should discontinue use of these products If you have followed the monthly purging instructions and still have an excess accumulation of bath residue and desire an alternative cleaning mechanism we recommend SUPER SYSTEMS CLEAN PLUS manufactured by Stearns Packaging Corporation to rectify this condition This may be obtained by contacting Aquatic...

Страница 25: ...nstallation However there is no guarantee that interference will not occur in a particular installation If this equipment does cause interference which can be determined by turning the equipment on and off the user is encouraged to try to correct the interference by one or more of the following measures Reorient the receiving antenna Relocate the receiver with respect to the bath tub Move the rece...

Страница 26: ... Lucite acrylic surface to come into contact with products such as acetone nail polish remover nail polish dry cleaning solution lacquer thinners gasoline pine oil etc Remove dust with a soft dry cloth Clean grease oil paint and ink stains with isopropyl rubbing alcohol SURFACE CLEANING All LuxeAir Series jets are removable and can simply be put into the dishwasher for easy cleaning See Jet Operat...

Страница 27: ... 4 Contact Aquatic Industries Inc If you have a remote pump refer to installer dealer Leakage of water at shaft 1 Shaft seal requires replacement 1 Contact Aquatic Industries Inc Leaking unions 1 O ring missing or damaged 1 Contact Aquatic Industries Inc 2 Plumbing in a bind 2 Contact Aquatic Industries Inc 3 Loose unions 3 Tighten unions Vibration noise 1 Tub or tub plumbing is touching tile wall...

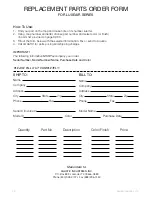
Страница 28: ...nd to Aquatic 4 Call Aquatic for parts pricing and shipping charges IMPORTANT The following information must accompany your order Serial Number Model Number Name Purchase Date and Color Please fill out completely SHIP TO Name Company Address City State Zip Phone Fax Quantity Part No Description Color Finish Price BILL TO Name Company Address City State Zip Phone Fax Mail orders to AQUATIC INDUSTRI...

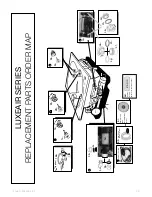
Страница 29: ...arts Order Map 3b 3a 1b 1a 5a 5b 5b 5c 16 option 2 2a 2b Timer Box 16a 5 1 3 1 Speed Timer Box Pump and Blower Control 6b 5c 6a 6 5d 4 4b 4h 4g 4f 4h 4b 4d 4a Blower Pump Control with chromatherapy option 6c Airbath Control with chromatherapy option 6d 16b ...

Страница 30: ...rder Map Overview Assorted Fittings Coupler Y Fitting Street 90o 90o fitting T fitting Street 45o 45o fitting 1 or 1 1 2 1 only 1 2 1 or 1 1 2 1 2 1 or 1 1 2 1 or 1 1 2 1 or 1 1 2 1 or 1 1 2 10 10a 10b 11 17 11a Option 12 Option 12a 8c 8d 8a 8b 8 9 Option 9a Blower 13b Blower Control 13d 7 Water Sensors ...

Страница 31: ...Aquatic Industries Inc 31 luxeair Series Replacement Parts Order Map 17 9c 9b 4a 5d 13a ...

Страница 32: ...VER 87SWIRLST 2a ROTARY MASSAGE JET WHITE 87SWIRLWH 3a STRESS EAZ JET BISCUIT 85SWIRLBI 3a STRESS EAZ JET BLACK 85SWIRLBK 3a STRESS EAZ JET BRUSHED NICKEL 85SWIRLBN 3a STRESS EAZ JET BONE 85SWIRLBO 3a STRESS EAZ JET BRASS 85SWIRLBR 3a STRESS EAZ JET CHROME 85SWIRLCH 3a STRESS EAZ JET CLEAR 85SWIRLCL 3a STRESS EAZ JET GOLD TONE 85SWIRLGD 3a STRESS EAZ JET INNOCENT BLUSH 85SWIRLIB 3a STRESS EAZ JET ...

Страница 33: ... Waste Overflow Polished Nickel 93PNDWO Lift and Turn Waste Overflow Gold 93PGDWO Lift and Turn Waste Overflow Oil Rubbed Bronze 93ORBDWO 12a option Geberit Cable Drive Waste Overflow Specifiy Color Model 13a BLOWER w HEATING ELEMENT 1104BLOWER 13A Blower w HEATING ELEMENT with optional chromatherapy 8000blw 13d 20 Minute Timer Control for Blower 1102 13D 20 Minute Timer Control for Blower w optio...

Страница 34: ...78646 3 The Whirlpools Air Baths and Tubs must have been installed and maintained in accordance with good industry practice and the specific Aquatic Industries Inc directions contained in the Owner s Manual and Installation Guide EXCLUSIONS These warranties do not extend to or do not cover defects caused by 1 Shipping damage by carriers or installation errors 2 Accident acts of God abuse or misuse...

Страница 35: ......
Страница 36: ...LAOM6 11 08 P O Box 889 Leander Texas 78646 0889 11880 RR 2243 W Leander Texas 78641 800 555 5324 FAX 800 421 3633 Fax On Demand 877 618 7024 www aquaticwhirlpools com ...

Отзывы: