5
☎
CAN (866) 766-3426 |
☎
US (866) 877-6637
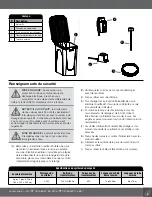
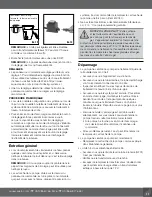
NOTE:
The unit can also be powered by an existing 12V
outdoor transformer. Each controller consumes 4.5 watts.
• Plug the transformer into a GFCI-rated receptacle.
NOTE:
The unit will add one dose (based on setting) once
it receives power.
SETTINGS
• The control panel will default to setting 1. To determine the
setting for your water feature use the charts on the back of
each water treatment or visit our website at https://www.
aquascapeinc.com/products/dosing-system-sl
• Once setting is determined, use the button on the control
panel to set to recommended setting.
General Maintenance
• When replacing water treatments, take a few seconds to inspect and, if necessary, clean the tubing of any debris that has
become trapped in the tubing.
NOTE:
A soft pipe cleaner, available at most hobby stores, can be used to clean the tubing.
• The pump cartridge, located on the top of the control panel, is a consumable part that may wear over time, reducing the
accuracy of the system. It is recommended to replace the pump cartridge once each year (Item #40041).
• Do not operate at temperatures below 40°F / 4°C as doing so will void the warranty.
PLEASE NOTE:
Your system and liquid water treatments are not designed to be operated during freezing
temperatures. The unit is equipped with an internal protection thermostat that will shut off the dosing pump at
temperatures below 40°F / 4°C. Remove the control panel, treatment, and intake assembly during winter freezing
temperatures and store in a frost-free location
Troubleshooting
• The pump does not seem to be pumping the liquid treatment from the bottle into my feature.
–
Make sure the unit is getting power.
–
Make sure the inner tubing and discharge tubing are properly connected and not kinked.
–
Inspect and clean all tubing of water treatment residue using a pipe cleaner
–
Make sure the system is primed. To enter the priming mode, hold the button for 3 seconds. It may take a few minutes for
the treatment to make its way through the tubing. Refer to page 5 for more information.
–
With priming mode engaged, listen closely, as you should be able to hear the pump turning if it’s working correctly.
If the pump is not turning when in priming mode, you may need to replace the control panel.
–
If problems persist, it may be time to replace the pump cartridge.
• Pump does not seem to be pumping accurately.
–
Replace the pump cartridge as explained in General Maintenance.
• There is no power reaching the unit.
–
Make sure the ground-fault circuit interrupter (GFCI) is not tripped.
–
Check that the transformer is plugged in.
–
Try replacing the transformer; please note that the dosing system uses a 12V low voltage outdoor rated transformer.
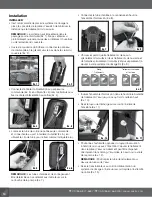
PRIMING PROCEDURE
• When first setting up the system or when adding a new
water treatment bottle, the system should be primed to
push the treatment through the output tubing.
• To enter the priming mode, hold the setting button for
3 seconds until the blue light below the setting number
begins to flash. The priming mode will automatically turn
off when completed returning to normal operation. The
priming mode can be exited at any time by pressing the
setting button when the treatment begins to discharge at
the end of the tubing.


