


Assembly
1) Locate a flat, dry area with access to electrical outlet or extension cord. The
best setup position will also make launching easy, so ideally the Fiesta ™ tube
should be carefully carried into position at the water’s edge. NOTE: Dragging
or sliding the Fiesta ™ over ground either before or after inflation can cause
damage.
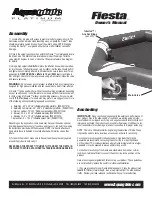
2) Once in the setup/ launch position, unfold the Fiesta ™ completely and locate
the Main Valve. The Main Valve is located near product Warnings. Twist the
valve stem 90 degrees to open or close the 1-Way valve feature. See diagram
for details.
3) Using a high output inflator/deflator place the inflation hose with proper adap
-
tor into the valve. Inflation times can vary by inflator, but the tube should be firm
and tight when completely inflated. In hot weather, be sure to leave room for air
expansion.
DO NOT OVER-FILL
.
Inflate to 1.2 psi (0,083 bar)
or until tube is
firm and tight. Check for proper air pressure using a manometer. Close the valve
and secure valve cap.
WARNING:
Do not use an air compressor to inflate tube. Air compressors are
designed for high pressure inflation and can cause tube to burst if over-inflated.
4) Fiesta ™ can be used with or without various boarding accessories depending
on your specific needs. In shallow water, most users will find it more convenient
to climb or step into Fiesta ™ without any boarding accessory. For use in water
over
4 ft. (1,21m) deep
, or for users who may prefer it, we suggest one or more
of the following optional boarding/ aquapark accessories:
a. Swimstep - 42” x 59” x 6” Inflatable boarding platform. (#58-5211016)
b. Swimstep Commercial - 42” x 59” x 6” Heavy duty platform. (#58-5210003)
c. InterLoc Ladder - 15” x 24” Webbing step-ladder. (#58-5211036)
d. Runway 20 - 5’ x 20’ x 6” Inflatable walkway. (#58-5209214)
e. Runway 10 - 5’ x 10’ x 6” Inflatable walkway. (#58-5210004)
f. Splashmat - 5’ x 18’ x 2” Inflatable splash mat. (#58-5211108)
Depending on the application, some users may have purchased an optional
boarding/ aquapark accessory. If you have an accessory, connect it now using
the instructions provided with the accessory. NOTE: It is best to attach such
items while they are deflated. Once fully attached with Interloc straps, then
inflate.
5) To launch the product, make sure to have at least 2 people evenly spaced
around the product to help carry it.
NEVER DRAG THE PRODUCT! YOU MUST LIFT AND SET THE FIESTA IN
THE WATER TO AVOID ANY ACCIDENTAL TEARING AND/OR ABRASION.
www.Aquaglide.com
North Sports, Inc. #1 North Shore Dr, SE White Salmon, WA 98672 TEL: (509) 493-4938 FAX: (509) 493-4966
Anchoring
IMPORTANT:
Proper anchoring is essential to the safety and performance of
your product. Due to the wide variety of conditions, we advise using a profes-
sional skilled in mooring and anchoring, and experienced with local conditions. If
improperly anchored, the product can move and/or float away. North Sports, Inc.
is not responsible for any damage, injuries or losses due to improper anchoring.
NOTE: There are 12 double Interloc rings along the waterline of Fiesta. These
rings can be used to connect various accessories, and also for anchoring.
For Long-term anchoring and/or situations where high loads that may be
generated, we recommend connecting the anchor line in a least 2 positions
on the product. This includes situations where Fiesta is integrated into a larger
Aquapark or may be exposed to waves and/or strong winds.
For short-term anchoring of the Fiesta as a stand-alone item, under normal
conditions it will be sufficient to connect the anchor line in one position on the
product.
Here are some general guidelines for anchoring your product. These guidelines
are not intended to replace the need for professional installation.
1) Choose a location for your Fiesta and/or aquapark. Place the product in
at
least 4 ft. (1,21m)
of water depth, in an area protected from the wind and boat
traffic. Review your lake rules and restrictions with your local authorities.
Owner’s Manual
Main Valve
Interloc™/
Anchor Rings
(set of 5)
Main Valve