6
Filter Set Up
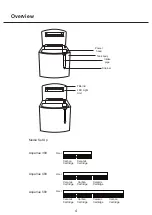
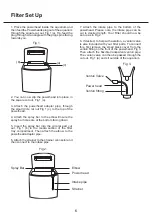
1. Place the powerhead inside the aquarium and
then feed the Powerheads plug out of the aquarium
through the square cut out, Fig 1 (a). Tip, feed the
plug through at an angle with the plugs pins facing
towards you.
Fig 1.
(a) (c)
(b)
2. You can now clip the powerhead into place in
the square cut out, Fig 1 (a).
3. Attach the powerhead adaptor pipe, through
the small circle cut out Fig 1 (c), to the top of the
powerhead.
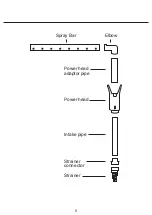
4. Attach the spray bar to the elbow. Ensure the
spray bar holes are at the bottom facing down.
5. Insert the spray bar into the circular part cut
out, Fig 1 (b) in the media section of the filter
tray compartment. Then attach the elbow to the
powerhead adaptor pipe.
6. Attach the strainer to the strainer connector and
then connect to the intake pipe.
7. Attach the intake pipe to the bottom of the
powerhead. Please note, the intake pipe can be
cut to desired length. Your Filter should now be
set up as in Fig 2.
8. If desired, to help with aeration, a venturi valve
is also included with your filter parts. To connect
this, first remove the small black cover from the
venturi fitting on the front of the powerhead, Fig 3.
Then attach the flexible transparent venturi pipe.
The venturi valve can then be passed through the
cut out, Fig 1 (a) and sit outside of the aquarium.
Fig 3.
Power head
Venturi fitting
Venturi Valve
Fig 2.
Power head
Elbow
Spray Bar
Intake pipe
Strainer


