background image


WARNING:

 Keep the appliance free & clear of all combustible substances. If gas odor is 

detected at any time, immediately shut unit down at the main shutoff valve. Do not permit 
any open flames in the area of the appliance. Immediately contact an authorized Service 
Agency or your local Gas Supplier for service. 


WARNING:

 Do not obstruct either the air inlet (underneath unit) or the ventilation air 

(back of unit). Provisions must be provided to provide an adequate air supply to the 
griddle. 


NOTICE:

 Local codes regarding installation vary greatly from one area to another. The 

National Fire Protection Association, Inc., states in its NFPA96 latest edition that local 
codes are "Authority Having Jurisdiction" when it comes to requirement for installation of 
equipment. Therefore, installation should comply with all local codes.


GENERAL INSTALLATION INSTRUCTIONS 

Ensure gas supply and gas type, as shown on unit nameplate agree. 

Unit installation must conform with the National Fuel Gas Code, ANSI Z223.1/NFPA 54, the National Gas 
Installation Code, CSA-B149.1, or the Propane Installation Code, CSA-B149.2 as applicable and in accordance 
with local codes. 

Screw legs into the permanently fastened nuts on the four corners of the unit and tighten by hand. Level the 
unit by turning the adjustment screw at the bottom of each leg. Do not slide unit with legs mounted, lift if 
necessary to move unit.  

Pipe threading compound must be resistant to the action of liquefied petroleum gases.  

Caution:

 DO NOT use an open flame to check for leaks. Check all gas piping for leaks with a soap and water 

solution before operating unit. 

THESE UNITS ARE SUITABLE FOR INSTALLATION ON NON-COMBUSTIBLE SURFACES ONLY. 

Noncombustible clearances: 

0" sides (0 mm)               0" rear (0 mm)               4" floor (102mm) 

Do not obstruct the flow of combustion and ventilation air, under the unit by the legs or behind the unit by the 
flue.  

Adequate clearance for air openings into the combustion chamber is required. Do not place objects between 
the bottom of the unit and the counter top.  

There must be adequate clearance for removal of the front panel. All major parts except the burners are 
removable thru the front if the gas line is disconnected. 

Unit must have adequate clearances for servicing. (Sides = 0", Rear = 0", Floor = 4"). 

European Community Installation Instructions: 

"THIS APPLIANCE MUST BE FITTED BY A COMPETENT PERSON. IN THE UK, CORGI REGISTERED 
INSTALLERS (INCLUDING THE REGIONS OF BRITISH GAS) UNDERTAKE TO WORK TO SAFE AND 
SATISFACTORY STANDARDS. THIS APPLIANCE MUST BE INSTALLED IN ACCORDANCE WITH THE 
GAS SAFETY (INSTALLATION AND USE) REGULATIONS AND THE RELEVANT BUILDING REGULATIONS 
/ IEE. REGULATIONS. DETAILED RECOMMENDATIONS ARE CONTAINED IN THE FOLLOWING BRITISH 
STANDARD CODES OF PRACTICE - BS 6172, BS 5440 PART 2, BS 6891" 

"THIS APPLIANCE MUST BE INSTALLED IN ACCORDANCE WITH THE RULES IN FORCE"  

Содержание HTG-2424i

Страница 1: ...rs and liquids in the vicinity of this or any other appliance WARNING Improper installation adjustment alteration service or maintenance can cause property damage injury or death Read the installation...

Страница 2: ...and liquids in the vicinity of this or any other appliance Keep the area free and clear of combustibles See ANZI Z83 14B 1991 NOTICE Instructions to be followed if anyone smells gas should be posted i...

Страница 3: ...eration is fully trained and is aware of all precautions Accidents problems can result by a failure to follow fundamental rules and precautions The following words and symbols found in this manual ale...

Страница 4: ...g Do not slide unit with legs mounted lift if necessary to move unit Pipe threading compound must be resistant to the action of liquefied petroleum gases Caution DO NOT use an open flame to check for...

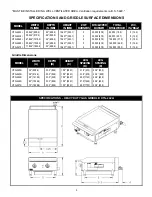
Страница 5: ...437 392 1 4 32 000 9 78 128 000 37 5 5 12 4 HTG 2460i 59 844 1520 0 24 609 6 15 437 392 1 5 32 000 9 78 160 000 46 9 5 12 4 HTG 2472i 71 844 1824 8 24 609 6 15 437 392 1 6 32 000 9 78 192 000 56 3 5...

Страница 6: ...ith the front panel removed remove the plug from the manifold Place a fitting in the plug opening and connect a manometer For Natural gas the pressure in the manifold should be 5 water column or 12 4...

Страница 7: ...liable ignition of the burners when the knobs are turned to HI RELIGHTING PILOT If the pilot light should go out for any reason Promptly shut off all gas at the manual shut off valve Turn off all knob...

Страница 8: ...ea in which the unit is installed and will leave the unit independent of changing draft conditions All valves must be checked and lubricated periodically This must be done by an authorized service rep...

Страница 9: ...ved After removal of the detergent the surface of the plate should then be covered with a thin film of oil to prevent rusting Clean stainless surfaces with a damp cloth and polish with a soft dry clot...

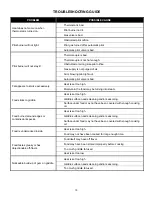
Страница 10: ...ing into steam Food sticks to griddle Heat is set too high Griddle surface needs cleaning and or seasoning Surface under food may not have been covered with enough cooking oil Food burned around edges...

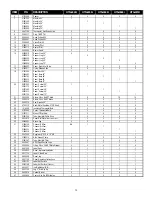
Страница 11: ...t Griddle Plate 1 2 21826433 Side Firebox 2 2 2 2 2 3 21831222 Body 24 Firebox 1 21831322 Body 36 Firebox 1 21826722 Body 48 Firebox 1 21826822 Body 60 Firebox 1 21826922 Body 72 Firebox 1 4 21826017...

Страница 12: ...NPT Male 4 6 8 10 12 22 2092614 Elbow 3 8c x 3 8 27 Brass 2 3 4 5 6 23 2425310 Pan Grease 24 1 1 1 1 1 24 8706315 Knob Metal Cookline 272 D Shaft 2 3 4 5 6 25 1018064 Insulation Thermostat Bulb 2 3 4...

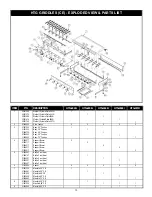
Страница 13: ...21826722 Body 48 Firebox 1 21826822 Body 60 Firebox 1 21826922 Body 72 Firebox 1 4 21826017 Support Bumer 2 21826117 Support Bumer 2 21826217 Support Bumer 2 21826317 Support Bumer 2 21826417 Support...

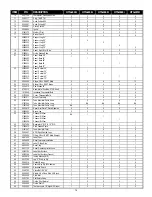
Страница 14: ...21831346 Tube Manifold Onfice Short 1 2 3 4 5 21831246 Tube Manifold Orifice Long 1 NA NA NA NA 31 21831348 Tube Manifold Orifice Long NA 1 1 1 1 32 8834910 Decal Dial Plate T Static Griddles 2 3 4 5...

Страница 15: ...Pilot Supply CE 1 21830813 Tube Pilot Supply CE 1 21831512 Tube Pilot Supply CE 1 1 60 21831317 Tube Pilot Supply CE 1 21831513 Tube Pilot Supply CE 1 21832913 Tube Pilot Supply CE 1 21833017 Tube Pil...

Страница 16: ...16 NOTES...
Страница 17: ...e conclusion of this warranty period portable units must be taken to or sent prepaid to the APW Wyott Authorized Service Agency for in warranty repairs No mileage or travel charges are allowed on port...

Отзывы: