5
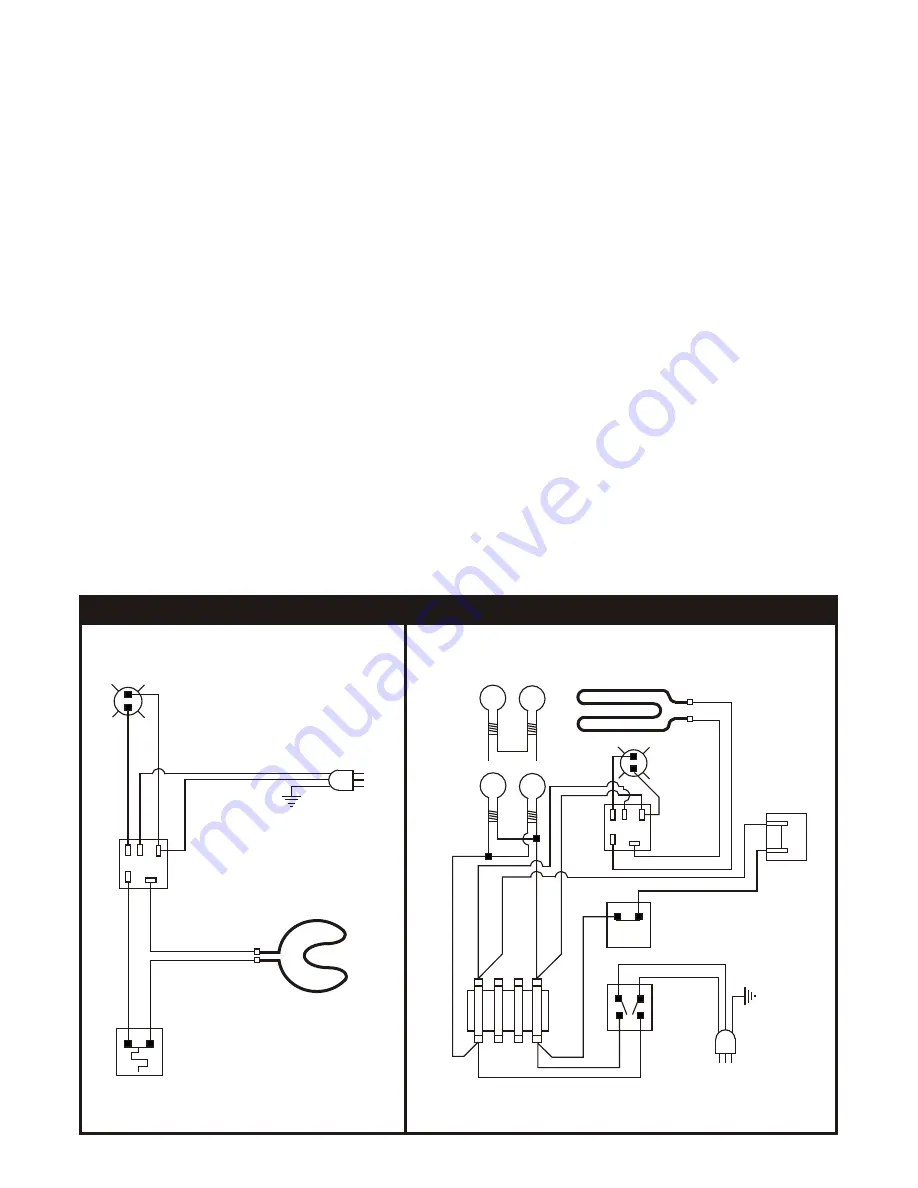
DR-1A—MR. FRANK DISPLAY BROILER WITH BH-1A BUN WARMER
Installation:
1. Follow general installation instructions on page 3. The broiler is labeled “Caution Hot.” Do not allow
customers to come in contact with the hot surface.
2. Insert basket holder assembly into cabinet by placing shaft end into spring loaded fitting. Connect
slotted coupling end over motor shaft by compressing spring loaded fitting.
3. Place individual baskets into support holes on hold assembly. Open side of basket should always
face operator.
4. Slide drip pan into cabinet under the basket assembly.
5. If optional bun warmer is used, place warmer into opening on top of broiler.
Operations:
1. Follow general operating instructions on page 4.
2. Switch on unit. Set infinite control to “HI” position to begin broiling.
3. Load each basket with up to 4 hot dogs. Use “Load/Unload” push button.
4. Heat up time will depend on the size and temperature of the hot dogs when loaded into the baskets.
5. For holding, readjust control to “5” or “6” setting after 15 minutes. If control is left on “HI,” hot dogs will
blister. To display hot dogs for several hours without shriveling or flavor loss, Do Not Pierce Casings.
6. If optional bun warmer is used, pour 1 quart of hot water, 120°-140°F (50°-60°C), into pan. Load up
to 36 buns. Attach drip shield. Buns may be stored in plastic bag for prolonged holding periods.
7. Use LOAD/UNLOAD push button to remove hot dogs from unit.
8. Add water as necessary to maintain moist buns.
Daily Cleaining:
1. Follow general cleaning instructions on page 4 .
Heating Element
Lamps
Lamps 240V, 1Ph
Indicator
Light
Infinite
Control
Gear
Motor
Load/Unload
Switch
On/Off
Switch
240V, 1Ph
Terminal Block
Heating Element
Indicator Light
Infinite
Control
Limiting Thermostat
WIRING DIAGRAMS
DR-1A, DR-2A
DS-1A
P L1 L2
H1 H2
P L1 L2
H1 H2


