background image


6

Cleaning 

ular basis.


ains and cool.


uld not use a steam jet or any other high pressure 

quipment to clean the appliance.


cordance 

ith the manufacturer’s instructions and the 

o


The manufacturer declines any responsibility for injury or 

f N 721 MUST be followed. 

nd that this appliance is installed on 

any type of marine vessel. 

Declaration of conformity 
 
Th

 of 

EC. 

9/109/EEC dated 25/01/1992 Materials that can touch food. 

b is built using certified 

aterials and requires the appliance to be installed in accordance with 

e standards currently in force. This appliance must be used by a 

omestic purposes only. 


o


Cleaning of the hob should be carried out on a reg

o


IMPORTANT:  Before attempting to clean the appliance, it 
should be disconnected from the m

o


Great care should be taken whilst using this appliance and when 
following the cleaning procedure.


o


You sho
cleaning e

 
Installation 

 
This appliance must be correctly installed by an 
Authorised Service Agent, strictly in ac
w
relevant Standards. Please see the specific section 
of this booklet that refers to installation. 
 

damage, to person or property, as a result of improper 
use or installation of this appliance.


o


If the appliance is being used in a Leisure Accommodation 
Vehicle, the requirements o


o


We DO NOT recomme


is appliance complies with the following European Directives: 

 
-73/23/EEC dated 19/02/1973 Low Voltage Directive. 
-89/336/EEC dated 03/05/1989 EMC Directive inclusive
Amending Directive 92/31/E
-93/68/EEC dated 22/07/1993 CE Marking Directive. 
-8
-90/396/EEC Gas Products. 
-EN60335-1, EN60335-2, EN301-1 Safety Standards. 
 

The manufacturer declares that the ho
m
th
trained person for d


Содержание BKG64SS

Страница 1: ...ins important information including safety installation points which will enable you to get the most out of your appliance Please keep it in a safe place so that it is easily available for future reference for you or any person not familiar with the operation of the appliance GS 16 12 10 ...

Страница 2: ...Cleaning 11 12 Cleaning the hob top 11 After each use 11 Cleaning the hob burners 11 12 Installation 12 21 Positioning 12 13 Unpacking the appliance 13 Installing the appliance 14 15 Gas connection 15 16 Ventilation requirements 16 17 Gas Safety Installation and Use Regulations 17 Gas Adjustment Conversion to LPG 18 19 Minimum flow adjustment for hob gas taps 19 Gas tap maintenance 20 21 Electrica...

Страница 3: ...Environmental note 3 o The packaging materials that we use are environmentally friendly and can be recycled all packaging material with due regard for the environment o Please discard ...

Страница 4: ...t be able to withstand a minimum temperature of 85 C above the room it is located in whilst in use o Certain types of vinyl or laminate kitchen furniture are particularly prone to heat damage or di temperatures below the guidelines given above o Any damage caused by the appliance being installed in contravention the owner o Your new appliance is guaranteed against electrical or mechanical defects ...

Страница 5: ... it can ignite extremely quickly For e left unattended o Make sure that all of the cooking zones are switched off after use Child Safety o We strongly recomm touch the appliance at any time During and after use all surfaces will be hot kitchen please ensure that they are kept under close supervision at all times o Older childr General Safety o The appliance should only be installed and connected b...

Страница 6: ... be disconnected from the m o Great care should be taken whilst using this appliance and when following the cleaning procedure o You sho cleaning e Installation This appliance must be correctly installed by an Authorised Service Agent strictly in ac w relevant Standards Please see the specific section of this booklet that refers to installation damage to person or property as a result of improper ...

Страница 7: ...dth 585 mm Width Height 40 mm Product specifications o 1 x 3 00 kW rapid burner o 2 x 1 75 kW semi rapid bur 1 x 1 00 kW auxiliary b o o Side control operation o Automatic ignition o Enamelled pan stan Standard accessories o LPG conversion Electrical details 220 240 Vac 50 Rated Voltage Supply Connection 13 A double pole switched fused outlet with 3mm contact gap M Mains Suppl 7 7 ...

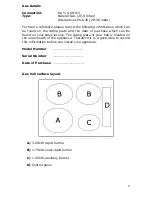
Страница 8: ...panel Type Natura Alternative LPG G30 28 30 mbar For future reference please record the following information which can be found on the rating plate and the date of purchase which can be found on your sales invoice The rating plate of yo th this information before you install your ap Model Number Serial Number D G urface layout A 3 00 kW rapid burner B 1 75 kW semi rapid burne C 1 00 kW auxilia ...

Страница 9: ...e selected between the maximum and minimum position o Never select a knob position between the maximum and off position o The symbol on th indicate which gas Pushbutton ignition o Press in and turn the appropriate control knob anti clockwise to the large flame symbol o Whilst pressing in the control knob press and hold down the ignition button which is located on the control panel o The ignition s...

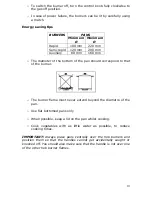
Страница 10: ...nd to that of the burner extend beyond the diametre of the pan o Use flat bottomed pans only keep a lid on the pan whilst cooking s centrally over the hob burners and osition them so that the handles cannot get accidentally caught or nocked off You should also make sure that the handle is not over one f the other hob burner flames e bottom of the pan should corre o The burner flame must never o Wh...

Страница 11: ...th warm soapy water Abrasive cleaners or sharp objects will damage the hob surface you should clean it using warm soapy water Although it is easier to clean som hob surface is still warm Make pan suppo before you attempt to touch them After each use o Remove the pan stands and wipe the appliance over with a soft damp cloth that has been put into warm soapy water The cloth should be wrung out after...

Страница 12: ...roviding the etween the highest point of the hob surface including the burners and the underside of any horizontal surface directly erside of the horizontal surface is lower than 400 mm then it must be at least 50 mm away from the outer edges of m the cut out as shown in the diagram on the next page and between the hob surface and any combustible materials A o 2010 E ng The adjacent furniture must...

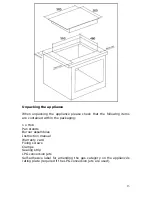
Страница 13: ...s are contained within the packaging 1 x Hob Pan stands Burner assemblies Instruction manual Warranty card Fixing screws Clamps Sealing strip LPG conversion jets Self adhesive label for amending the gas category on the appliance s rating plate required if the LPG conversion jets are used 13 ...

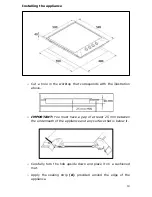
Страница 14: ...llustration above o IMPORTANT You must have a gap of at least 25 mm between the underneath of the appliance and any surface that is below it o Carefully turn the hob upside down and place it on a cushioned mat o Apply the sealing strip A provided around the edge of the appliance 14 ...

Страница 15: ...lamp B so that the clamp is attached to the hob but so that you can still adjust the position of it o Carefully turn the hob back over and then gently lower it into the aperture hole that you have cut out o On the underneath of the hob adjust the clamps into a position that is suitable for your worktop Then fully tighten the screws C to secure the hob into position Gas connection 15 ng This applia...

Страница 16: ... vent of 50cm effective area Unless it has a door which opens directly to the outside o If the room has a volume of less than 5m it will require an air vent of 100cm effective area o If it is installed in a room with a volume that exceeds 11m then no air vent is required o If there are any other fuel burning appliances in the same room the current edition of BS 5440 Part 2 should be consulted to d...

Страница 17: ...ion and Use Regulations o It is in your interest and that of safety to ensure compliance with the law o The cooker must also be installed in accordance with the current edition of BS 6172 Failure to install the hob correctly could invalidate the warranty liability claims and lead to prosecution o Put the gas seal into the elbow o Fully tighten the elbow and seal onto the gas rail o The elbow MUST ...

Страница 18: ...lame spreaders A o Unscrew the injector B and replace it with the stipulated injector for the new gas supply see table on next page GENERAL INJECTORS TABLE Kind of gas Ø injectors Burners Power MJ h Natural 1 55 0 90 1 18 Rapid Auxiliary Semi rapid 11 9 4 0 7 0 L P G Butane Propane 0 90 0 53 0 69 Rapid Auxiliary Semi rapid 10 8 3 6 6 3 o Reassemble all the burners carefully in particular you shoul...

Страница 19: ...place a small bladed screwdriver in the centre of the tap shaft o Unscrew the adjusting screw in order to increase the gas flow or tighten the adjusting screw to decrease the gas flow o The correct adjustment is obtained when the flame has a length of about 3 4 mm o For butane propane gas the adjusting screw must be tightly screwed in o Refit the control knob o Make sure that the flame does not go...

Страница 20: ...th solvent o Lightly smear the cone with high temperature grease reassemble into position and rotate a few times o Remove the cone again and remove any excess grease making sure that the gas ducts are not obstructed with grease o Carefully reassemble the components and perform a gas soundness test If it becomes necessary to replace a gas tap then you should proceed as follows o Remove the control ...

Страница 21: ...ble If the mains supply cable is damaged then it must be replaced by an appropriate replacement The mains supply cable should be replaced in accordance with the following instructions o Switch the appliance off at your mains supply o Open the box of the supply board o Unscrew the clamp fixing the cable o Replace the cable with one of the same length and in accordance with the specification given a...

Страница 22: ...iance must be accessible for the engineer to perform any necessary repair If your appliance is installed in such a way that an engineer is concerned that damage will be caused to the appliance or your kitchen then he will not complete a repair This includes situations where appliances have been tiled in sealed in with sealant have wooden obstructions placed in front of the appliance like plinths O...

Страница 23: ...23 ...

Страница 24: ...24 ...

Отзывы: