background image

CONTENTS OF PACKAGE 


APOLLO SY-Z18M8 Tablet 8GB 
User Manual 
USB OTG 2.0 High speed Cable for PC connection 
AC/DC power adaptor – 100-240V AC 50-60Hz 
Leather pouch 
In ear Earphones  
 

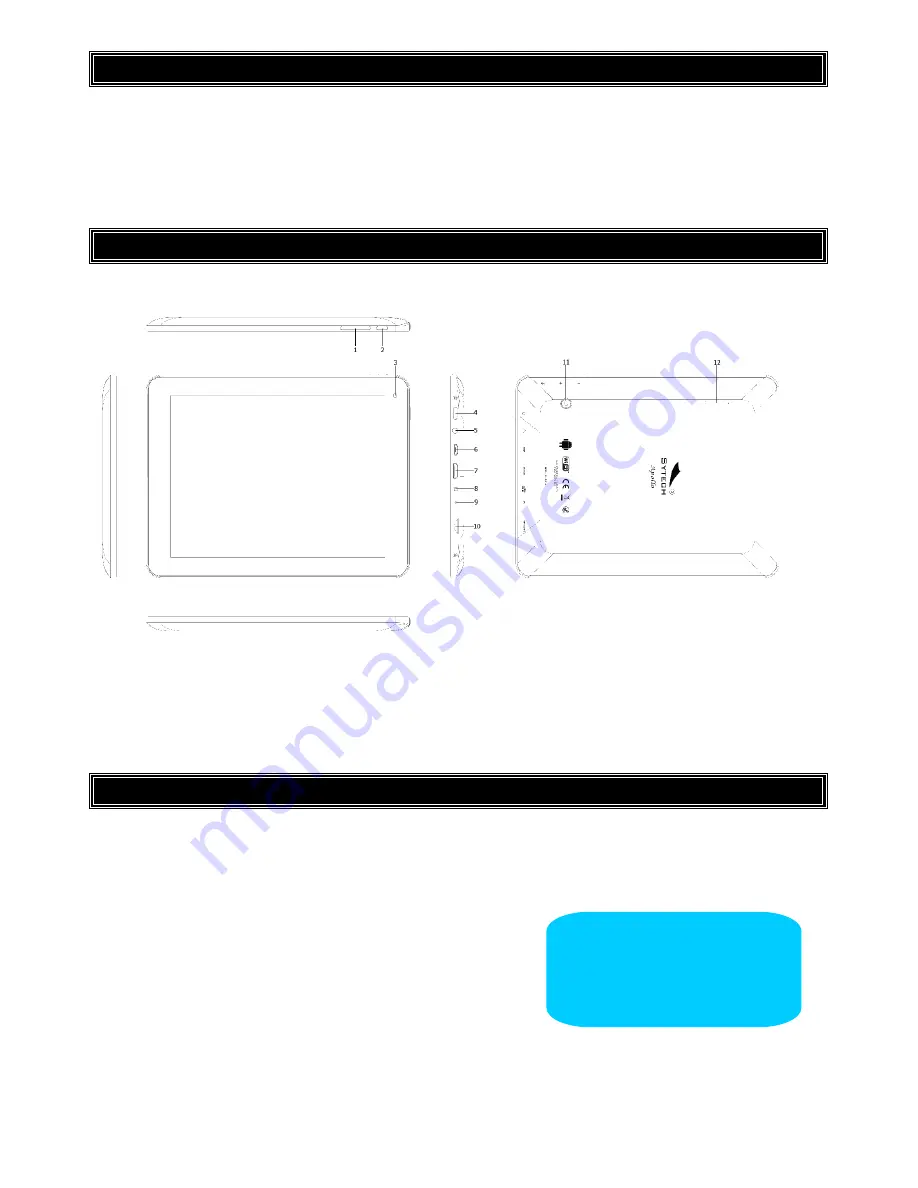
PICTURE DESCRIPTION 


1.


Volume – / + 

2.


Return 

3.


Front Camera 

4.


On/Off Button 

5.


Earphone Jack 

6.


Mini USB interface 

7.


HDMI input 

8.


AC adaptor input 

9.


Reset 

10.


TF Card slot 

11.


Rear Camera 

12.


Speaker 


TURNING ON AND OFF THE UNIT 

 
To switch on your APOLLO SY-Z18M8 tablet, press the On/Off button (1), located on the top right hand side of the unit, for a 
few seconds. Before being able to use the unit you will have to unlock the device. Drag the padlock towards the right (wave 
icons will be shown to indicate in which direction to move the padlock).  
To turn off the unit, press the On/Off button (1) for a few seconds and the unit will turn off completely. If you press the 
On/Off button (1) once, the unit will enter into power saving mode.  


NOTE: To turn off the unit, you must 

press and hold the On/Off button. If 

it is only pressed the unit will only 

turn off the screen. 

Содержание SY-Z18M8

Страница 1: ...ctions are based on the factory settings of the device It may be possible that some of the images and screenshots in this manual do not match the final product It is possible that the contents in this...

Страница 2: ...capacitive screen 8 TFT LCD 800x600 pixels Allwinner A10 1 0 GHz processor 3D engine 512kb L2 Cache GPU Mali 400 1GB DDR3 RAM Integrated Wi Fi Supports Wi Fi USB 3G modem Front Camera 0 3MP 640x480 R...

Страница 3: ...r APOLLO SY Z18M8 tablet press the On Off button 1 located on the top right hand side of the unit for a few seconds Before being able to use the unit you will have to unlock the device Drag the padloc...

Страница 4: ...lete charge is around 3 4 hours approximately when unit is turned off This depends whether the unit is being charged while using or while it is turned off There are certain settings which can be manip...

Страница 5: ...ded where they are stored and which ones are currently running Personal Accounts Sync Manage your accounts through this section You may add a new account if you do not have one already Location Servic...

Страница 6: ...how you the time current weather or even your e mail inbox without launching the application To add widgets onto the desktop follow the steps below 1 Press the Applications and Widgets icon situated o...

Страница 7: ...con will now appear on your desktop as shown below Once the widget is on the desktop you can move it around or delete it To do this you must press and hold on the widget until it is highlighted You ma...

Страница 8: ...ocess has been completed the device will save the data so that the next time you turn on the device it will automatically establish connection with the network when in range without having to repeat t...

Страница 9: ...rf the internet quickly and easily When the device is connected to a Wi Fi network tap on the browser application icon 1 from the desktop or from the applications menu to begin using the internet The...

Страница 10: ...appear Type the desired webpage address and press enter 2 Tabs The different tabs will be shown on the top part of your browser In order to view all the pages that are currently opened simply press on...

Страница 11: ...be saved in the browser history search history and will not create any cookies Share Page Share the page you are browsing with someone through social media or e mail Find on Page Find a particular wo...

Страница 12: ...l application 1 2 Insert your email address and the password Once the setup process has been completed you will begin to receive your e mails on your APOLLO tablet If you have a POP3 IMAP or Exchange...

Страница 13: ...Mail Box Features 1 Folders 2 New Emails 3 Compose New Email 4 Search 5 Refresh Check for new e mails 6 E mail settings 7 Received mail...

Страница 14: ...the pictures as a presentation Tap on the screen to return to normal viewing mode Party Shuffle Press this button to play songs in a random order Add to Playlist Press this button to add the current p...

Страница 15: ...VIDEO PLAYER 1 Time elapsed 2 Video Title 3 Volume Down 4 Volume Up 5 Previous Video 6 Pause 7 Next Video 8 Options Aspect Ratio Video Track Repeat Mode 9 Restart...

Страница 16: ...and previous images will appear as a bar below To view the next or previous image simply flick through the images 2 Press the Share button on the screen to share the picture via Email or Social Media...

Страница 17: ...n to change the effects lighting colour and size and shape of the image Rotate Left Turn the image 90 to the left Rotate Right Turn the image 90 to the right Crop Cut out any borders or sides Set Pict...

Страница 18: ...o Camera 1 Front camera Rear Camera switch 2 Shutter 3 Settings 4 Zoom 5 Panoramic Mode 6 Video Recorder Mode 7 Camera Mode Press the shutter button 2 to take a picture Once the picture has been taken...

Страница 19: ...ing screen will appear and the dot on the right will turn red Press the Record button 1 and the device will begin recording The Time elapsed will be shown on the top left corner During recording it is...

Страница 20: ...es in panoramic mode Press the Panoramic View Icon and the following screen will appear All the images taken with the camera will be saved in your picture folders You may access these pictures by exit...

Страница 21: ...CONNECTING THE TABLET TO A PC Once you have connected the tablet to the PC press the USB device icon that appears on the bottom of the screen 1 Select the USB CONNECTED option 2...

Страница 22: ...and the device is now connected to the PC At this point some applications which you are using will be unavailable until the device has been disconnected from the PC To disconnect the device from the...

Страница 23: ...App doesn t work on your tablet please contact the application developer for further information I connect the tablet to the PC but the PC does not recognize it You have to disable the USB debug mode...

Страница 24: ...stead of once every 10 minutes When the internet is not needed it is recommended to turn off the Wi Fi so that the battery charge can last longer The same applies with the brightness set it to a mediu...

Страница 25: ...d Tel 902 430 967 Fax 91 8864285 NIF B83254763 Manufacturing country China Sytech SY Z18M8 APOLLO The following product complies with the Directive 1999 5 EC of the European parliament and of the Coun...

Отзывы: