background image


ENG 

SAFETY INSTRUCTIONS 


  Instruction manual is an integral part of the product. 

  Carefully read and follow the below manual before use.  

  Get acquaintance with the technical data, available in the chapter Specification or on the rating plate, 

prior to connect the appliance to the electrical source of power.  

  Keep this Instruction Manual and the Warranty Card along with the proof of purchase for any claims. 

  Before use check if the appliance is not damaged. Particular attention must be paid to the power cord. 

Should any component, including the power cord, be damaged the appliance must not be used.  

  Never attempt any repairs of the appliance. Any repairs must be performed by an Authorized Service 

Station or a Central Service (more information see the Warranty Card). 

  Never use the appliance in a manner inconsistent with the intended use and this Manual.  

  Never immerse the appliance in water or any other solution.  

  The manufacturer is not liable for any damages that may arise as a result of installation and use of the 

car audio system not in accordance with the technical specification described in this manual. 

  Never open nor remove the housing, as doing so may cause electric shock. 

  Ensure unobstructed clearance around the appliance. 

  Do not place the appliance on soft surfaces, carpets, or similar surfaces that could block ventilation 

from the bottom.  

  The ventilation should not be impeded by covering the housing. 

  Do not expose the appliance to rain or an environment where it may be splashed by water or other 

liquids. 

  Do not place containers or objects containing liquid (e.g. vases) on top of the appliance.  

  Keep the appliance away from naked flames (e.g. burning candles). 

  Install the appliance on a stable, flat surface. 

  When unplugging the power supply cord, be sure to grasp the power supply plug; never pull on the 

cord itself. 

  Never plug in nor remove the power supply plug with wet hands, as doing so may cause electric 

shock. 

  Cable should be protected against physical and mechanical damage (e.g. bending). 

  Keep out of reach of children. Children should not play with tuner and packaging.  

  Protect the device from being dropped. 

  Switch off the power, and unplug the power supply plug for safety cleaning purposes when cleaning.  

  When cleaning do not  use abrasive sponges, substances and products containing solvents, benzene 

or alcohol. 

  Switch off the power, and unplug the power supply plug for safety purposes during storm or before 

leaving the appliance unused for an extended period. 


According  to  provisions  of  the  Law  of  1  July  2005  on  Waste  Electrical  and  Electronic  Equipment  it  is 
forbidden  to  dispose  of  waste  equipment  marked  with  crossed  out  wheeled  bin  together  with  other 
wastes. The user who intends to dispose of such an equipment is obliged to deliver the waste electrical 
or  electronic  equipment  to  the  waste  equipment  collection  points.  Such  points  are  established  by  i.a. 
retailers  and  wholesalers  of  the  equipment  and  the  commune  organizational  units  operating  in  waste 
collection  business.  The  above  legal  obligations  have  been  introduced  to  reduce  the  amount  of  waste 
electrical  and  electronic  equipment  and  to  ensure  appropriate  standard  for  collection,  recovery  and 

recycling  of  waste  equipment.  Proper  fulfillment  of  those  obligations  is  of  particular  importance  when  the  waste 
equipment  contains  hazardous  components  of  particularly  adverse  effect  on  environment  and  human  health.  Weight: 
0,5kg. 


Содержание AHD-115

Страница 1: ...AHD 115 TV tuner DVB T Tuner telewizyjny DVB T Instruction Manual 3 Instrukcja obs ugi 23...

Страница 2: ...served Any reproduction reprint adaptation or translation without permission is prohibited Niniejszy produkt spe nia wszystkie wymogi i przepisy obowi zuj cych dyrektyw Unii Europejskiej Deklaracja zg...

Страница 3: ...e appliance we ask you to read the below Instruction Manual TABLE OF CONTENTS SAFETY INSTRUCTIONS 4 FRONT PANEL 5 REAR PANEL 5 REMOTE CONTROL 6 CONNECTION 8 LANGUAGE SETTING 9 SEARCHING 9 AUTO SCAN 10...

Страница 4: ...nce Keep the appliance away from naked flames e g burning candles Install the appliance on a stable flat surface When unplugging the power supply cord be sure to grasp the power supply plug never pull...

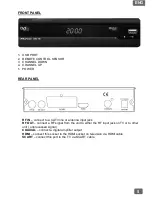
Страница 5: ...to a CATV line or antenna input jack RF OUT connect a RF signal from the unit to either the RF input jack on TV or to other unit unprocessed signal COAXIAL connect a digital amplifier output HDMI conn...

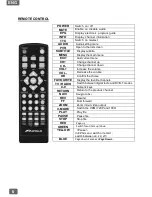
Страница 6: ...down VOL Increase the volume VOL Decrease the volume OK Confirm the choise FAVOURITE Display the favorite channels TV RADIO Switch between digital radio and DVB T modes 0 9 Numeric keys RETURN Return...

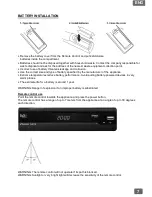
Страница 7: ...by the manufacturer of the appliance Extreme temperatures reduce battery performance Avoid putting battery powered devices in very warm places The estimate life for a battery is around 1 year WARNING...

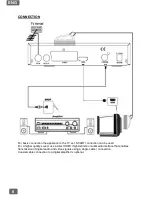
Страница 8: ...SCART connection can be used For a higher quality sound use a direct HDMI high definition multimedia interface that enables transmission of digital audio and video signals using a single cable connec...

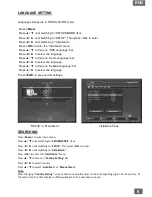
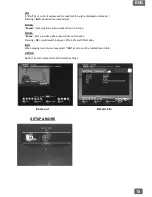
Страница 9: ...ge bar Press to select one language Press Exit to save current settings SEARCHING Press Menu to enter main menu Press until switching to SETUP MORE item Press until switching to SETUP Then press OK to...

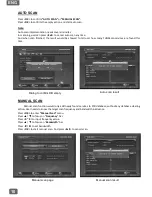
Страница 10: ...rvices are found this time MANUAL SCAN Manual scan function would only add newly found services to STB database without any database clearing action User needs to know the target scan frequency and ba...

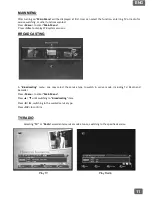
Страница 11: ...o to display STB system versions BROADCASTING In Broadcasting menu one may select the service type to watch in serive mode including TV Radio and Recorder Press Menu to enter Main Menu Press until swi...

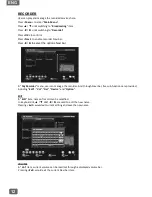
Страница 12: ...options Navi bar In My Recorder menu user can manage the recorder And through Navi bar five sub functions are provided including Edit Vol Del Device and Option EDIT In Edit item name of record can be...

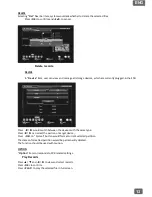
Страница 13: ...pe Press would switch between the devices with the same type Press can select the partion on target device Press OK on Format button would format current selected partition The data on formatted parti...

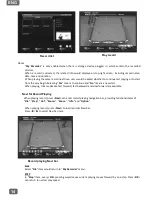
Страница 14: ...nd No means a new start When playing trick modes like fast forward fast backward and slow forward are available Navi for Record Playing When playing record press Navi can enter record playing navigati...

Страница 15: ...M Zoom item provides video output zoom in function ZOOM Zoom item provides video output zoom out function Pressing OK would switch between 75 50 and 25 modes INFO When playing record user may select I...

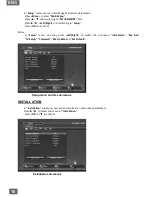
Страница 16: ...g to Setup Press OK to confirm Notes In Setup menu one may press Left Right to switch the sub menu Installation My Box TV Setup Password SW Update and Set Default INSTALLATION In Installation sub menu...

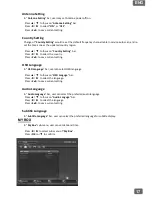
Страница 17: ...he country Press Exit to save current setting OSD Language In OSD Language bar user can select OSD language Press to focus on OSD Languge bar Press to select the language Press Exit to save current se...

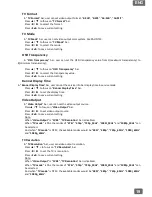
Страница 18: ...to save current setting Set Date In Set Date bar user can set current system date Press to focus on Set Date bar Press 0 9 to input the date Set Time In Set Date bar user can set current system time...

Страница 19: ...Display Time bar Press to set the display time Press Exit to save current setting Video Output In Video Output bar user can set the video output source Press to focus on Video Output bar Press to set...

Страница 20: ...e parameter is ON or OFF Press Exit to save current setting Instant Record User may press key PVR to start Instant Record recording the favorite program And this function is only valid when there is s...

Страница 21: ...to confirm exit teletext setting page Press to select teletext pages Subtitle In service mode user can set and watch subtitle of current channel Press Subtitle to enter subtitle setting page Press Up...

Страница 22: ...t AVI MKV Xvid divx MPEG 1 MPEG 2 MP4 VOB H264 Output Format HDMI Audio Decoder Format mp3 E AC 3 DD wma wav MPEG 1 LAYER 1 2 Audio output Digital audio S PDIF Photo bmp jpg gif tif png General Voltag...

Страница 23: ...ia prosimy o zapoznanie si z poni sz instrukcj obs ugi SPIS TRE CI WSKAZ WKI BEZPIECZE STWA 24 PRZEDNI PANEL 25 TYLNY PANEL 25 PILOT ZDALNEGO STEROWANIA 26 POD CZENIE 28 USTAWIENIE WERSJI J ZYKOWEJ 29...

Страница 24: ...rz dzenie powinno sta na p askiej stabilnej powierzchni Nie dotyka przewodu zasilaj cego mokrymi r koma Grozi to pora eniem pr dem elektrycznym W celu wyj cia przewodu z gniazda zasilaj cego nale y ch...

Страница 25: ...cznik ZA WY TYLNY PANEL RF IN wej cie sygna u telewizji kablowej lub kabla antenowego RF OUT wyj cie antenowe do telewizora lub innego odbiornika sygna nieprzetworzony COAXIAL wyj cie d wi ku cyfrowe...

Страница 26: ...ni kana VOL Zwi krzanie g o no ci VOL Zmniejszanie g o no ci OK Potwierdzenie wybranej funkcji FAVOURITE Wy wietlanie ulubionych kana w TV RADIO Wyb r TV Radio 0 9 Klawiatura numeryczna RETURN Powr t...

Страница 27: ...ie i urz dzenia z zainstalowanymi bateriami nale y chroni przed nadmiernym ciep em pochodz cym od s o ca ognia itp Czas pracy baterii wynosi zwykle ok 1 roku ywot baterii jest uzale niony od stopnia i...

Страница 28: ...po czenie za pomoc z cza cyfrowego HDMI Nale y pod czy wyj cie sygna u HDMI OUT w urz dzeniu do wej cia HDMI IN w telewizorze za pomoc kabla posiadaj cego z cza HDMI Urz dzenie posiada cyfrowe wyj cia...

Страница 29: ...aci nij aby przej do J ZYK NAPIS W Naci nij aby wybra wersj j zykow Naci nij Exit aby zapisa ustawienia Widok menu ustawie Widok strony instalacyjnej WYSZUKIWANIE Naci nij Menu Naci nij aby przej do U...

Страница 30: ...kcie skanowania naciskaj c klawisz EXIT przerywa skanowanie Po zako czeniu skanowania otrzymujemy list wyszukanych stacji telewizyjnych i radiowych Auto wyszukiwanie Lista wyszukanych stacji SKAN R CZ...

Страница 31: ...wa skanowanie MENU G WNE Po uruchomieniu MENU G OWNEGO u ytkownik mo e wybra funkcje odbioru telewizji radia lub innych dost pnych opcji Naci nij Menu aby wej do Menu g wnego Naci nij Info aby wy wiet...

Страница 32: ...u aby wej do Menu G ownego Naci nij aby przej do RADIO TELEWIZJA Naci nij aby wybra ODTWARZACZ Naci nij OK aby zatwierdzi Naci nij Navi aby wy wietli pasek opcji Naci nij aby wybra funcj NAVI Menu odt...

Страница 33: ...iskaj c EXIT wychodzimy z edycji i zapisujemy now nazw pliku Edycja nazwy plik w G OSNO Dzi ki tej funkcji mo na regulowa poziom g o no ci Naciskaj c EXIT wychodzimy z bie cego okna NAVI USUWANIE Dzi...

Страница 34: ...rtycje urz dzenia Naci nij OK na przycisk FORMAT aby sformatowa wybrana partycj Dane zawarte na sformatowanej partycji zostan trwale usuni te Funkcje t nale y stosowa z ostro no ci OPCJE Dzi ki tej fu...

Страница 35: ...arzania pliku uruchamia pasek nawigacyjny maj cy nastepuj ce funkcje PLIK KROK G OSNO ZOOM ZOOM INFO OPCJE Aby uruchomi pasek nawigacyjny naci nij NAVI Naci nij aby wybrac funkcj Funkcje nawigacyjne P...

Страница 36: ...ametry system Naci nij Menu aby wej do Menu G wnego Naci nij az przejdziesz do USTAW WI CEJ Naci nij az przejdziesz do USTAW Naci nij OK aby zatwierdzi UWAGA W Menu USTAW naci ni cie prze cza dost pne...

Страница 37: ...w w funkcji skanowania I ponownym ustawieniem strefy czasowej Naci nij aby wybra Ustawienia kraju Naci nij aby wybra kraj Naci nij Exit by zapisa ustawienia J zyk OSD W ustawieniach J ZYK OSD mo na do...

Страница 38: ...nij aby wybra ZA lub WY Naci nij Exit by zapisa ustawienia STREFA CZASOWA W ustawieniach Strefy Czasowej mo na dokona wyboru czasu lokalnego Naci nij aby wybra stref czasow Naci nij aby wybra czas lok...

Страница 39: ...Exit aby zapisa ustawienia Tryb TV W ustawieniach tej funkcji mo na ustawi standard nadawania koloru PAL NTSC Naci nij aby wy wietli Tryb TV Naci nij aby wybra standard nadawania Naci nij Exit aby zap...

Страница 40: ...0i 480p 720p_60Hz 1080i_60Hz and 1080p_60Hz HAS O Has o pocz tkowe to 0000 Naci nij aby wybra Has o Naci nij OK aby zatwierdzi Zablokuj Menu W ustawieniach tej funkcji mo na wybra zablokowanie menu Na...

Страница 41: ...Press OK Exit aby zatwierdzi zamkn okno ustawie telegazety Naci nij aby wybra stron telegazety Napisy Mo liwe jest ustawianie i ogl danie napis w bie cego kana u Naci nij Subtitle aby wy wietli stron...

Страница 42: ...zane formaty mp3 E AC 3 DD wma wav MPEG 1 LAYER 1 2 Wyj cie audio Digital audio S PDIF Pliki graficzne bmp jpg gif tif png Og lne Napi cie zasilania tuner 5 0V DC Napicie zasilania zasilacz 100 240 50...

Страница 43: ......

Страница 44: ...wykonywania kt rych zobowi zany jest U ytkownik we w asnym zakresie np wymiana materia w eksploatacyjnych itp e wady spowodowane niew a ciwym lub niezgodnym z instrukcj obs ugi u ytkowaniem produktu...

Страница 45: ...PL KARTA GWARANCYJNA...

Страница 46: ...Rozwi zywanie problem w...

Страница 47: ...PL...

Страница 48: ......

Страница 49: ...PL...

Отзывы: