background image

5

A

ligning

the Finderscope

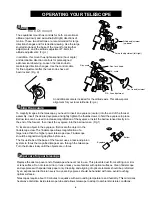
1) Focus the telescope eyepiece on a distant object.
2) Once the object has been centered in the telescope 
    view, ensure the locking screws are tightened.
3) Use the three alignment screws to center the 
    finderscope crosshairs on the object seen in the
    telescope view (Fig.a). 


Depending on telescope design, the object may appear 

    inverted in the telescope view. 
    Do not over-tighten the three alignment screws 
    on the finderscope mount.

OPERATING YOUR TELESCOPE

Fig.a

Telescope should be balanced before each observing session. Balancing reduces stress on telescope mount 
and allows precise control of micro-adjustement. A balanced telescope is specially critical when using the 
optional clock drive for astrophotography.  

The telescope should be balanced after all accessories (eyepiece, camera, etc.) have been attached. Before 
balancing your telescope, make sure that your tripod is balanced and on a stable surface. For photography, 
point the telescope in the direction you will be taking photos before preforming the balancing steps.

R.A. Balancing


1) Adjust altitude of the mount to between 15º and 30º by 
    using the altitude adjustment T-bolt. 
2) Slowly unlock the R.A. and Dec. lock knobs. 
    Rotate the telescope unitl both the optical tube 
    and counterweight rod is horizontal to the ground, 
    and the telescope tube is to the side of the mount. (Fig. b)
3) Tighten the Dec. lock knob.
4) Move counterweight along counterweight rod until 
    telescope is balanced and remains stationary when released 
5) Tighten counterweight thumb screws to hold the counterweight 
     in its new position. 

Dec. Balancing

All accessories should be attached to the telescope before 
commencing with balancing the declination axis. The R.A. 
axis should be balanced before proceeding with Dec. balancing.
1) Adjust altitude of the mount to between 60º and 75º. 
2) Release the R.A. lock knob and rotate R.A. axis so that the 
    counterweight rod is in horizontal position. Tighten the R.A. thumbscrew. 
3) Unlock the Dec. thumbscrew and rotate telescope tube until it is paralled to the ground.
4) Slowly release telescope and determine which direction the telescope rotates. Loosen 
    telescope tube rings and slide telescope tube forward or backward in the clamps 
    to balance Dec. axis.
5) Once telescope no longer rotates from its parallel starting position, re-tighten tube rings 
    and the Dec. lock knob. Reset altitude axis to your local latitude.

B

alancing

telescope

Fig.b

Содержание 1141EQ1

Страница 1: ...wing Focus Tube Finderscope Bracket Finderscope Finderscope Adjustment Screws Eyepiece Focus Knob Telescope Main Body a b Accessory Tray Tripod Leg 1 2 3 4 5 6 7 8 9 10 11 Dec Flexible Control Cable R A Control Cable Altitude Adjustable T bolt Azimuth Adjustable Knob Counterweight Counterweight Thumb screw Counterweight Rod Hour Axis Scale Dec Scale Dec Lock Knob Tube Rings ...

Страница 2: ... 270 2813 between 9 00AM and 3 00PM PST Outside Canada Please contact your dealer for technical support T echnical Support Never use your telescope to look directly at the sun Permanent eye damage will result Use a proper solar filter for viewing the sun When observing the sun place a dust cap over your finderscope to protect it from exposure Never use an eyepiece type solar filter and never use y...

Страница 3: ...e screws and wing nuts Flange fits under accessory tray when attached 2 3 ATTACHING MOUNT TO TRIPOD 1 1 Gently push middle section of each tripod leg at the top so that the pointed foot protrudes below the tripod clamp 2 Insert tripod lock screws into the thread holes on the side of the tripod clamp without over tightening Note To level the tripod slacken the locking thumb screws on the side of th...

Страница 4: ... their thumb nuts and opening their hinges 3 Using the bolts provided fasten the tube rings to the mount with the 10mm wench provided ATTACHING THE TELESCOPE MAIN TUBE TO TUBE RINGS 8 1 Remove the telescope tube from the paper covering 2 Find the center of balance of the telescope tube Place this in between the two tube rings Close the hinges around the telescope and fasten securely by tightening ...

Страница 5: ...nd 30º by using the altitude adjustment T bolt 2 Slowly unlock the R A and Dec lock knobs Rotate the telescope unitl both the optical tube and counterweight rod is horizontal to the ground and the telescope tube is to the side of the mount Fig b 3 Tighten the Dec lock knob 4 Move counterweight along counterweight rod until telescope is balanced and remains stationary when released 5 Tighten counte...

Страница 6: ...s should be preformed by an experienced technician every two years Eyepieces should be handled with care avoid touching optical surfaces Telescopes require about 30 minutes to equalize with surrounding temperature and humidity This minimizes heat wave distortion inside telescope tube and allows telescope to adapt to ambient moisture conditions P roper care for your telescope Fig f The equatorial m...

Страница 7: ...k 3rd edition 2000 A Manual Of Advanced Celestial Photography by Brad D Wallis and Robert W Provin Cambridge University Press New York 1984 Astrophotography An Introduction by H J P Arnold Sky Publishing Corp Cambridge MA Sky Telescope Observer s Guides Series ed Leif J Robinson 1995 Observational References Magazines Astrophotography for the Amateur by Michael Covington Cambridge University Press...

Отзывы: