background image

ACS-2110 User Manual   

28 

3.2 Standard CMOS Features 

Press [Del] key to enter BIOS Setup utility during POST, and then a main menu containing system 

summary information will appear. 


Phoenix 

– Award BIOS CMOS Setup Utility 

►Standard CMOS 

Features 

Load Fail-Safe Defaults 

►Advanced BIOS Features 

Load Optimized 

Defaults 

►Advanced Chipset 

Features 

Set Administrator 

Password 

►Integrated Peripherals 

Set User Password 

►Power Management 

Setup 

Save & Exit Setup 

►PnP/PCI Configurations 

    Exit Without Saving 

►PC Health Status 


Esc : Quit 

↑↓→← : Select Item 

F10 : Save & Exit Setup 


Time, Date, Hard Disk Type… 


Standard CMOS Features 

Use this menu to modify basic system configurations such as time, date and etc. 


Advanced BIOS Features 

Use this menu configure advanced features of Award®  BIOS. 


Advanced Chipset Features 

Use this menu to change the values in the chipset registers and optimize your system 

performance. 


Integrated Peripherals 

Use this menu to specify your settings for integrated peripherals.   


Power Management Setup 

Use this menu to specify your settings for power management.   


PnP/PCI Configurations 

This menu is valid only if your system supports PnP/PCI. 

Содержание ACS-2110

Страница 1: ...on Nov 2011 V1 0 Jun 2013 V1 1 2011 Aplex Technology Inc All Rights Reserved Published in Taiwan Aplex Technology Inc 15F 1 No 186 Jian Yi Road Zhonghe District New Taipei City 235 Taiwan Tel 886 2 82262881 Fax 886 2 82262883 E mail aplex aplex com tw URL www aplex com tw ...

Страница 2: ...rated in a commercial environment Operation of this equipment in a residential area is likely to cause interference in which case the user at his own expense will be required to take whatever measures may be required to correct the interference Disclaimer This information in this document is subject to change without notice In no event shall Aplex Technology Inc be liable for damages of any kind w...

Страница 3: ...id your systems from damage Avoid your system from static electricity on all occasions Prevent electric shock Don t touch any components of this card when the card is power on Always disconnect power when the system is not in use Disconnect power when you change any hardware devices For instance when you connect a jumper or install any cards a surge of power may damage the electronic components or...

Страница 4: ...2 Installations 15 2 3 Onboard Jumpers and Port Pin outs 16 Chapter 3 BIOS Setup 3 1 Operations after POST Screen 26 3 2 Standard CMOS Features 28 3 3 Advanced BIOS Features 31 3 4 Advanced Chipset Features Setup 34 3 5 Integrated Peripherals 38 3 6 Power Management Setup 44 3 7 PnP PCI Configurations Setup 47 3 8 PC Health Status 49 3 9 Load Fail Safe Optimized Defaults 50 3 10 Set Administrator ...

Страница 5: ...FE Ethernet PCI E NIC Driver 63 4 4 Realtek HD Audio Driver Installation 66 Figures Figure 1 1 Dimensions of the ACS 2110 7 Figure 1 2 Front View of ACS 2110 8 Figure 1 3 Rear View of ACS 2110 8 Figure 2 1 Mainboard Overview 9 Figure 2 2 Mainboard Dimensions 10 Figure 2 3 Connector and Jumper Locations 12 Figure 2 4 Installation of Memory Module 15 ...

Страница 6: ...TA HDD Space 1 x CF slot On board internal External I O Port Rear I O 4 x USB 2 0 connector 2 x RJ 45 LAN connector 1 x DB 9 RS232 COM1 1 x DB 15 VGA 1 x 3 Pin DC Terminal by TB 323 Front I O 1 x Switch Board by TB 2000 1 x DB9 RS232 COM2 RS232 422 485 select Default RS232 1 x DB9 RS232 Expansion Slots None Power Input 12V DC optional 11 32V DC OS support Windows XP Windows XP Pro XP Embedded Wind...

Страница 7: ...ACS 2110 User Manual 7 Storage Humidity 10 90 40 ゚ C non condensing Certificate CE FCC Class A 1 3 Dimensions Figure 1 1 Dimensions of the ACS 2110 ...

Страница 8: ...CF slot etc It is ideal for kiosks POS systems airport terminal controllers digital entertainments etc and running factory operations from small visual interface and maintenance applications to large control process applications The ACS 2110 works very well along with any of our Display Monitor series It absolutely can provide an easy way to perform control and field maintenance It comes with a DC...

Страница 9: ...ACS 2110 User Manual 9 Figure 1 3 Rear View of ACS 2110 Chapter 2__________Hardware Installation 2 1 Mainboard Specifications Figure 2 1 Mainboard Overview ...

Страница 10: ...ACS 2110 User Manual 10 Figure 2 2 Mainboard Dimensions ...

Страница 11: ...ACS 2110 User Manual 11 ...

Страница 12: ...ACS 2110 User Manual 12 Figure 2 3 Connector and Jumper Locations ...

Страница 13: ...lot 1 x 44 pin IDE Connector Network 2 x Gigabit Ethernet Port by RJ45 with LED indicators Ethernet controller 2 x PCIe by one bus Realtek 8111D USB 4 x USB 2 0 stack port for external 2 x USB 2 0 header for internal Serial 1 x RS232 port DB9 connector for external COM1 pin 9 w 5V 12V Ring select 1 x RS232 422 485 Full duplex select header for internal COM2 default RS232 4 x RS232 header for inter...

Страница 14: ...ower on off switch Reset switch Power LED status HDD LED status Buzzer Watchdog Timer Software programmable 1 255 second by Super I O External I O port 1 x COM Port COM1 4 x USB 2 0 Ports stack 2 x RJ45 GbE Port 10 100 1000Mbps 1 x VGA Port Temperature Operating 0 60 degree C Storage 20 80 degree C Humidity 5 95 non condensing operating Power Consumption 12V 1 4 5A Intel N270 processor with 1GB DD...

Страница 15: ...945GSE2 on an anti static pad with the solder side facing up Step 2 Align the SO DIMM with the socket The SO DIMM must be oriented in such away that the notch in the middle of the SO DIMM must be aligned with the plastic bridge in the socket Step 3 Insert the SO DIMM Push the SO DIMM chip into the socket at an angle See Figure 2 3 Step 4 Open the SO DIMM socket arms Gently pull the arms of the SO ...

Страница 16: ... CLOSE 2 3 CLEAR CMOS Procedures of CMOS clear 1 Turn off the system and unplug the power cord from the power outlet 2 To clear the CMOS settings use the jumper cap to close pins 2 and 3 for about 3 seconds then reinstall the jumper clip back to pins 1 and 2 3 Power on the system again 4 When entering the POST screen press the DEL key to enter CMOS Setup Utility to load optimal defaults 5 After th...

Страница 17: ...y pins No 8 10 of JCOM For details please refer to description of JCOM 5 KB MS 2 0MM 1X6 PS 2 keyboard mouse port the port can be connected to PS 2 keyboard or mouse via a dedicated adapter cable for direct use Pin Signal Name 1 KBDATA 2 MSDATA 3 Ground 4 5V 5 KBCLK 6 MSCLK 6 LPT 2 0MM 2X13 Parallel port a standard 26 pin parallel port is provided to connect parallel peripherals as required Signal...

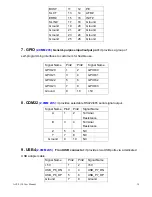
Страница 18: ... Name Pin Pin Signal Name GPIO20 1 2 GPIO60 GPIO21 3 4 GPIO61 GPIO22 5 6 GPIO62 GPIO23 7 8 GPIO63 Ground 9 10 5V 8 COM22 2 0MM 2X5 it provides selectable RS422 485 serial signal output Signal Name Pin Pin Signal Name A 1 2 Terminal Resistance B 3 4 Terminal Resistance Z 5 6 NC Y 7 8 NC Ground 9 10 NC 9 USB4 2 0MM 2X5 Front USB connector it provides two USB ports via a dedicated USB adapter cable S...

Страница 19: ...2 FROM COM2 default CLOSE 9 11 CLOSE 10 12 COM2 FOR RS485 RS422 FROM COM22 Note 1 As determined by its hardware design the board features full duplex RS485 communication Like RS422 a four wire connection is necessary 2 Since COM2 and COM22 use the same address they cannot work at the same time 11 IDE 2 0MM 2X22 IDE connector the motherboard provides a 44 pin IDE connector for connection of 2 5 IDE...

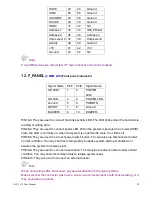
Страница 20: ...r writing data PIN2 4 They are used to connect power LED When the system is powered on or under S0 S1 state the LED is normally on when the system is under S4 S5 state the LED is off PIN5 6 They are used to connect power switch button The two pins are disconnected under normal condition You may short them temporarily to realize system startup shutdown or awaken the system from sleep state PIN7 8 T...

Страница 21: ...input 14 USB1 2 Rear USB connector it provides up to 4 USB2 0 ports 15 LAN1 2 Rear LAN connectors 2 standard 1000M RJ 45 Ethernet ports are provided LINK LED green and ACTIVE LED yellow respectively located at the left hand and right hand side of the Ethernet port indicate the activity and transmission state of LAN 16 VGA Video Graphic Array GMA950 GPU is integrated to provide high quality video o...

Страница 22: ...945GSE chipset the interface features single and dual channel 18 bit output with maximum resolution support up to 1600 1200 The format of connected display screen is SPWG Model name of the interface connector is Hirose DF13 40DP 1 25V Signal Name Pin Pin Signal Name 5V 1 2 5V Ground 3 4 Ground 3 3V 5 6 3 3V LADATAN0 7 8 LBDATAN0 LADATAP0 9 10 LBDATAP0 Ground 11 12 Ground LADATAN1 13 14 LBDATAN1 LA...

Страница 23: ...ed display screen is OPENLDI Model name of the interface connector is Hirose DF13 40DP 1 25V Signal Name Pin Pin Signal Name 5V 1 2 5V Ground 3 4 Ground 3 3V 5 6 3 3V A0M 7 8 A4M A0P 9 10 A4P Ground 11 12 Ground A1M 13 14 A5M A1P 15 16 A5P Ground 17 18 Ground A2M 19 20 A6M A2P 21 22 A6P Ground 23 24 Ground CLK1M 25 26 CLK2M CLK1P 27 28 CLK2P Ground 29 30 Ground SC_DDC 31 32 SD_DDC Ground 33 34 Gro...

Страница 24: ...und 5 LBKLT_EN 6 LBKLT_CTRL Note Remember that BLK1 supports LVDS1 and BLK2 supports LVDS2 during wiring The two must not be confused 24 SATA1 2 SATA Connectors two SATA connectors are provided with transfer speed up to 3 0Gb s 25 CN1 2 5MM 1X2 an onboard 5V output connector is reserved to provide power for IDE SATA devices Pin Signal Name 1 5V 2 Ground Note ...

Страница 25: ...N 1 8V DDRII400 533 memory module up to 2G If a DDRII667 800 memory module is installed the system will reduce the DRAM frequency to 533MHz 29 MPCIE Mini PCIE slot it supports MINI PCIE devices with USB2 0 SMBUS and PCIE signal 30 CF CF Card Slot it is located at the backside of the board and serves as an insert interface for Type I and Type II Compact Flash card The operating voltage of CF card c...

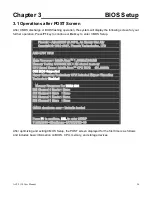
Страница 26: ...x12 Memory Testing 515008K OK 8M shared memory CPU Brand Name Intel Atom CPU N270 1 60GHz C1E BIOS Supported Hyper Threading Technology CPU Detected Hyper Threading Technology Enabled Memory Frequency For DDR2 533 IDE Channel 0 Master None IDE Channel 0 Slave None IDE Channel 1 Master None IDE Channel 1 Slave None CMOS checksum error Defaults loaded Press F1 to continue DEL to enter SETUP 11 25 20...

Страница 27: ...ported Hyper Threading Technology CPU Detected Hyper Threading Technology Enabled Memory Frequency For DDR2 533 IDE Channel 0 Master None IDE Channel 0 Slave None IDE Channel 1 Master None IDE Channel 1 Slave None Press DEL to enter SETUP F12 to Enter Boot Menu 11 25 2009 Silverthrone 6A79KAPXC 00 Press F12 key to enter Boot Menu during POST as shown by the following figure Boot Menu Select a Boot...

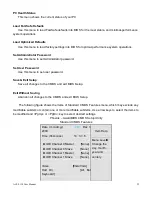
Страница 28: ...ions Exit Without Saving PC Health Status Esc Quit Select Item F10 Save Exit Setup Time Date Hard Disk Type Standard CMOS Features Use this menu to modify basic system configurations such as time date and etc Advanced BIOS Features Use this menu configure advanced features of Award BIOS Advanced Chipset Features Use this menu to change the values in the chipset registers and optimize your system p...

Страница 29: ...Save all changes to the CMOS and exit BIOS Setup Exit Without Saving Abandon all changes to the CMOS and exit BIOS Setup The following figure shows the items of Standard CMOS Features menu which may exclude any modifiable subitem or contain one or more modifiable subitems Use arrow keys to select the items to be modified and PgUp or PgDn key to select desired settings Phoenix AwardBIOS CMOS Setup ...

Страница 30: ... of Drive Table If the information registered in this item is not correct your hard disk will not work properly if your hard disk specification is not found or does not conform to or the Driver Table you may select Manual type to set the specification manually If you choose Manual you will be requested to enter relevant information in the following entries Keyboard input is also supported For deta...

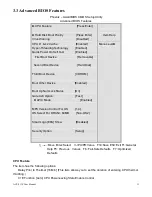
Страница 31: ...Third Boot Device CDROM Boot Other Device Enabled Boot Up NumLock Status On Gate A20 Option Fast X APIC Mode Enabled MPS Version Control For OS 1 4 OS Select For DRAN 64MB Non OS2 Small Logo EPA Show Disabled Security Option Setup Move Enter Select PU PD Value F10 Save ESC Exit F1 General Help F5 Previous Values F6 Fail Safe Defaults F7 Optimized Defaults CPU Feature The item has the following opt...

Страница 32: ... is used to accelerate Power On Self Test POST process If set to Enabled BIOS will shorten or skip some of its tests Enabled default Quick POST Disabled Normal POST First Second Third Boot Other Device BIOS will load the operating system according to the boot order of available devices If disabled the function will be inactivated Boot Up NumLock Status Default On On default Keypad numeric keys rem...

Страница 33: ...ill be displayed during POST The options are Disabled and Enabled Security Option Such option allows users to set access restrictions to both system and Setup utility or just Setup utility System If one fails to enter a valid password in the popup box the system will not boot up and the Setup utility will not be accessible Setup default If one fails to enter a valid password in the popup box the s...

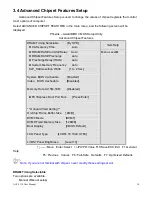
Страница 34: ...ge Delay tRAS Auto X System Memory Frequency Auto SLP_S4 Assertion Width 1 to 2 Sec System BIOS Cacheable Enabled Video BIOS Cacheable Disabled Memory Hole At 15M 16M Disabled PCI Express Root Port Func Press Enter Onboard VGA Setting On Chip Frame Buffer Size 8MB DVMT Mode DVMT DVMT Fixed Memory Size 128MB Boot Display VBIOS Default LCD Panel Type LVDS1 18 1024 X 768 LVDS1 Panel Brightness Level ...

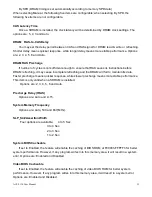
Страница 35: ...incomplete refreshing and the DRAM will fail to maintain its data Faster precharge means quicker response while slower precharge means more stable performance This item is only valid when a SDRAM is installed Options are 2 3 4 5 6 and Auto Precharge Delay t RAS Options are Auto and 4 15 System Memory Frequency Options are Auto 533 and 667 MHz SLP_S4 Assertion Width Four options are available 4 to ...

Страница 36: ...f the system memory will be allocated to GPU Two allocation sizes are available 64MB and 128MB When set to DVMT Mode the system will dynamically allocate system memory to GPU In this mode up to 224MB of system memory can be allocated When set to Both FIXED DVMT mode the system will allocate a fixed memory of 64MB as dedicated graphic memory as well as allow a memory of 64MB to be dynamically alloc...

Страница 37: ...gth of BIOS only a portion of panel parameters are listed in BIOS Setup If the connected panel is not included in the parameter list display problem will occur In this case we need to adjust BIOS setup LVDS1 Panel Brightness This feature provides adjustable brightness control LEVEL3 10 Note This feature is valid only when the panel supports PWM function ...

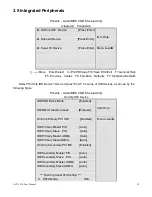
Страница 38: ... Device item and press Enter for setup of IDE devices as shown by the following figure Phoenix AwardBIOS CMOS Setup Utility OnChip IDE Device IDE HDD Block Mode Enabled Item Help IDE DMA Transfer access Enabled On Chip Primary PCI IDE Enabled Menu Level IDE Primary Master PIO Auto IDE Primary Slave PIO Auto IDE Primary Master UDMA Auto IDE Primary Slave UDMA Auto On Chip Secondary PCI IDE Enabled ...

Страница 39: ...s are Enabled and Disabled IDE Primary Secondary Master Slave PIO The four IDE PIO Programmed Input Output fields allow you to set a PIO mode 0 4 for each of the four IDE devices that the onboard IDE interface supports Mode 0 through 4 provides successively increased performance In Auto mode the system automatically determines the best mode for each device Options are Auto Mode 0 Mode 1 Mode 3 and...

Страница 40: ...d Device item and press Enter for setup of onboard devices as shown by the following figure Phoenix AwardBIOS CMOS Setup Utility Onboard Device USB Controller Enabled Item Help USB 2 0 Controller Enabled USB Keyboard Support Enabled Menu Level USB Mouse Support Enabled Azalia AC97 Audio Select Auto Move Enter Select PU PD Value F10 Save ESC Exit F1 General Help F5 Previous Values F6 Fail Safe Defa...

Страница 41: ...e Enabled and Disabled Azalia AC97 Audio Select This item is used to select Audio mode Select Super IO Device item and press Enter for setup of Super IO devices as shown by the following figure Phoenix AwardBIOS CMOS Setup Utility Super IO Device Onboard Parallel Port 378 IRQ7 Item Help Parallel Port Mode Standard X ECP Mode Use DMA 3 Menu Level Onboard Serial Port 1 3F8 IRQ4 Onboard Serial Port 2...

Страница 42: ...ing interrupts for serial port COM1 2 3 4 Options are Disabled 3F8 IRQ4 2F8 IRQ3 3E8 IRQ4 and 2E8 IRQ3 Onboard Serial Port 5 6 These two selection fields allow you to select the I O address and corresponding interrupts for serial port COM5 6 Options are Disabled 4F8 IRQ4 and 4E8 IRQ3 UART Mode Select Generally Onboard Serial Port 2 of motherboard can also be used as infrared port This item allows ...

Страница 43: ...ACS 2110 User Manual 43 Any key Keyboard 98 Watch Dog Timer Select Eight options are available Disabled 10Sec 20Sec 30Sec 40Sec 1Min 2Min and 4Min ...

Страница 44: ...od DPMS Video Off In Suspend Yes Suspend Type Stop Grant MODEM Use IRQ 3 Suspend Mode Disabled HDD Power Down Disabled Soft Off by PWR BTTN Instant Off Resume by Alarm Disabled X Date Of Month Alarm 0 X Time hh mm ss Alarm 0 0 0 Reload Global Timer Events Primary IDE 0 Disabled Primary IDE 1 Disabled Secondary IDE 0 Disabled Secondary IDE 0 Disabled FDD COM LPT Port Disabled PCI PIRQ A D Disabled ...

Страница 45: ...15min Max Saving Maximum power management Suspend Mode 1min and HDD Power Down 1min Video Off Method This item determines the display type of monitor V HSYNC Blank This option turns off the vertical and horizontal synchronization ports and writes blanks to the video buffer Blank Screen This option only writes blanks to the video buffer DPMS This option controls initial display of power management ...

Страница 46: ...me When set to Disabled the feature is inactivated when set to Enabled date and time of power on can be set Date of month Alarm Turn on the system at a specific time on each day or on a specific day in a month If set to 0 the system will be powered on once every day Time hh mm ss Alarm Set the time hh mm ss at which the system will be powered on automatically Note You must restart the system after...

Страница 47: ...y First PCI Slot Item Help Reset Configuration Data Disabled Menu Level Resources Controlled By Auto ESCD X IRQ Resources Press Enter PCI VGA Palette Snoop Disabled PCI Express Relative Items Maximum Payload Size 128 Move Enter Select PU PD Value F10 Save ESC Exit F1 General Help F5 Previous Values F6 Fail Safe Defaults F7 Optimized Defaults Init Display First PCI Slot PCI display device Onboard O...

Страница 48: ...ting system such as Windows 95 98 If set to Manual you may have access into each submenu under this item each submenu begins with and select specific resource manually Options are Auto ESCD and Manual IRQ Resources This item determines whether IRQ interrupt is assigned to Plug and Play device or Non Plug and Play ISA device PCI VGA Palette Snoop This item should be left Disabled Options are Enable...

Страница 49: ...e Defaults F7 Optimized Defaults This module mainly shows motherboard information on current operating voltage CPU temperature system temperature and fan rotation speed Refer to actual screen for name of each column CPU Fan Cruise Target Fan Cruise Threshold this item determines the rotation condition of fan when CPU temperature reaches preset value Options of CPU Fan Cruise Target are Disable 55 ...

Страница 50: ...select Load Fail Safe Defaults the following information will be shown Phoenix AwardBIOS CMOS Setup Utility Standard CMOS Features Load Fail Safe Defaults Advanced BIOS Features Load Optimized Defaults Advanced Chipset Features Set Administrator Password Integrated Peripherals Set User Password Power Management Setup Save Exit Setup PNP PCI Configurations Exit Without Saving PC Health Status Esc Q...

Страница 51: ...ed BIOS Features Load Optimized Defaults Advanced Chipset Features Set Administrator Password Integrated Peripherals Set User Password Power Management Setup Save Exit Setup PNP PCI Configurations Exit Without Saving PC Health Status Esc Quit Select Item F10 Save Exit Setup Load Optimized Defaults Press Y to load factory settings delivering optimized performance Load Optimized Defaults Y N N ...

Страница 52: ...ndon password entry operation To clear the password just press Enter key when password input window pops up A confirmation message will be shown on the screen as to whether the password will be disabled You will have direct access to BIOS setup without typing any password after system reboot once the password is disabled Once the password feature is used you will be requested to type the password ...

Страница 53: ...lts Advanced BIOS Features Load Optimized Defaults Advanced Chipset Features Set Administrator Password Integrated Peripherals Set User Password Power Management Setup Save Exit Setup PNP PCI Configurations Exit Without Saving PC Health Status Esc Quit Select Item F10 Save Exit Setup Save Data to CMOS Press Enter key to save the changes and exit from BIOS setup Save to CMOS and Exit Y N Y ...

Страница 54: ...dvanced BIOS Features Load Optimized Defaults Advanced Chipset Features Set Administrator Password Integrated Peripherals Set User Password Power Management Setup Save Exit Setup PNP PCI Configurations Exit Without Saving PC Health Status Esc Quit Select Item F10 Save Exit Setup Save Data to CMOS Press Y and then Enter key to exit from BIOS setup without saving the changes Quit Without Saving Y N ...

Страница 55: ...are and drivers are included with the motherboard The contents include Intel chipset driver VGA driver LAN drivers Audio driver Installation instructions are given below I Important Note After installing your Windows operating system Windows XP you must install first the Intel Chipset Software Installation Utility before proceeding with the installation of drivers ...

Страница 56: ...r Manual 56 4 1 Intel Chipset Driver To install the Intel chipset driver please follow the steps below Step 1 Select Chipset from the list Follow the step by step installation process to install the LMS_SQL driver ...

Страница 57: ...ACS 2110 User Manual 57 ...

Страница 58: ...ACS 2110 User Manual 58 ...

Страница 59: ...ation process is complete the Setup Complete screen appears See as picture 4 2 Intel Graphics Media Accelerator Driver To install the VGA drivers follow the steps below to proceed with the installation 1 Click Intel R 945GSE Chipset Family Graphics Driver ...

Страница 60: ...ACS 2110 User Manual 60 Follow the step by step installation process to install the Graphics Media Accelerator driver ...

Страница 61: ...ACS 2110 User Manual 61 ...

Страница 62: ...ACS 2110 User Manual 62 ...

Страница 63: ...er Manual 63 Click FINISH A Driver Installation Complete 4 3 Realtek GbE FE Ethernet PCI E NIC Driver To install the Realtek GbE FE Ethernet PCI E NIC Driver please follow the steps below Select LAN from the list ...

Страница 64: ...ACS 2110 User Manual 64 Follow the step by step installation process to install the LAN driver ...

Страница 65: ...ACS 2110 User Manual 65 ...

Страница 66: ...User Manual 66 Click FINISH A Driver Installation Complete 4 4 Realtek HD Audio Driver Installation To install the Realtek High Definition HD Audio driver please follow the steps below Select Audio from the list ...

Страница 67: ...ACS 2110 User Manual 67 Follow the step by step installation process to install the Realtek HD Audio driver ...

Страница 68: ...ACS 2110 User Manual 68 ...

Страница 69: ...ACS 2110 User Manual 69 Click FINISH A Driver Installation Complete ...

Отзывы: