
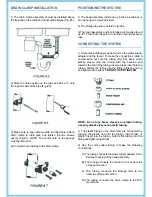

DRAIN CLAMP INSTALLATION
1) The drain clamp assembly should be installed above
the trap and on the vertical or horizontal tailpiece (Fig. #5)
2) Mark the hole position on the pipe and drill a ¼” hole
through one side of the pipe (Fig. #6).
3) Make sure to align drain saddle to drilled hole. Attach
drain clamp to drain pipe and tighten the two screws
evenly (Fig #7). NOTE: The center hole on the sponge
must be removed.
4) Connect the red tubing to the drain clamp.
POSITIONING THE SYSTEM
CONNECTING THE SYSTEM
1) The head assembly will stand up in the sink cabinet or
can be hung on screws provided.
2) The storage tan k may be laid on its side.
3)The head assembly and/or storage tank maybe placed
up to 15 feet from the point of use with nominal pressure
loss.
1) Compression fittings may be found on the water supply
adapter and the faucet. To make the connections, slide a
compression nut onto the tubing (Fig. #8), slip a white
plastic sleeve onto the tubing with the beveled end
towards the end of the tubing, insert a brass insert into the
tubing, bottom the tubing into the fitting, slide the nut up
and tighten with a wrench.
DO NOT OVER TIGHTEN
.
NOTE: Do not use brass sleeves on plastic tubing,
use only plastic sleeves on plastic tubing.
1) The plastic fitting on the drain clamp is connected by
slipping the plastic nut onto the tubing, insert brass or
plastic insert into the tubing, bottom the tubing into the
fitting and tighten finger tight.
2) Use the color coded tubing to make the following
connections:
A) The tubing connects the water supply adapter to the
first clear housing of the head assembly.
B) The tubing connects the faucet to the outlet side
of the post carbon.
C) The tubing connects the storage tank to the
inlet side of the post carbon.
D) The tubing connects the drain clamp to the R/O
membrane.


