background image

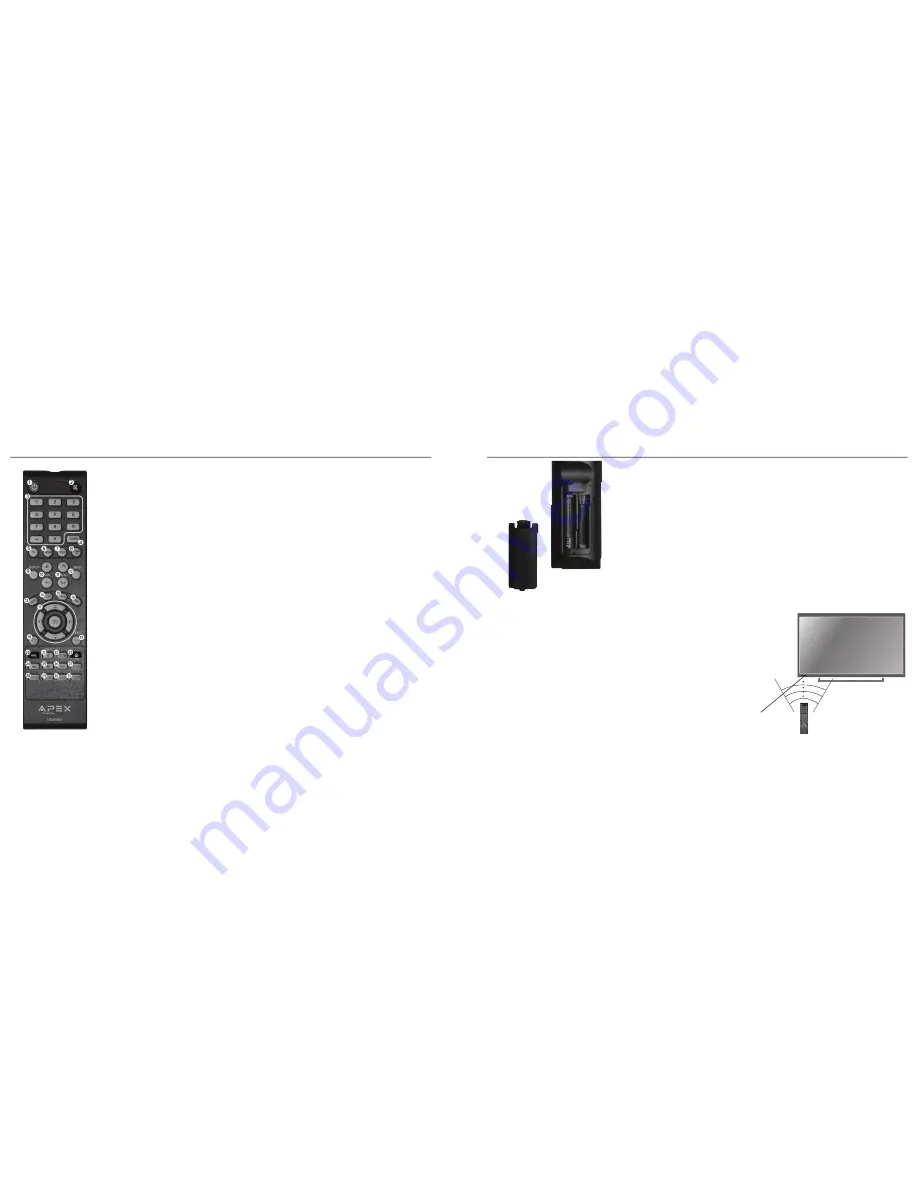
REMOTE CONTROL BATTERY INSTALLATION

REMOTE CONTROL

12

1. 

Power – Press to turn television power ON or OFF.

2. 

Mute – Press to turn off the sound. Press again to restore the sound.

3. 

Numbers /Dash – Press to select the desired TV channel. Example: To select digital channel 4-1, press “4”, then “-“, then “1”. 

4. 

Guide – Display scheduled programming for the current channel.

5. 

TV – Press to access the TV tuner.

6. 

HDMI – Press to select the desired HDMI input. 

7. 

VGA – Select to view your connected PC.

8. 

Comp /AV – Select to view the device connected to Component or AV input.

9. 

Display – Information on the program currently viewed.

10. 

Volume (+/-) – Adjust volume up (+) or down (-).

11. 

Channel (+/-) – Select channel up or channel down.

12. 

Input – Press to display all input sources available.

13. 

Menu – Press to display the user menu. Press again to exit.

14. 

CCD – Select closed caption subtitles (if available) OFF > ON > CC ON MUTE.

15. 

CH List – Press to display the channel list.

16. 

FAV – Display a list of TV channels you have added as favorites.

17. 

Arrow Buttons/Enter – Navigate menus and highlight input selections. Press Enter to confirm.

18. 

Return – Press to go back to the previous channel or “instant replay” on certain media sticks.

19. 

Exit – Press to exit the menu displayed

20. 

MHL – Press to select the MHL input.

21. 

Info – Display current information on-screen.

22. 

Freeze – Press to pause and still-frame the current image. Press again to resume regular viewing.

23. 

Home – Press for direct access to the home screen on a device connected through the MHL input. 

Use the following buttons to control certain MHL media devices (not included):

24. 


tt

 - Rewind 

25. 


u

II

– Play/Pause

26. 


uu

 - Fast forward

27. 

Zoom – Select viewable picture options: Normal > Wide > Zoom > Cinema.

28. 

Picture – Select from preset picture modes: Personal > Standard > Dynamic > Movie.

29. 

Audio – Select from various preset audio EQ settings: Personal > Standard > Music > Movie.

30. 

MTS – Select SAP audio in an alternative language (if available).

31. 

Sleep – Activates the Sleep Timer to turn off the TV after 5 minutes or up to 240 minutes.

13

• 

When pointed towards the television, the effective range is 

approximately 16 feet from the front of the IR receiver, 30° to the left 

and right, 20° up and down.

• 

To avoid damage from possible battery chemical leakage, remove 

the batteries if you do not plan to use the remote control handset for 

an extended period of time. Do not mix batteries of different age and/

or type. Always discard used batteries safely.

• 

Do not expose remote control to liquids, direct sunlight or sources of 

excessive heat.

• 

The IR receiver will not work properly if TV is in direct sunlight, the 

remote control is pointed off-axis or an object is in the IR path.

Your remote control handset is powered by two (2) AAA type batteries.

1. 

To insert batteries, turn the remote control over 

  and remove the battery cover.

2. 

Place two (2) AAA batteries into the compartment 

  with the correct polarity.

3. 

Replace the cover.

30°

30°

IR Receiver

Содержание LE32D5

Страница 1: ...QUICK START GUIDE Apex LE32D5 32 CLASS HDTV Full User Manual Available at www tmaxdigital com Customer Support 877 833 1888 7 00am 10 00pm CST Daily Email Support cs tmaxdigital com ...

Страница 2: ...nded so as to provide some protection against voltage surges and built up static charges Article 810 of the National Electrical Code U S A ANSI NFPA 70 provides information with regard to proper grounding of the mast and supporting structure grounding of the lead in wire to an antenna discharge unit size of grounding conductors location of antenna discharge unit connection to grounding electrodes ...

Страница 3: ...e Quick Setup Guide will answer the most frequently asked questions for setup installation and use We encourage you to visit us at www tmaxdigital com to download the complete online manual For your convenience this QR code will take you directly to the online manual as well The TV package includes the following items 1 HDTV 2 Pedestal Base Hardware 3 Remote Control 4 2 AAA Batteries for Remote Co...

Страница 4: ...Headphone Stereo mini jack to connect headphones 2 SPDIF Connect an optional coaxial digital cable through a compatible amp receiver to enjoy superior audio sound 3 AV Composite Inputs Connect a standard AV device to the composite video Y and audio L R output jacks found on most external video equipment AV Composite and Component YPbPr connections are shared Only one device may be connected at a t...

Страница 5: ...oded connectors to similar colored ports found on the TV Only one device may be connected To view press the INPUT button on the remote Using the p arrow buttons highlight YPbPr and press ENTER HDMI delivers pure and uncompressed 1080P digital signals for both video and sound all in one cable Use for best performance whenever possible with Cable Satellite Blu ray high performance video consoles etc...

Страница 6: ...the cursor will move up and CABLE SYSTEM will be displayed next Press the u arrow button to select STD IRC HRC Auto Auto is recommended Press the down q arrow button to select Auto Scan and press ENTER to start Channel Auto Scan Channel Auto Scan may take several minutes to complete NOTE You must run the Channel Auto Scan if you plan to use an antenna for TV reception You do not need to run Channe...

Страница 7: ...age Press again to resume regular viewing 23 Home Press for direct access to the home screen on a device connected through the MHL input Use the following buttons to control certain MHL media devices not included 24 tt Rewind 25 uII Play Pause 26 uu Fast forward 27 Zoom Select viewable picture options Normal Wide Zoom Cinema 28 Picture Select from preset picture modes Personal Standard Dynamic Mov...

Страница 8: ...erted Verify you have selected the correct audio source from your amplifier Mute function may be enabled press Mute on the remote Black box on screen The Text option is enabled and no text is available Press the CC Button on the remote control to turn off No power Batteries in the remote control may need replacing Re attach AC plug to wall outlet Check power switch on TV s rear panel Remote contro...

Страница 9: ...ainst defects in material or workmanship and labor costs for a period of one 1 year from the original date of purchase During this period TMAX Digital Inc will provide service repairs when the unit is shipped to the authorized service center We will replace any defective part s with new or refurbished part s without charge to you If your unit is deemed not to be repairable TMAX Digital Inc will re...

Отзывы: