background image

A

P

E

X


D

I

G

I

T

A

L

H

T

-

1

7

0

21

1. Press SETUP.
2. Press                   to select category (highlight), then press ENTER.
3. Press SETUP to exit setup menu.

THIS UNIT ALLOWS YOU TO CUSTOMIZE THE PERFORMANCE TO YOUR PERSONAL PREFERENCE.

• Preset password is 

3308 

.

•The SETUP MENU screen disappears if you press the SETUP button while it is
displayed.
• Functions and menu are subject to change without notice.
• 

You must set up  Preference, when the unit is stopped completedly.

* Factory defaults

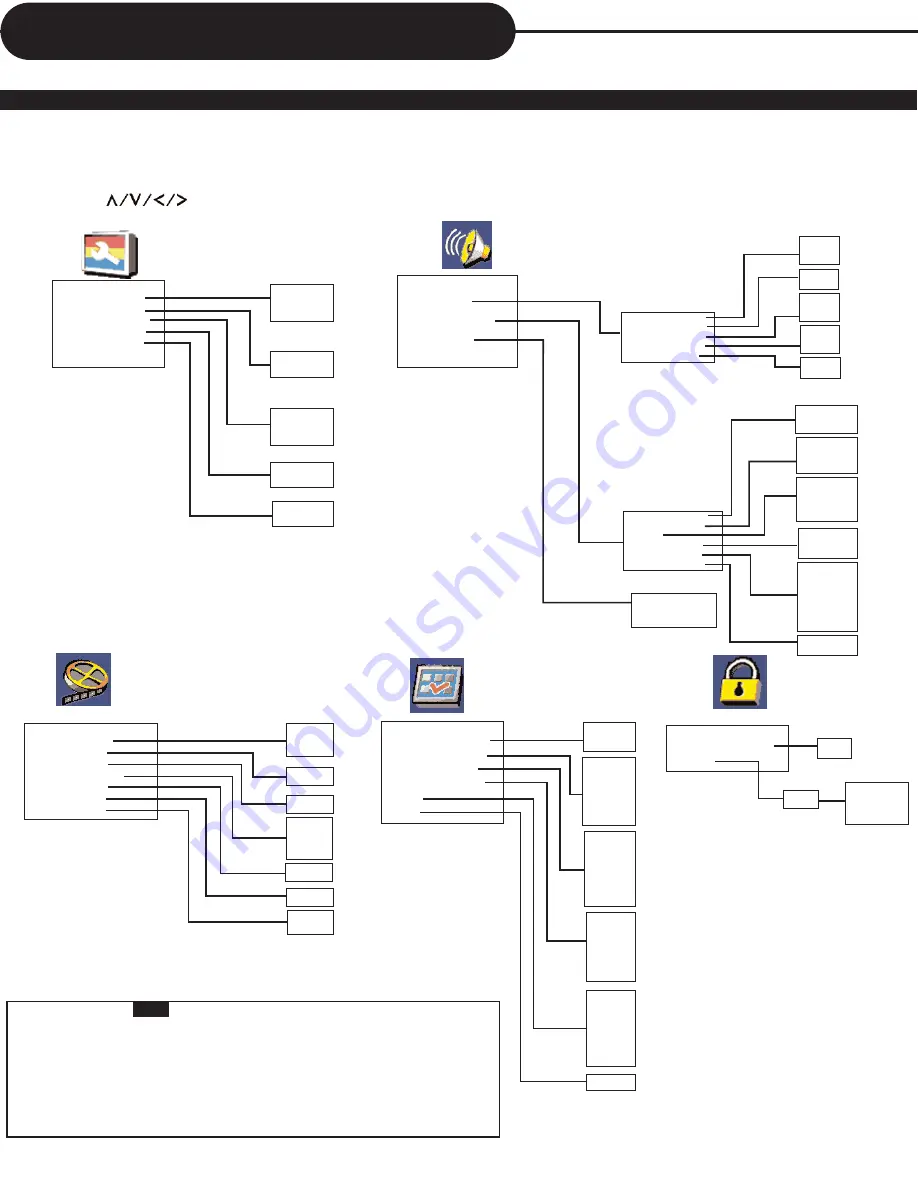
DISPLAYING THE SETUP MENU SCREEN

The SETUP MENU screen asks you to select a setting category from General Setup, Audio Setup, Video
Setup, Preference Setup and Password Setup.  The selected category will provide you the setting details
on-screen.

--General Setup Page--
TV Display         PS
Angle Mark        On
OSD Lang         ENG
Captions            Off
Screen Saver     On

Normal /PS*
Normal /LB
Wide

On*
Off

English*
French
Spanish

On
Off*

--Audio Setup Page--

Speaker Setup     

Dolby Digital Setup

Channel Delay 

Downmix            Off
Front Speaker   SML
Center Speaker  SML
Rear Speaker     SML
Test Tone      

Off

FULL*
3/4
1/2
1/4
OFF

SPDIF Off
SPDIF/RAW*
SPDIF/PCM

LT/RT
Stereo
Off*

Large
Small*

Large 
Small*
Off

Large 
Small*
Off

On
Off*

SPDIF Output    RAW 
Dual Mono        STR  
Dynamic         
Dolby PL II          On
Reverb Mode     Off
LPCM Out          48K

Stereo*
L-MONO
R-MONO
MIX-MONO

On*
Off 
Auto

Off*
Concert
Living Room
Hall
Bathroom
Cave
Arena
Church

48K*
96K

Center (0-170cm)
Subwoofer (0-510cm)
LS/RS (0-510cm)

On*
Off

--Video Setup Page--

Sharpness      Low
Brightness      00
Contrast          00
Gamma           None
Hue                 00
Saturation       00
Luma Delay    1 T

High
Medium
Low*

High
Medium
Low
None*

-20~+20

-16~+16

-9~+9

-9~+9

0 T
1 T*

--Preference Page--

TV Type               NTSC

Audio                  ENG

Subtitle               Off

Disc Menu           ENG

Parental          

Default 

PAL
Multi
NTSC*

English*
French
Spanish
Chinese
Japanese
Korean
Russian
Thai

1 KID SAFE
2 G
3 PG
4 PG-13
5 PG R
6 R
7 NC-17
8 ADULT*
Off

English*
French
Spanish
Chinese
Japanese
Korean
Russian
Thai

English
French
Spanish
Chinese
Japanese
Korean
Russian
Thai
Off*

Reset

--Password Setup Page--

Password mode      On

Password

On*
Off

Old Password
New Password
Confirm PWD

OK

Change

Customizing the Function Settings


Содержание HT-170

Страница 1: ...terference in a residential installation This equipment generates uses and can radiate radio frequency energy and if not installed and used in accordance with the instructions may cause harmful interference to radio communication However there is no guarantee that interference will not occur in a particular installation If this equipment does cause harmful interference to radio or television recep...

Страница 2: ...xit from the apparatus 11 Only use attachments accessories specified by the manufacturer 12 Use only with the cart stand tripod bracket or table specified by the manufacturer or sold with the apparatus When a cart is used use caution when moving the cart apparatus combination to avoid injury from tip over 13 Unplug this apparatus during lightning storms or when unused for long periods of time 14 R...

Страница 3: ...e Do not use is on a shaky or unstable surface such as a wobbling table or inclined stand The loaded disc may come off the proper position and cause damage to the player When you place this player near a TV or radio the playback picture may become poor and the sound may be distorted In this case place the player away from the TV or radio Notes on cleaning Use a soft dry cloth for cleaning For stub...

Страница 4: ... sound deterioration Wipe the disc from the center outward with a soft cloth Always keep the disc clean If you cannot wipe off the dust with a soft cloth wipe the disc lightly with a slightly moistened soft cloth and finish with a dry cloth Do not use any type of solvent such as a thinner benzine commercially available cleaners or anti static spray for vinyl LP s It may damage the disc STORING DIS...

Страница 5: ...NDICATOR LIGHT 3 VFD 4 DISC TRAY 5 PLAY 6 PREVIOUS 7 VOLUME KNOB VOLUME UP DOWN 8 NEXT 9 STOP 1 0 OPEN CLOSE You can change the brightness of the front panel display by pressing the DIMMER button repeatedly FRONT PANEL REAR PANEL 1 AV INPUT COMPOSITE VIDEO AUDIO L AUDIO R 2 AV OUTPUT COMPOSITE VIDEO AUDIO L AUDIO R 3 COMPONENT VIDEO OUTPUT 4 FM 75 OHMS WIRE ANTENNA 5 AM LOOP ANTENNA 6 DOLBY 5 1 CH...

Страница 6: ... BUTTONS 8 SUBTITLE 9 AUDIO 10 DISPLAY 11 DIRECTION BUTTONS 12 TITLE 13 MENU 14 SETUP 15 SKIP FORWARD PRESET 16 SKIP REVERSE PRESET 17 FM AM 18 PLAY PAUSE 19 STOP THE INSTRUCTIONS BELOW DESCRIBE THE FUNCTIONS ON THE REMOTE CONTROL NOTICE 20 FAST REVERSE TUNING 21 FAST FORWARD TUNING 22 STEP 23 SLOW 24 ENTER 25 MODE 26 VOLUME 27 MUTE 28 CLEAR 29 ZOOM 30 ANGLE 31 KODAK T E 32 PRO LOGIC 33 DIMMER 34 ...

Страница 7: ...ompartment Close the cover NOTICE PREPARING THE REMOTE CONTROL To operate the unit you must first place the batteries in the remote control FOLLOW INSTRUCTIONS BELOW BECAUSE INCORRECT USE OF BATTERIES MIGHT CAUSE THEM TO LEAK OR ERODE Do not place the batteries in the wrong direction It is dangerous to charge heat open or short circuit the batteries Do not leave dead batteries or mix old with new ...

Страница 8: ... of your unit to the TV Video Input For TV that support S video Input please follow the diagram to the right BETTER Yellow Red White TV Video Input TV Audio Input TV s S video input Optional Cable Connect the unit with an optional S Video cable if the TV has an S Video input Do not connect the yellow video cable if using the S Video cable During connecting do not connect the S Video output and YPb...

Страница 9: ...or speakers Each press of the MODE button steps through the speakers as follows LEFT CENTER RIGHT SR SL SW VOL NOTICE Depending on the settings of other speakers excessive volume may be output from the subwoofer If the distances of the speakers are not equal adjust the speaker with shortest distance to the listener You may set delay value for speakers via the Channel Delay in Audio Setup Page Noti...

Страница 10: ...t be authorized by Macrovision Corporation and is intended for home and other limited viewing uses only unless otherwise authorized by Macrovision Corporation Reverse engineering or disassembly is prohibited It is forbidden by law to copy broadcast show play in public and rent copyrighted material without permission DVD video discs are copy protected and any recordings made from these discs will b...

Страница 11: ...cause the unit to malfunction The menu screen will appear automatically or you may access the menu screen by pressing the TITLE button AFF Function Before AFF After AFF WHAT IS AFF AFF stands for Active Full screen Function It allows you to fill the television screen viewing area when using a wide screen formatted DVD Press the AFF button on your remote control this will eliminate black bars on th...

Страница 12: ...ing any discs After removing the discs press the OPEN CLOSE button to close the disc tray At the completion of each movie a menu screen will appear Be aware that the on screen setup menu may damage your TV by permanently burning that image onto the screen To avoid this press the STOP button at the completion of each movie ADVANCED PLAYBACK The unit allows you to playback discs at various speeds PL...

Страница 13: ...K WITH THIS UNIT TITLE 1 DVD Video Disc TITLE 2 Audio CD LOCATING A TITLE USING THE TITLE MENU You can locate a specific title using the title menu function if a DVD video disc contains a title menu 1 Press the TITLE button On the TV screen the title menu will appear 2 Press the button to select the title you want You can also directly locate a specific title by pressing its assigned number with t...

Страница 14: ...G THE OPERATIONAL STATUS With this function you can view on your TV the following Current title Track number Total playing time Press DISPLAY during playback Title Elapsed TT 01 12 CH 06 039 0 02 20 Chapter Elapsed TT 01 12 CH 06 039 0 03 50 Chapter Remain TT 01 12 CH 06 039 0 10 40 Current Title Total Titles Current Chapter Total Chapters Title Remain TT 01 12 CH 06 039 0 18 50 Display Off TO TUR...

Страница 15: ...Press the A B RPT button at the beginning of the segment in which you want to repeat playback point A 2 Press the A B RPT button again at the end of the segment point B The unit will automatically return to point A and start to repeat playback of the selected segment A B 3 Press the A B RPT button to cancel the A B repeat function The unit will resume to normal playback Chapter Title All Repeats t...

Страница 16: ... SELECT FROM SEVERAL DIFFERENT ANGLES AND LANGUAGES HOW TO CHANGE THE CAMERA ANGLE Press the ANGLE button while playing back a scene recorded with multiple angles Each time you press the ANGLE button the angle will change NOTICE The angle function will not work on DVD video discs that do not contain recorded multiple angles The angle icon indicator will illuminate while playing back a title that c...

Страница 17: ...will be cleared Depending on the disc the program playback may not func tion To clear the numbers that you have programmed in just now press CLEAR button Program TT 22 CH 01 TT CH 06 TT CH 02 TT CH 07 TT CH 03 TT CH 08 TT CH 04 TT CH 09 TT CH 05 TT CH 10 TT CH Exit NEXT Program TT 22 CH 01 TT 05 CH 12 06 TT CH 02 TT 02 CH 07 07 TT CH 03 TT 04 CH 07 08 TT CH 04 TT CH 09 TT CH 05 TT CH 10 TT CH Exit...

Страница 18: ...m the stop position After it is enabled up to twelve scaled down thumbnail pictures will be displayed on the screen The keys can be used to display the NEXT and PREVIOUS twelve pictures in the current directory mode 9 EXTEND FROM CENTER H mode 10 EXTEND FROM CENTER V mode 11 COMPRESS TO CENTER H mode 12 COMPRESS TO CENTER V mode 13 WINDOW H mode 14 WINDOW V mode 15 WIPE FROM EDGE TO CENTER RANDOM ...

Страница 19: ... screen Fifteen slideshow transition modes are provided Use KODAK T E key to select IMAGE ROTATION ZOOM mode 9 EXTEND FROM CENTER H mode 10 EXTEND FROM CENTER V mode 11 COMPRESS TO CENTER H mode 12 COMPRESS TO CENTER V mode 13 WINDOW H mode 14 WINDOW V mode 15 WIPE FROM EDGE TO CENTER RANDOM NONE by default mode 1 WIPE TOP mode 2 WIPE BOTTOM mode 3 WIPE LEFT mode 4 WIPE RIGHT mode 5 DIAGONAL WIPE ...

Страница 20: ... edit out violent scenes unsuitable for children and replace them with more suitable scenes or lock out playback of the disc all together TO CHANGE YOUR PASSWORD 3 Select Preference Page press ENTER 4 Select Parental press ENTER And then select rating with DIRECTION buttons press ENTER 1 Highlight Password Setup with DIRECTION but tons from setup menu to enter setup page Set Password Mode to On 3 ...

Страница 21: ...hannel Delay Downmix Off Front Speaker SML Center Speaker SML Rear Speaker SML Test Tone Off FULL 3 4 1 2 1 4 OFF SPDIF Off SPDIF RAW SPDIF PCM LT RT Stereo Off Large Small Large Small Off Large Small Off On Off SPDIF Output RAW Dual Mono STR Dynamic Dolby PL II On Reverb Mode Off LPCM Out 48K Stereo L MONO R MONO MIX MONO On Off Auto Off Concert Living Room Hall Bathroom Cave Arena Church 48K 96K...

Страница 22: ... tuner will automatically search and store all local stations with good signal 3 Press TUNING or TUNING button to scan forward or reverse to a desired radio sta tion To manual scan in increments or decrements press the TUNING or TUNING on the remote control as long as necessary After the radio station has been received the station will be stored automatically 4 If you want to cancel the radio stat...

Страница 23: ...atteries AAA 2 Owner s manual 1 AM loop antenna 1 FM wire antenna 1 Speakers 5 Subwoofer 1 Speaker cords 6 System PLL quartz locked digital synthesizer system Tuning range 87 5 108 00 MHz 100 kHz step Antenna FM wire antenna Antenna terminals 75 ohms unbalanced Intermediate frequency 10 7 MHz FM TUNER SECTION System PLL quartz locked digital synthesizer system Tuning range 530 1710 kHz 10 kHz inte...

Страница 24: ...fer to disc This is especially true of some discs manufactured between 1997 1998 Scratched disc Connect the unit directly through the TV and not through any other source What you re view ing is the effect of the copy protection circuitry required on all units If you don t have a video input on your TV you must purchase an RF adapter from your deal er Place the disc with the graphics side up Place ...

Страница 25: ...odification or adaptation to enable it to operate in any country other than the country for which it was designed manufactured approved and or authorized or repair of products damaged by these modifi cations Incidental or consequential damages resulting from the product Some states do not allow the incidental or con sequential damages so the above exclusion may not apply to you This includes but i...

Страница 26: ......

Отзывы: