7
7. USB/1394/Audio cable pin assignments:
6. Complete the installation:
6.1 With all components properly installed, gently
return side panels and hard-drive cage to their
original positions and replace all screws.
Congratulations! You have completed assembly
of your X-QBoii chassis.
6
4.1 Locate the front panel leads.
1 x USB
1 x 1394
1 x HD AUDIO
5
4. Connect case leads to motherboard:
4.2 Connect leads to motherboard head-
ers. Your motherboard documentation
will provide schematics. The triangular
markings on the leads indicate a
positive wire.
4.4 Connect front panel leads to the
motherboard headers
. Please refer
to your motherboard documentation
for placement schematics.
4.3 Locate the front panel leads. (You
should find them twist-tied to the
3½” drive cage.)
1 x Power SW 1 x Reset SW
1 x H.D.D. LED 1 x Pow LED +/-
1 x Speaker
4
3.2 Insert PCI card into assigned slot
for card type (i.e. x1, x8, x16 etc.)
3.1 First, remove the PCI slot covers.
Gently push inward to remove.
2.5 Attach 1 mounting rail to each side
of each hard-disk drive.
3. Install PCI components:
3
2.1 To install an optical or floppy drive,
first remove the metal shields that
sit behind each drive bay cover.
This must be done from the inside
of the case. Next remove the drive
bay covers by using a screwdriver,
and knocking them out from behind.
2.4 Install 3½”drive into 3½” drive
bay.
2.2 For 5¼” drives, align the device
with the drive bay and insert. Do
the same for 3½”
drives using
the lower drive bays.
2.3 Slide the blue drive-rail forward
and push the clamp downwards
to engage locking mechanism.
No screws are necessary, but
can be used optionally on opti-
cal and floppy drive bays.
2. Install 5¼” and 3½” drives
:
1.
Motherboard installation..................................
CONTENTS
1
1. Motherboard installation:
1.1 Remove thumbscrews from the
rear of the X-QBoii.
NOTE:
CPU and memory installation is not covered in
this manual. Please refer to each components’
documentation for instructions.
Non-window Version
Window Version
X-QBoii
Finished Appearance
1.2 Grab the notch on the left panel.
Pull until the panel is released and
r
emove.
2
1.4
Install your motherboard’s IO shield
in the area shown. Make sure that
shield will line up with rear mother-
board ports.
1.6 Align and mount the motherboard over
the standoffs and screw to the case.
1.5 If installing a full-sized micro ATX form
factor motherboard (9.6”x9.6”), you will
need to remove the screw shown and
extract the hard-drive cage. You can
also remove the hard-drive cage should
you require a larger workspace.
NOTE: Touch an unpainted metal section of the case to discharge static before handling
components (with power supply plugged in). An anti-static wrist-strap should also be
worn to further minimize the possibility of damage.
1.3 Likewise for the window version,
grab the notch on the left panel
and pull until the panel releases.
R
emove panel.
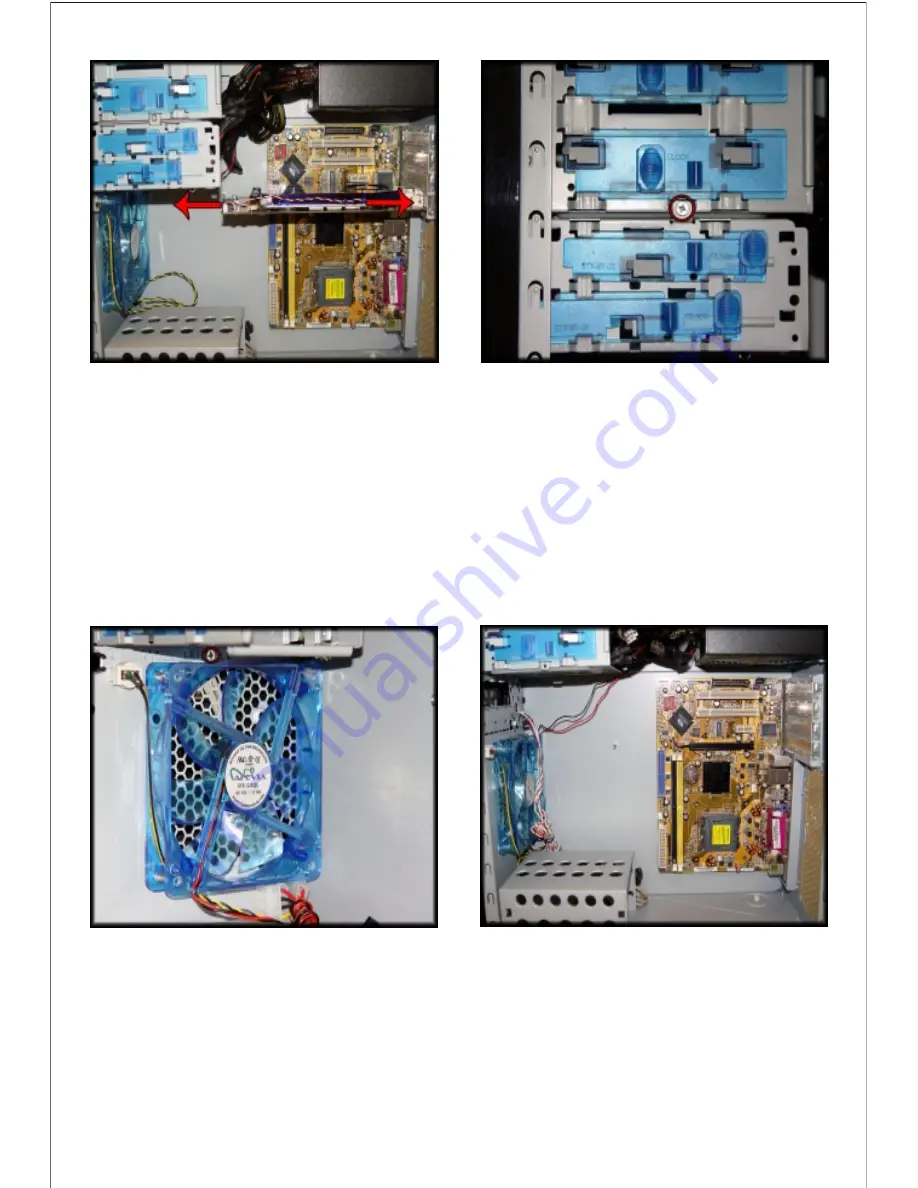
3.3 Lengthier PCI cards such as the
8800GTX can be installed if your
motherboard’s PCI slot aligns
with the first slot, as shown.
3.4 If the PCI slot you need is in any
of the other positions, the 3½”
drive cage must be uninstalled.
Remove the screw shown above.
3.5 There is also a screw between
the fan and bottom of the drive
bays that must be removed.
3.6 Next, simply pull the drive cage
forward and remove from case.
You will then have ample space
for installing lengthy PCI cards.
*If you are new to PC building, we recommend reading
through this manual before assembling your system.
2.6 Insert drive into the drive cage
until rails “click” into place.
5. Daisy-chaining case fans:
5.1 If using more than one case fan, you
have the option of daisy-chaining them.
Plug the male end of the first fan to the
female end of the second fan, then plug
the male end of the second fan into one
of the power supply’s 4-pin connectors.
8
1
2.
Install 5¼” and 3½” drives
..............................
3.
Install PCI components....................................
4.
Connect case leads to motherboard...................
5.
Daisy-chaining case fans..................................
6.
Complete the installation..................................
7.
USB/1394/Audio cable pin assignments..............
3
4
6
7
7
8
USER’S MANUAL


