Apera Instruments PH850 Скачать руководство пользователя страница 9


4.3  pH Meter Calibration (with an example of 3-point calibration) 

4.3.1. First point calibration 

(a) Press 


  key to enter the calibration mode, “

CAL 1

”   

flashes at the top right of LCD and “7.00 pH” flashes at the bottom right of 

LCD, indicating using pH 7.00 buffer solution to make the 1

st

 point calibration. 

(b)  Rinse  pH  electrode  in  distilled  or  deionized  water,  allow  it  to  dry,  and 

submerge it in pH7.00 buffer solution. Stir the solution briefly and allow it to 

stay in the buffer solution until a stable reading is reached. When stable icon         

        stays  on  LCD,  press          key  to  calibrate,  then  1

st

  point  calibration  is 

finished,  the  meter  enters  in  measurement  mode  of  one-point  calibration. 

Calibration guide icon        will display at the bottom left of LCD.   


4.3.2. Second point calibration 

Press 


  key to enter the calibration mode, “

CAL 2

” flashes at the top right 

of  LCD  indicating  to  make  the  2

nd

  point  calibration.  Rinse  pH  electrode  in 

distilled or deionized water, allow it to dry, and submerge it in pH4.00 buffer 

solution. Stir the solution briefly and allow it to stay in the buffer solution until 

a  stable  reading  is  reached.  The  meter’s  display  will  show  scanning  and 

locking process of calibration buffer solution at the bottom right of LCD. When 

the  meter  locks  4.00  pH,  stable  icon          stays  on  LCD,  press          key  to 

calibrate the meter. LCD will display electrode slope of acidity range, then 2

nd


point calibration is finished, the meter enters measurement mode of two-point calibration. Calibration guide 

icons                  will display at the bottom left of LCD. 


4.3.3. Third point calibration 

Press 


  key to enter the calibration mode, “

CAL 3

” flashes at the top right of LCD indicating to make the 

3

rd

 point calibration. Rinse pH electrode in distilled or deionized water, allow it to dry, and submerge it in 

pH10.01  buffer  solution.  Stir  the  solution  briefly  and  allow  it  to  stay  in  the  buffer  solution  until  a  stable 

reading is reached. The meter’s display will show scanning and locking process of calibration buffer solution 

at the bottom right of LCD. When the meter locks 10.01pH, stable          icon stays on LCD, press          the         

key to calibrate the meter. LCD will display electrode slope of alkalinity range, then 3

rd

 point calibration is 

finished, the meter enters in measurement mode of three-point calibration.   

Calibration guide icons                        will display at the bottom left of LCD. 


Notes: 

(a) The meter can perform 1-3 points calibration. When the 1

st

 point calibration is done, the meter will enter 

measurement mode of one-point calibration. Two-point and three-point calibration are in the same manner. 

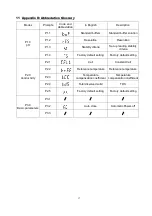
(b) During the calibration process, if measuring value is not stable yet (when        does not stay on and the         

key          is pressed, then 

Er 2

 will display. (See chart – 5). To solve the problem, simply


wait for          to 

Diagram- 6 

Содержание PH850

Страница 1: ...Version2 0 PH850 Portable pH Meter User Manual...

Страница 2: ...3 6 Automatic Power off 5 3 7 Manual Temperature Compensation MTC 5 4 pH Measurement 5 4 1 pH Electrode Information 5 4 2 pH Calibration Consideration 5 4 3 pH Meter Calibration with an example of 3 p...

Страница 3: ...ssor based portable meter features automatic calibration automatic temperature compensation function setup self diagnostics automatic power off and low voltage display The meter s digital filter impro...

Страница 4: ...manual or automatic mV Range 1 000 mV Resolution 1 mV Accuracy 0 2 F S 1 digit Temperature Range 0 100 C Resolution 0 1 C Accuracy 0 5 C 1 digit 2 2 Other Specifications Power AAA batteries 3 1 5V 3 I...

Страница 5: ...al temperature compensation 10 Calibration guide icon 11 Stability icon of readings 12 Low battery icon when this icon appears please replace the battery 13 Automatic reading hold icon 3 2 Keypad Func...

Страница 6: ...this key to enter the calibration mode In the calibration mode or the parameter setup and auto lock up HOLD mode press this key to return to the measurement mode Short press In the measurement mode pr...

Страница 7: ...C 4 pH Measurement 4 1 pH Electrode Information The meter connects to 201T F plastic three in one combination pH electrode with built in temperature sensor with automatic temperature compensation func...

Страница 8: ...ation Accuracy 0 1pH Two point calibration Range 7 00pH 0 Range 7 00pH Three point calibration 0 Large Range 4 2 3 Calibration frequency Calibration frequency depends on the sample the electrode perfo...

Страница 9: ...on LCD press key to calibrate the meter LCD will display electrode slope of acidity range then 2nd point calibration is finished the meter enters measurement mode of two point calibration Calibration...

Страница 10: ...r connects the electrode well 3 Check whether the electrode is damaged Pressing key too soon Press key after icon appears and stays During calibration the measuring value is not stable for 3min 1 Chec...

Страница 11: ...d in distilled or deionized water protein solution or acid fluoride solution In addition do not soak the electrode in organic silicon lipids For best accuracy always keep the meter clean and dry espec...

Страница 12: ...on stir the solution briefly and allow it to stay in the solution until icon stays and then record the reading which is ORP value ORP is in short for Oxidation Reduction Potential The unit is mV 5 2 N...

Страница 13: ...r submenu P1 1 of pH parameter setting then press key to switch among submenu P1 1 P1 2 P1 3 P1 4 see Diagram 9 7 2 3 In P3 0 mode press key to enter submenu P3 1 of basic parameter setting then press...

Страница 14: ...ia Normal High Low 1 Press key nor flashes Press key to select nor HI Lo press to confirm Nor Normal Hi High Lo Low 2 After confirming parameter press key to enter P1 4 mode or press key to return to...

Страница 15: ...Automatic lock up setup Off On 1 Press key OFF flashes press key to select OFF On press to confirm Off not set On set the reading is automatically locked when stabilizes 10 seconds 2 When Parameter i...

Страница 16: ...21 High Temperature solution LabSen 861 Low temperature solution LabSen 881 Meat LabSen 763 Micro volume solution LabSen 241 6 LabSen 241 3 Purified Water Low ion concentration samples LabSen 803 LabS...

Страница 17: ...sibility of APERA INSTRUMENTS LLC for a period of THREE YEARS for the instrument and SIX MONTHS for the probe from the delivery This limited warranty does NOT cover any issues due to Accidental damage...

Страница 18: ...iteria Normal High Low Normal P1 4 Restore to factory default setting No Yes No P2 0 Cond P2 1 Select electrode constant 1 0 10 0 0 1 1 0 P2 2 Select reference temperature 15 30 1 P2 3 Adjust temperat...

Страница 19: ...t up reading stability criteria P1 4 Factory default setting Factory default setting P2 0 Conductivity P2 1 Cell Constant Cell P2 2 Reference temperature Reference temperature P2 3 Temperature compens...

Страница 20: ...18...

Отзывы: