AOS D2267PW Скачать руководство пользователя страница 33

.  HDMI input mode un r 3D: Press the Menu key to enter the  OSD menu and select 

the 2D/3D/ menu. 


4

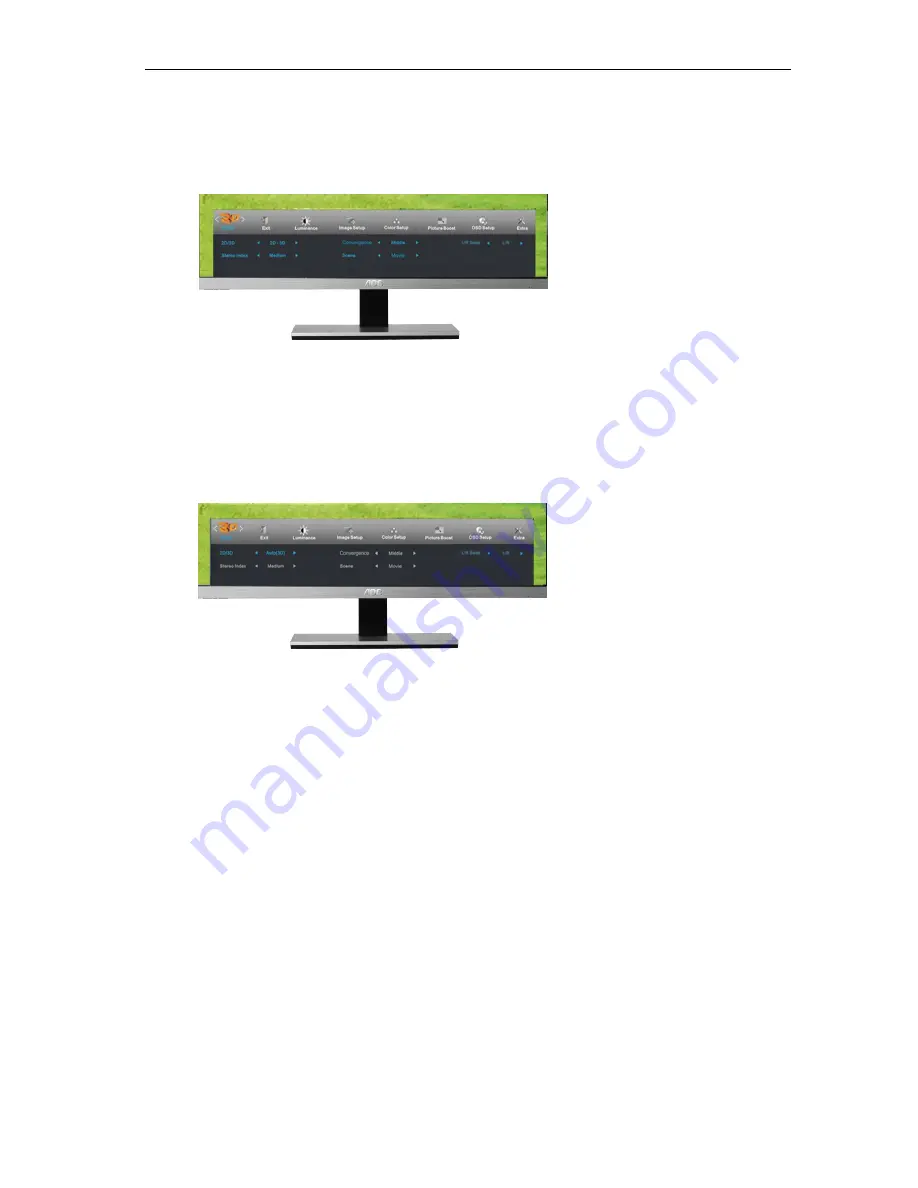
HDMI input mode under 2D: Press the Menu key to enter the OSD menu and select 
the 2D/3D menu. When select 2D-3D mode, the Stereo Index, Convergence and 
Scene icon in 3D sub tier menu is able to adjust. 

5.

Only Auto(3D) is able to select, 2D-3D, 3D

SBS),3D(T/B) mode is 

disable and grey. 

de


31

3 3

Содержание D2267PW

Страница 1: ...LCD Monitor User Manual D2367P D2267PWH D2367P D2267PW LED Backlight...

Страница 2: ...r Setup 24 Picture Boost 26 OSD Setup 28 Extra 30 Exit 34 LED Indicator 35 Driver 36 Monitor Driver 36 Windows 7 36 Windows Vista 40 Windows XP 42 Windows 2000 45 Windows ME 2 45 i Menu 46 e Saver 47...

Страница 3: ...used as follows NOTE A NOTE indicates important information that helps you make better use of your computer system CAUTION A CAUTION indicates either potential damage to hardware or loss of data and...

Страница 4: ...n it will not be used for long periods of time This will protect the monitor from damage due to power surges Do not overload power strips and extension cords Overloading can result in fire or electric...

Страница 5: ...mbination should be moved with care Never push any object into the slot on the monitor cabinet It could damage circuit parts causing a fire or electric shock Never spill liquids on the monitor Do not...

Страница 6: ...t the stain instead of strong detergent which will cauterize the product cabinet When cleaning make sure no detergent is leaked into the product The cleaning cloth should not be too rough as it will s...

Страница 7: ...plug IMMEDIATELY and contact a Service Center Make sure that the ventilating openings are not blocked by a table or curtain Do not engage the LCD monitor in severe vibration or high impact conditions...

Страница 8: ...dealer or AOC branch office for confirmation Monitor CD Manual Base Adapter Power Cable Analog Cable HDMI Cable Audio Cable 3D Glasses Not all signal cables Analog and HDMI cables will be provided fo...

Страница 9: ...9 Setup Stand Base Please setup or remove the base following the steps as below Setup Remove 1 2...

Страница 10: ...10 Unit standing without base is available Caution must put unit in flat surface Any uneven or sloped surface may result unit damaged or injury to user...

Страница 11: ...n adjust the monitor s angle to your own preference Hold the stand so you will not topple the monitor when you change the monitor s angle You are able to adjust the monitor s angle from 5 to 23 11 5 2...

Страница 12: ...monitor 2 Connect one end of the 15 pin D Sub HDMI cable to the back of the monitor and connect the other end to the computer s D Sub HDMI port 3 Turn on your monitor and computer If your monitor disp...

Страница 13: ...of the monitor 2 Connect one end of the 15 pin D Sub DVI cable to the back of the monitor and connect the other end to the computer s D Sub DVI port 3 Turn on your monitor and computer If your monitor...

Страница 14: ...Adjusting Setting Optimal Resolution Windows Vista For Windows Vista 1 Click START 2 Click CONTROL PANEL 3 Click Appearance and Personalization 4 Click Personalization 14...

Страница 15: ...5 Click Display Settings 6 Set the resolution SLIDE BAR to 1 Optimal preset resolution 5...

Страница 16: ...Windows XP For Windows XP 1 Click START 2 Click SETTINGS 3 Click CONTROL PANEL 4 Click Appearance and Themes 5 Double click DISPLAY 16...

Страница 17: ...ion SLIDE BAR to Windows ME 2000 For Windows ME 2000 1 Click START 2 Click SETTINGS 3 Click CONTROL PANEL 4 Double click DISPLAY 5 Click SETTINGS 6 Set the resolution SLIDE BAR to 17 Optimal preset re...

Страница 18: ...nuously to select the input source showed in the message bar press Menu Enter button to change to the source selected Press this hotkey continuously to select 2D 3D functions when the on screen displa...

Страница 19: ...D Lock Function To lock the OSD press and hold the MENU button while the monitor is off and then press power button to turn the monitor on To un lock the OSD press and hold the MENU button while the m...

Страница 20: ...Luminance 1 Press MENU Menu to display menu 2 Press or to select Luminance and press MENU to enter 3 Press or to select submenu and press MENU to enter 20...

Страница 21: ...ode Standard Standard Mode Text Text Mode Internet Internet Mode Game Game Mode Movie Movie Mode Sports Sports Mode Gamma Gamma1 Adjust to Gamma1 Gamma2 Adjust to Gamma 2 Gamma3 Adjust to Gamma 3 A DC...

Страница 22: ...Image Setup 1 Press MENU Menu to display menu 2 Press or to select Image Setup and press MENU to enter 3 Press or to select submenu and press MENU to enter 2 2...

Страница 23: ...Clock to reduce Vertical Line noise Phase 0 100 Adjust Picture Phase to reduce Horizontal Line noise Sharpness 0 100 Adjust picture sharpness H Position 0 100 Adjust the horizontal position of the pic...

Страница 24: ...Color Setup 1 Press MENU Menu to display menu 2 Press or to select Color Setup and press MENU to enter 3 Press or to select submenu and press MENU to enter 2 4...

Страница 25: ...User Red Red Gain from Digital register Green Green Gain Digital register Blue Blue Gain from Digital register DCB Mode Full Enhance on or off Disable or Enable Full Enhance Mode Nature Skin on or of...

Страница 26: ...Picture Boost 1 Press MENU Menu to display menu 2 Press or to select Picture Boost and press MENU to enter 3 Press or to select submenu and press MENU to enter 2 6...

Страница 27: ...100 Adjust Frame Size Brightness 0 100 Adjust Frame Brightness Contrast 0 100 Adjust Frame Contrast H position 0 100 Adjust Frame horizontal Position V position 0 100 Adjust Frame vertical Position Br...

Страница 28: ...OSD Setup 1 Press MENU Menu to display menu 2 Press or to select OSD Setup and press MENU to enter 3 Press or to select submenu and press MENU to enter 2 8...

Страница 29: ...exit H Position 0 100 Adjust the horizontal position of OSD V Position 0 100 Adjust the vertical position of OSD Timeout 5 120 Adjust the OSD Timeout Transparence 0 100 Adjust the transparence of OSD...

Страница 30: ...Extra 1 Press MENU Menu to display menu 2 Press or to select Extra and press MENU to enter 3 Press or to select submenu and press MENU to enter 30...

Страница 31: ...e and sub image source HDMI Select Source as Input D SUB HDMI 2 D SUB Reset Reset the menu to default yes or no 1 HDMI HDMI 2 1 Input Select Auto Select to Auto Detect input signal Select Signal Sourc...

Страница 32: ...reo Index Convergence and Scene icon in sub tier menu is disable and grey 2 VGA menu When select 2D 3D mode the Stereo Index Convergence and Scene icon in sub tier menu is able to adjust 3 When select...

Страница 33: ...menu 4 HDMI input mode under 2D Press the Menu key to enter the OSD menu and select the 2D 3D menu When select 2D 3D mode the Stereo Index Convergence and Scene icon in 3D sub tier menu is able to adj...

Страница 34: ...34 Exit 1 Press MENU Menu to display menu 2 Press or to select Exit and press MENU to enter 3 Press AUTO to exit Exit Exit the main OSD...

Страница 35: ...35 LED Indicator Status LED Color Full Power Mode Blue Active off Mode orange...

Страница 36: ...36 Driver Monitor Driver Windows 7 1 Start Windows 7 2 Click on the Start button and then click on Control Panel 3 Click on the Display icon...

Страница 37: ...37 4 Ckick on the Change display settings button 5 Click the Advanced Settings button 6 Click the Monitor tab and then click the Properties button...

Страница 38: ...ab 8 Open the Update Driver Software Generic PnP Monitor window by clicking on Update Driver and then click the Browse my computer for driver software button 9 Select Let me pick from a list of device...

Страница 39: ...ROM drive 11 Select the xxx inf file and click the Open button Click the OK button 12 Select your monitor model and click the Next button The files will be copied from the CD to your hard disk drive...

Страница 40: ...40 Windows Vista 1 Click Start and Control Panel Then double click on Appearance and Personalization 2 Click Personalization and then Display Settings 3 Click Advanced Settings...

Страница 41: ...w click Continue 5 Click Update Driver in the Driver tab 6 Check the Browse my computer for driver software checkbox and click Let me pick from a list of device drivers on my computer 7 Click on the H...

Страница 42: ...42 Windows XP 1 Start Windows XP 2 Click on the Start button and then click on Control Panel 3 Select and click on the category Appearance and Themes 4 Click on the Display Item...

Страница 43: ...nitor tab If the Properties button is inactive it means your monitor is properly configured Please stop installation If the Properties button is active click on Properties button Please follow the ste...

Страница 44: ...se button and then select the appropriate drive F CD ROM Drive 11 Click on the Open button then click the OK button 12 Select your monitor model and click on the Next button If you can see the has not...

Страница 45: ...e Open button then click on the OK button 10 Select your monitor model and click on the Next button 11 Click on the Finish button then the Close button If you can see the Digital Signature Not Found w...

Страница 46: ...e to i Menu software by AOC i Menu makes it easy to adjust your monitor display setting by using on screen menus instead of the OSD button on the monitor To complete installation please follow the ins...

Страница 47: ...ll wizard to complete software installation Under each of the four PC status you may choose from the pull down menu the desired time in minutes for your monitor to automatically shutdown The example a...

Страница 48: ...g tool it splits the desktop into different panes each pane displays a different window You only need to drag the window to a corresponding pane when you want to access it It supports multiple monitor...

Страница 49: ...ust the Contrast and Brightness Controls Press to auto adjust Make sure you are not using an extension cable or switch box We recommend plugging the monitor directly to the video card output connector...

Страница 50: ...a result EDID DDC displayed can not be read or the graphics adapter driver is abnormal 2 Sit at a position at least 90 cm away from the display unit Keep the line of sight horizontal to the display u...

Страница 51: ...be a result of the following 1 the display unit has not been adjusted to its optimum resolution of 1920 1080 at 60HZ if a customer complains that they are unable to locate the resolution 1920 1080 a...

Страница 52: ...game screens for a long time otherwise you may develop eye strain Stop watching and rest immediately if you develop symptoms such as headaches lethargy fatigue etc 3 Pregnant women senior citizens an...

Страница 53: ...range 50Hz to 76Hz Vertical scan Size Maximum 286 42mm Optimal preset resolution 1920 1080 60Hz Plug Play VESA DDC2B C1 Input Connector VGA HDMI 2 Input Video Signal Analog 0 7Vp p standard 75 OHM Po...

Страница 54: ...54 51 Operating 0 to 40 Non Operating 25 to 55 Humidity Operating 10 to 85 non condensing Non Operating 5 to 93 non condensing Altitude Operating 0 2000m 0 6562 ft Non Operating 0 12192m 0 40000 ft...

Страница 55: ...0 x1080 60 Hz Plug Play VESA DDC2B CI Input Connector VGA HDMIx2 Input Video Signal Analog 0 7Vp p standard 75 OHM Positive HDMI Power Source 100 240VAC 50 60Hz Power Consumption Active 40 W Standby 0...

Страница 56: ...76Hz Vertical scan Size Maximum 286 42mm Optimal preset resolution 1920 1080 60Hz Plug Play VESA DDC2B C1 Input Connector VGA DVI Input Video Signal Analog 0 7Vp p standard 75 OHM Positive DVI Power S...

Страница 57: ...Non Operating 25 to 55 Humidity Operating 10 to 85 non condensing Non Operating 5 to 93 non condensing Altitude Operating 0 5000m 0 16404 ft Non Operating 0 12192m 0 40000 ft 57...

Страница 58: ...o 76Hz Vertical scan Size Maximum 267 79mm Optimal preset resolution 1920 1080 60Hz Plug Play VESA DDC2B C1 Input Connector VGA DVI Input Video Signal Analog 0 7Vp p standard 75 OHM Positive DVI Power...

Страница 59: ...Operating 0 to 40 Non Operating 25 to 55 Humidity Operating 10 to 85 non condensing Non Operating 5 to 93 non condensing Altitude Operating 0 5000m 0 16404 ft Non Operating 0 12192m 0 40000 ft 59...

Страница 60: ...8 60Hz 48 363 60 004 1024x768 70Hz 56 476 70 069 1024x768 75Hz 60 023 75 029 SXGA 1280x1024 60Hz 63 981 60 020 1280x1024 75Hz 79 976 75 025 WXGA 1440x900 60Hz 55 935 59 887 WSXGA 1680x1050 60Hz 65 290...

Страница 61: ...le 6 GND R 7 GND G 8 GND B 9 5V 3D Format Resolution Refresh Rate Frame Packing 1080p 24Hz Frame Packing 720p 50 60Hz Side by Side Half 1080p 50 60Hz Side by Side Half 1080i 50 60Hz Side by Side Half...

Страница 62: ...Pin No Signal Name 1 TMDS Data 2 9 TMDS Data 0 17 DDC CEC Ground 2 TMDS Data 2 Shield 10 TMDS Clock 18 5V Power 3 TMDS Data 2 11 TMDS Clock Shield 19 Hot Plug Detect 4 TMDS Data 1 12 TMDS Clock 5 TMD...

Страница 63: ...1 TMDS data 5 10 TMDS data 1 22 TMDS Clock Shield 11 TMDS data 1 3 Shield 23 TMDS Clock 12 TMDS data 3 24 TMDS Clock Plug and Play Plug Play DDC2B Feature This monitor is equipped with VESA DDC2B capa...

Страница 64: ...dio TV technician for help NOTICE The changes or modifications not expressly approved by the party responsible for compliance could void the user s authority to operate the equipment Shielded interfac...

Страница 65: ...to a designated collection point for the recycling of waste electrical and electronic equipment The separate collection and recycling of your waste equipment at the time of disposal will help to cons...

Страница 66: ...signated collection point for the recycling of waste electrical and electronic equipment The separate collection and recycling of your waste equipment at the time of disposal will help to conserve nat...

Страница 67: ...it or assume the risk of loss damage during shipment Pay all shipping charges AOC International Europe BV is responsible neither for any damage or loss during inbound transport damage nor to inbound p...

Страница 68: ...STRICT LIABILITY OR OTHER THEORY SHALL NOT EXCEED THE PRICE OF THE INDIVIDUAL UNIT WHOSE DEFECT OR DAMAGE IS THE BASIS OF THE CLAIM IN NO EVENT SHALL AOC INTERNATIONAL EUROPE BV BE LIABLE FOR ANY LOSS...

Страница 69: ...Pay all shipping charges EPI is not responsible for damage to inbound product that was not properly packaged EPI will pay the return shipment charges within one of the countries specified within this...

Страница 70: ...AGES SO THE ABOVE LIMITATION MAY NOT APPLY TO YOU ALTHOUGH THIS LIMITED WARRANTY GIVES YOU SPECIFIC LEGAL RIGHTS YOU MAY HAVE OTHER RIGHTS WHICH MAY VARY FROM STATE TO STATE In the United States of Am...

Страница 71: ...ours after you are approved for our program If your monitor qualifies for the EASE program AOC will pay for freight both ways Step 1 Phone our TECH Department at 888 662 9888 Step 2 Fill out and retur...

Страница 72: ...Some of the Environmental features of TCO Certified Displays Production facilities have an Environmental Management System EMAS or ISO 14001 Low energy consumption to minimize climate impact Restrict...

Отзывы: