EN- 1
Congratulations on your purchase of the AORUS Notebook!
This Manual will help you to get started with setting up your notebook. For more detailed information,
please visit our website at http://www.aorus.com. All specifications are subject to the manufacturer's
configuration at the time of shipping and may change without prior notice,written or otherwise.
1
2
3
4
1
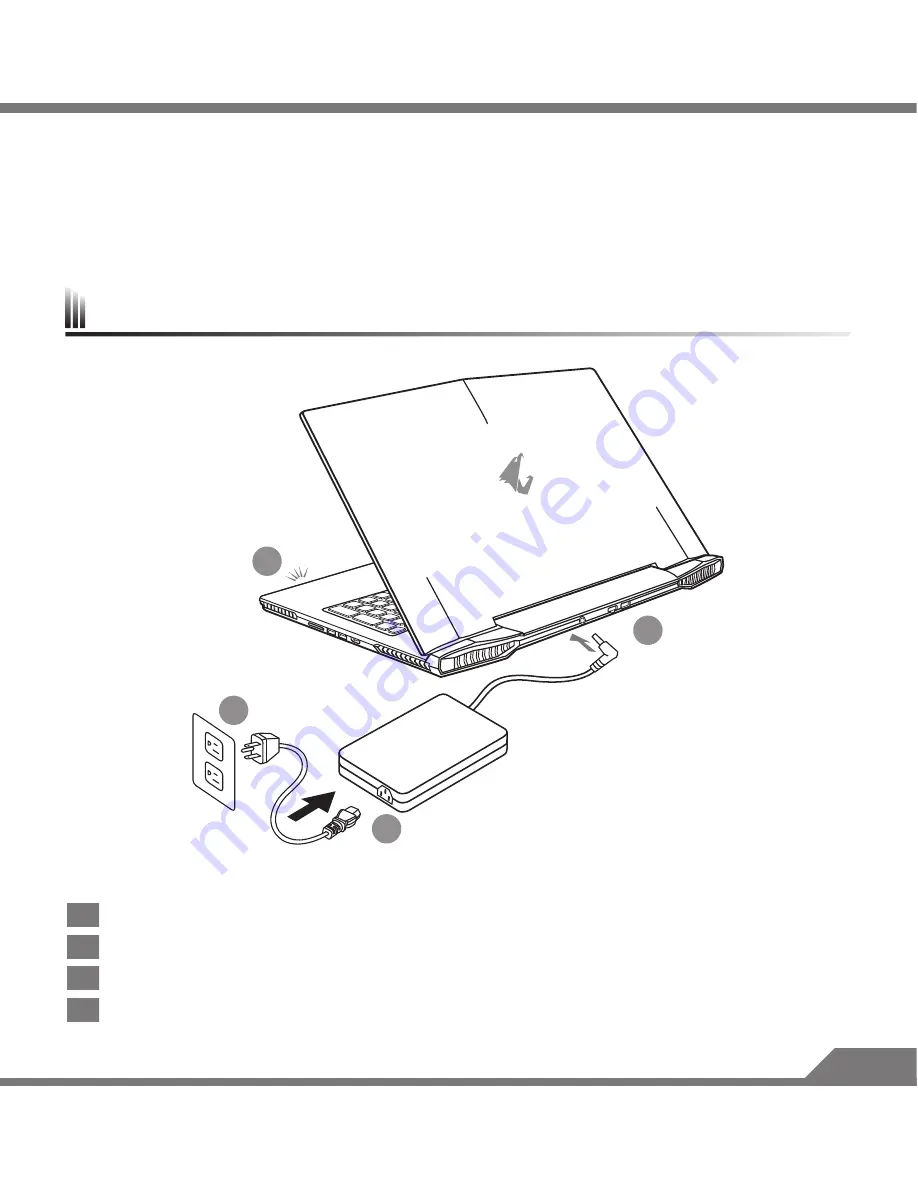
Connect the power cord to the AC adapter.
2
Connect the AC adapter to the DC-in jack on the back side of the notebook.
3
Connect the power cord to the power outlet.
4
While the Battery Indicator lights on, press the Power Button to turn on the notebook.
Using AORUS Notebook for the First Time
Содержание X5v6
Страница 1: ......
Страница 8: ...TW 1 AORUS AORUS AORUS http www aorus com AORUS 1 2 3 4 1 2 3 4...
Страница 9: ...TW 2 100 240Vac 50 60Hz 19V or 19 5V Windows...
Страница 10: ...TW 3 1 2 3 4 5 6 7 8 LED AORUS 6 8 7 5 2 3 1 4 1 2 10 11 30 31 50 51 70 71 90 90 1 30 10 2 2 2 1...
Страница 12: ...TW 5 1 2 USB 3 0 3 LAN 3 2 1 Aorus 45 C...
Страница 13: ...TW 6 X5 AORUS FAQ AORUS FAQ 45 C 45 C AORUS http www aorus com FAQ AORUS http www aorus com...
Страница 14: ...SC 1 AORUS AORUS AORUS http www aorus com AORUS 1 2 3 4 1 2 3 4...
Страница 15: ...SC 2 100 240Vac 50 60Hz 19V or 19 5V Windows...
Страница 16: ...SC 3 1 2 3 4 5 6 7 8 LED AORUS 6 8 7 5 2 3 1 4 1 2 10 11 30 31 50 51 70 71 90 90...
Страница 18: ...SC 5 1 2 USB 3 0 3 LAN 3 2 1 Aorus 45 C...
Страница 19: ...SC 6 X5 AORUS FAQ AORUS FAQ 45 45 AORUS http www aorus com FAQ AORUS http www aorus com...
Страница 20: ...KR 1 AORUS http www aorus com 1 2 3 4 1 AC 2 DC AC 3 4 AORUS...
Страница 21: ...KR 2 AC PC 100 240Vac 50 60Hz 19V or 19 5V...
Страница 22: ...KR 3 6 8 7 5 2 3 1 4 1 LED 2 3 4 5 6 7 8 LED AORUS 1 2 10 11 30 31 50 51 70 71 90 90 LED HDD...
Страница 24: ...KR 5 3 2 1 1 DC in 2 USB 3 0 3 AORUS 112 F 45 C 22...
Страница 25: ...KR 6 AORUS X5 AORUS FAQ X5 http www aorus com FAQ http www aorus com...


